With the Table.TransformColumns function in Power Query, you can quickly clean and transform all the values in one or more columns by using a transformation function for each column.
For example, if you have a dataset where you have names in one column and their sales values in another column, and you want to convert all the names into uppercase and round up all the sales values to the nearest thousand, you can do that with one single Table.TransformColumns function.
Syntax
Below is the syntax of the Table.TransformColumns
Table.TransformColumns(table as table, transformOperations as list, optional missingField as nullable number) as table
- table – this is the table in which you want to transform one or more columns.
- transformOperations – This is where the magic happens. It’s a list that tells Power Query exactly which columns to change and how to change them. You can structure this in two ways:
- Simple format: {“ColumnName”, TransformFunction} – transforms one column
- Advanced format: {“ColumnName”, TransformFunction, NewDataType} – transforms a column and changes its data type
- Multiple columns: {{“Column1”, Function1}, {“Column2”, Function2}} – transforms several columns at once
- missingField (optional) – This parameter saves you from errors when working with tables that might not always have the same structure. Your options are:
- MissingField.Error (default) – Stops everything and throws an error if a column you’re trying to transform doesn’t exist
- MissingField.Ignore – Gracefully skips any missing columns and continues with the transformation on the columns that do exist
Now let’s look at a practical example that will make it clear how to use the Table.TransformColumns function in real-life scenarios.
Table.TransformColumns Example
Suppose you have the table below named ‘StudentScores’ in a worksheet.
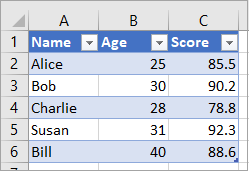
You want to change the values in the Name column to uppercase, add 5 to each value in the Age column, and round the values in the score column to zero decimal places.
Here’s how you can do it in Power Query:
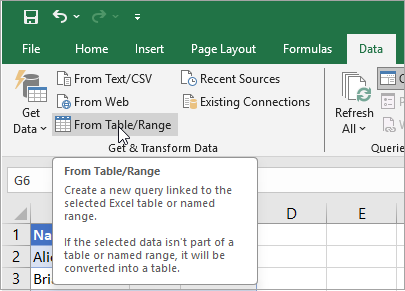
- Select a cell in the table.
- Open the Data tab and click the From Table/Range option on the Get & Transform Data group.
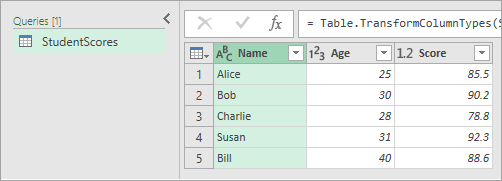
The step above loads the table into the Power Query Editor.
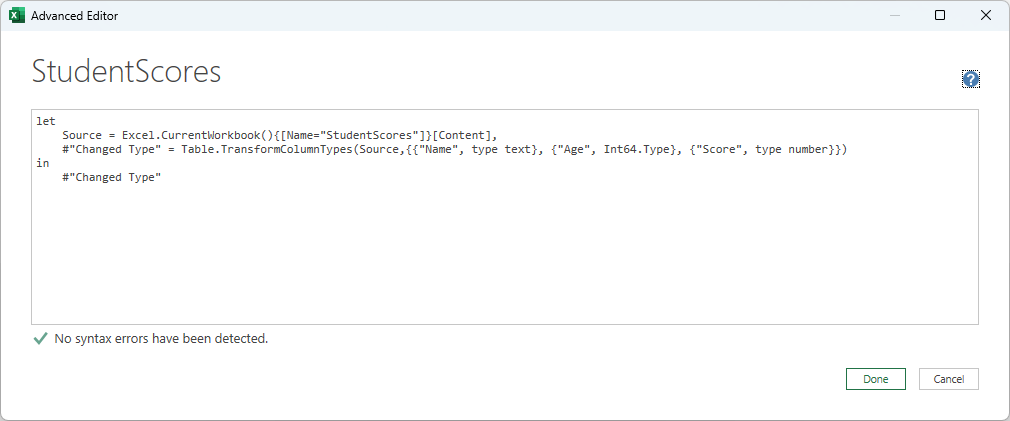
- On the Home tab, click the Advanced Editor option on the Query group.
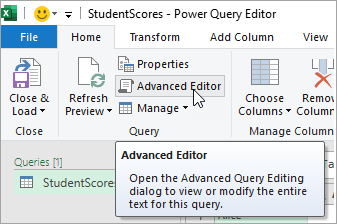
The Advanced Editor should look like the example depicted below.
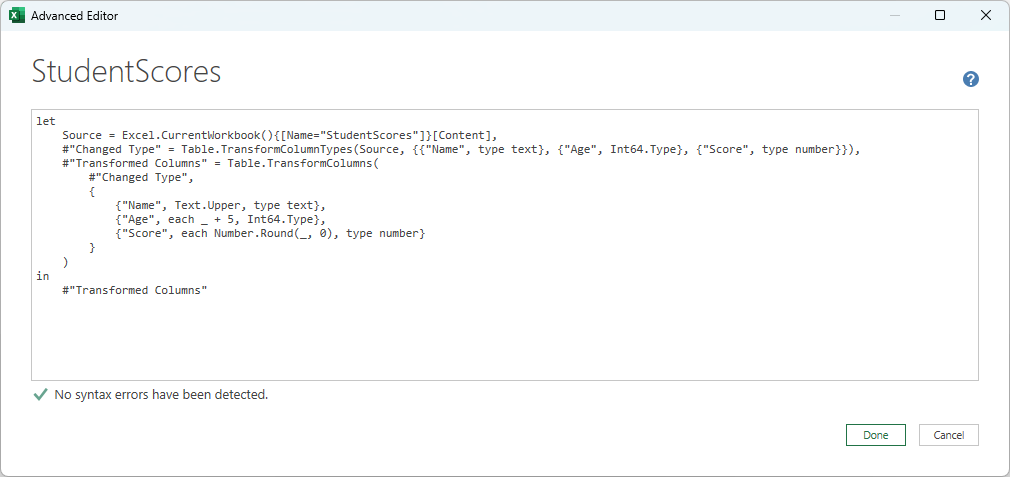
- Copy the ‘Transformed Columns’ step below and add it below the existing ‘Changed Type’ step.
#"Transformed Columns" = Table.TransformColumns(
        #"Changed Type",
        {
            {"Name", Text.Upper, type text},
            {"Age", each _ + 5, Int64.Type},
            {"Score", each Number.Round(_, 0), type number}
        }
    )
in
    #"Transformed Columns"
The Advanced Editor should look like the example below.
- Click the Done button.
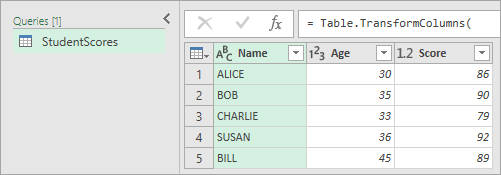
Power Query executes the ‘Transformed Columns’ step and applies the transformations you specified to the columns.
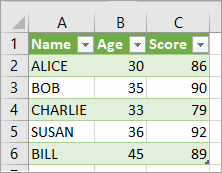
- Click the Close & Load button on the Close group.

The above step saves the changes to the ‘StudentScores’ query, closes the Power Query Editor window, and loads the results to a new worksheet.
Let me quickly also explain the formula.
- The step name: #”Transformed Columns” is what we’re calling this new step in our query.
- The function: Table.TransformColumns is the Power Query function that lets us modify multiple columns at once.
- The source data: #”Changed Type” is the previous step that contains our table data – this is what we’re starting with.
- The transformations: The three items in curly braces tell Power Query what to do with each column:
- {“Name”, Text.Upper, type text} – Takes the Name column and makes all text uppercase
- {“Age”, each _ + 5, Int64.Type} – Takes the Age column and adds 5 to every number
- {“Score”, each Number.Round(_, 0), type number} – Takes the Score column and rounds all numbers to whole numbers
- The output: in #”Transformed Columns” simply returns our newly transformed table so we can use it in the next step.
I have shown you how to clean data using the Table.TransformColumns function in Power Query. I hope you found the tutorial helpful.
Related Power Query Functions / Articles: