When you start out using Microsoft Excel, you’ll notice that printing Excel sheets do not quite feel the same as printing an MS Word document.
The idea of ‘What You See Is What You Get’ is a little far-fetched when it comes to printing in Excel.
One of the issues that a lot of Excel users face while printing worksheets is the placement of data on the paper. Intuitively we all start working from the top-left corner of the worksheet in the Excel Window.
However, when we print this out on paper, a lone table at the top left corner of the paper doesn’t look very aesthetic.
If you have a small dataset, the main work area of the worksheet is quite small compared to the page you’re printing on. As such, the printout usually looks like it has been squished to one corner of the page.
Under such circumstances, centering your worksheet horizontally makes the page look more symmetric and professional.
In this tutorial, you will see three ways to center the worksheet horizontally on a page in Excel.
Method 1: Centering the Worksheet Horizontally using Page Setup Launcher Tool
In this method, you will use a dialog box launcher tool. A dialog box launcher is a tiny icon that appears in a group in the ribbon in Excel.
When you click on the dialog box launcher, it opens dialog boxes or task panes related to the relevant group. In this way, you get more related options.
Say you want to print the following dataset. For simplicity, we kept the dataset small and basic:

When you try to print this dataset on an A4 sized paper, this is how it is going to look:

To center your sheet horizontally on the page, you need to open the Page Setup dialog box Launcher.
So, here are the steps you need to follow if you want to use the launcher corresponding to the Page Setup dialog box:
- Select the area of your worksheet that you want to print. You can do this by dragging your mouse to make a box around your print area.
- Click on the Page Layout tab. You’ll find this in the top portion of your Excel window.
- Under this tab, look for the ‘Page Setup’ group of tools. At the bottom right corner of this group, you’ll see a tiny dialog box launcher tool. Click this tool to launch the Page Setup dialog box.

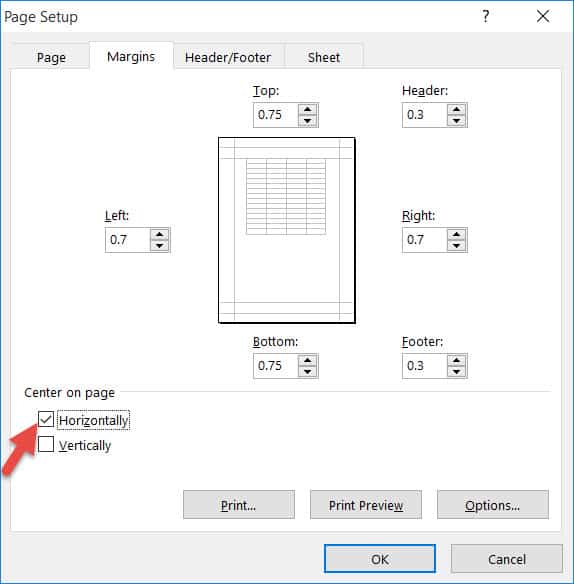
- The Page Setup dialog box should now appear. Select the ‘Margins’ tab at the top of the dialog box.
- Towards the bottom of this tab’s window, you will see two checkboxes – one for centering the content horizontally, the other for centering vertically. If you want to horizontally center the content on your printed page, click on the first checkbox to select it.
- Your content should now be centered horizontally. To check if it is done right, you can see a preview of how your page will look after printing. For this, click on the Print Preview button in the dialog box.
- This will take you to the print menu, where you can see your print preview. If you like how it looks, you can directly print from here.

This was one way of horizontally centering your Excel worksheet on the page.
Let’s look at other ways.
Method 2: Centering the Worksheet Horizontally using Custom Margins
There is another path to reach the Page Setup dialog box and that is by navigating to the Custom Margins menu.
Here are the steps to center your print content through Custom Margins:
- Select the area of your worksheet that you want to print. You can do this by dragging your mouse to make a box around your print area.
- Select the Page Layout tab.
- Under this tab, you will find the ‘Margins’ button in the Page Setup group.
- From the dropdown menu that appears, select the ‘Custom Margins’ option.

- This will open the Page Setup dialog box, with the Margin tab already selected.
- Towards the bottom of this tab’s window, there are two checkboxes – one for centering the content horizontally, the other for centering vertically. If you want to horizontally center the content on your printed page, click on the first checkbox to select it.
- Your content should now be centered horizontally. To check if it is done right, you can see a preview of how your page will look after printing. For this, click on the Print Preview button at the bottom of the window.
- This will take you to the print options, where you can see your print preview of the dataset. If it looks the way you want it, you can directly print from here.
Method 3: Centering the Worksheet Horizontally from Print Preview Mode
The last way is actually the quickest.
If your page is already set to print and you see from the preview on the right-hand side that you need to center the contents of the page, then you can directly reach the Page Setup dialog box from there.
Here’s how to horizontally center your worksheet directly from Print mode:
- If you’re not already in Print preview mode, then press CTRL+P (if you’re on a Mac, press Cmd+P), or navigate to File->Print. This will bring you to Print Preview mode.
- On the left-hand side, you will see a list of options (drop-down menus) under Settings. Select the fifth option from here (It should most likely say ‘Normal Margins’, but it could also say ‘Wide Margins’ or ‘Narrow Margins’, depending on the previous print setting). This menu is to let you select margin settings for your printouts.
- You should now see a dropdown menu with different preset margin options, along with an option to customize your margins. Select ‘Custom Margins’ from this menu.

- This will open the Page Setup dialog box, with the Margin tab already selected.
- Towards the bottom of this tab’s window, there are two checkboxes – one for centering the content horizontally, the other for centering vertically. If you want to horizontally center the content on your printed page, click on the first checkbox to select it.
- Click OK to close the Page Setup dialog box.
- This will bring you back to your Print Preview mode, where you can now see how the page will look after horizontally centering the content.
- If you’re ready to print now, you can go ahead and press the large Print button on the left-hand side.

Manually Setting Margins on the Page
One thing to note here is that the Page Setup dialog box has a few additional options for you to fine-tune your margin settings.
This is helpful if you don’t exactly want your content at the dead center of the page and would rather want to set the left and right margins yourself.
For this, you have options to set the margins on the top, bottom, left, right, header, and footer of the page.
Note that when the checkbox for horizontal centering is checked, the left and right margin buttons will not make any difference to your page.
So, if you want to set the left and right margins yourself, you first need to uncheck the horizontal centering. Then you can feel free to adjust the left and right margins as you need.

In this Excel tutorial, I covered three ways in which you can center your worksheet horizontally (or vertically) when printing on a page.
I hope you found this tutorial helpful.
Other Excel tutorials you may find useful: