
An XML map in Excel lets you bring recurring order, invoice, or system-export files into the same worksheet layout each time.
You can edit the imported values and send them back out as XML, too.
The map connects the XML fields to your cells, so another file with the same structure can use the layout you’ve already set up.
I’ll show you how to create that map, use it to import and export your data, and remove it while keeping your worksheet values.
What Is an XML Map in Excel?
An XML file stores data inside named tags. An XML map tells Excel which cells should hold the values from those tags.
Excel saves the map in your workbook. It links the XML structure, called a schema, to cells on your worksheets.
When your XML data file doesn’t include a schema, Excel works out the structure from the data and creates one for you.
For example, here’s one order from the downloadable Orders-January.xml file. The dots stand for the remaining orders:
<Orders>
  <Order>
    <OrderID>1001</OrderID>
    <Customer>Bean Street Cafe</Customer>
    <City>Denver</City>
    <Product>Espresso Beans</Product>
    <Quantity>12</Quantity>
    <UnitPrice>18.5</UnitPrice>
  </Order>
  ...
</Orders>
Here’s how to read that structure:
Ordersis the root element. It contains all the orders.Orderrepeats once for each order.- The six child elements inside each
Orderbecome your table columns.
The January file contains eight coffee-shop orders, numbered 1001 to 1008. The shops buy Espresso Beans, Paper Cups, Oat Milk, and Ceramic Mugs.
The second file, Orders-February.xml, has the same structure and four more orders, numbered 1009 to 1012.
Once you’ve mapped the elements, you can import either file into the same cells and export your mapped data back to XML.
You’ll need the Developer tab for these commands. To show it, go to File > Options > Customize Ribbon, check Developer, and click OK.
You can follow along in Excel for Windows, including Microsoft 365, Excel 2024, 2021, 2019, and 2016. XML maps aren’t supported on Mac or the web.
How to Create an XML Map in Excel
I recommend creating the map through the XML Source task pane so you can decide where the fields go. Opening an XML table is quicker for immediate results.
Method #1: Using the XML Source Task Pane
Start with a blank workbook and Orders-January.xml saved on your computer. You’ll create the map first, then choose its worksheet layout.
Here are the steps to add the map:
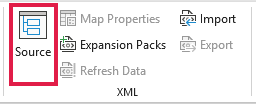
- Click the Developer tab, then click Source in the XML group.
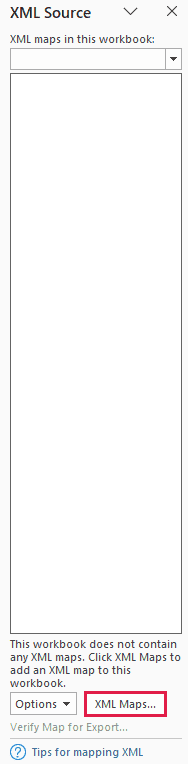
- The XML Source task pane opens on the right. At the bottom of the pane, click XML Maps…
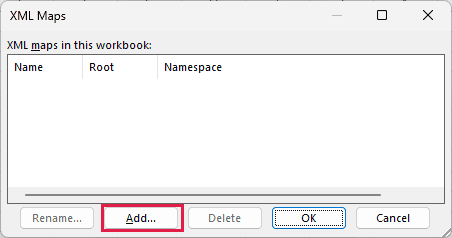
- In the XML Maps dialog box, click Add…
- Browse to Orders-January.xml, select it, and click Open.
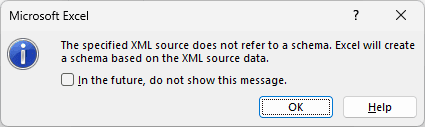
- Excel says the XML source doesn’t refer to a schema and it will create one based on the XML source data. Click OK.
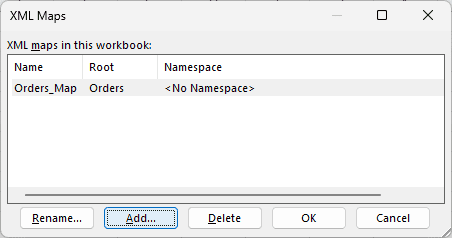
- The new Orders_Map map appears in the XML Maps dialog box, with Orders as its root. Click OK.
You’ll now see a tree in the XML Source pane: Orders at the top, the repeating Order element underneath, and its six child elements.
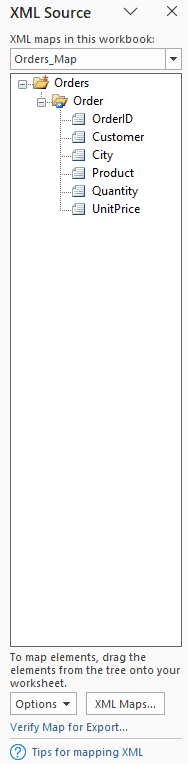
Excel names the map by adding _Map to the root element’s name. That’s why you see Orders_Map.
Your worksheet is still empty. You’ll decide where the elements go in the mapping section below.
Note: If you add an .xsd schema file instead, Excel builds the map from that schema and skips the message about creating one.
If your schema has more than one root element, Excel opens the Multiple Roots dialog so you can choose the one to use.
Method #2: Opening the XML File as an XML Table
For the quickest route to a filled table, open Orders-January.xml directly. You get a new workbook containing both the XML map and the eight orders.
Here’s how to open the file as an XML table:
- Click File > Open, browse to Orders-January.xml, and open it.
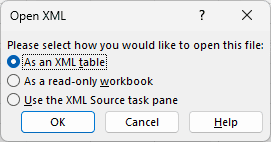
- In the Open XML dialog box, select As an XML table and click OK.
- Click OK on the message about Excel creating a schema.
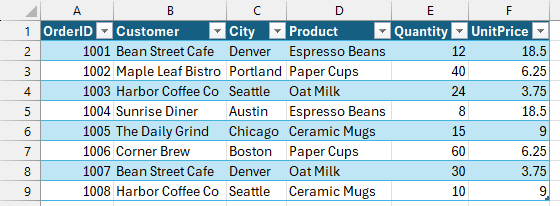
You’ll see the eight orders in an XML table at A1:F9, with headers OrderID, Customer, City, Product, Quantity, and UnitPrice.
The workbook also contains Orders_Map. You can see it by opening Developer > Source.
The Open XML dialog gives you two other ways to open the file:
- As a read-only workbook opens the data without creating an XML map.
- Use the XML Source task pane creates the map and leaves the sheet empty, just like Method #1.
How to Use an XML Map in Excel
With your map created, you can connect its fields to cells, import orders, append another month’s data, and export your edits.
Mapping XML Elements to Worksheet Cells
Here, you have Orders_Map from the XML Source task pane method above, an empty worksheet, and the XML Source pane open.
I’ll put all six order fields into one table.
Follow these steps to map the fields:
- In the XML Source pane, click the Order element. This is the repeating element that holds all six fields.
- Drag it onto cell A1 and release.
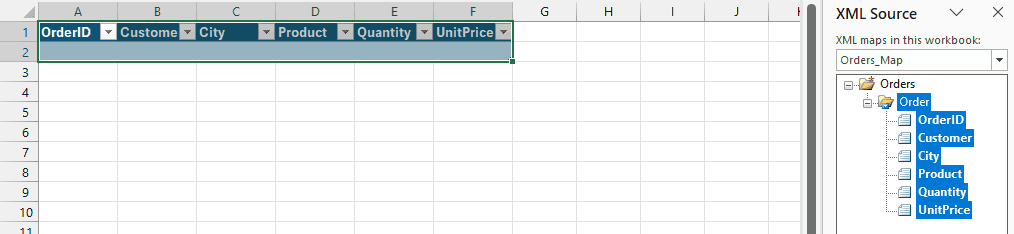
You now have six headers in A1:F1 and one empty row underneath. Dragging Order maps all its child elements at once.
This creates an XML table, an Excel table whose columns are linked to XML elements. You can rename its header cells without changing those links.
You can also drag an individual element, such as Customer, onto a cell. Because Customer repeats inside each order, it becomes an XML table column.
With a non-repeating element, you get a single mapped cell instead. That’s useful for an invoice layout with one invoice number above a table of line items.
Prefer using a menu? Right-click an element in the pane, choose Map element, and select the destination cell.
Mapped elements appear in bold in the pane. You can map each element to only one place in your workbook.
Importing XML Data Into the Mapped Cells
You have an empty XML table linked to Orders_Map, with six headers starting at A1. Now you can fill it with the eight January orders.
Here’s how to import the data:
- Select any cell in the XML table.
- On the Developer tab, click Import.
- In the Import XML dialog box, select Orders-January.xml and click Import.
Your table now fills A1:F9, including the header row and orders 1001 to 1008.
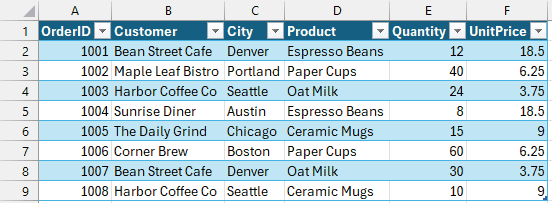
Excel fills your mapped columns and grows the table to fit the incoming rows. It also adjusts column widths unless you turn that off in Map Properties.
Your Customer, City, and Product cells use Text formatting because Excel’s inferred schema identifies those fields as strings.
When the source file changes, click Refresh Data on the Developer tab to re-import the last XML file you imported into the map.
Appending New Data Instead of Overwriting It
You have the eight January orders in A1:F9, linked to Orders_Map. Next, you’ll add the four February orders underneath them.
By default, an import replaces the data already in your mapped cells. Change the map’s import setting before bringing in February.
Here’s how to append the new orders:
- Select a cell in the XML table and click Map Properties on the Developer tab.
- In the XML Map Properties dialog box, under When refreshing or importing data, select Append new data to existing XML tables and click OK.
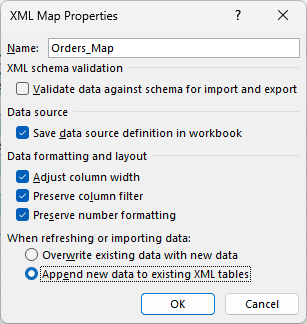
- Click Developer > Import, select Orders-February.xml, and click Import.
You now have all 12 orders, numbered 1001 to 1012, in A1:F13.
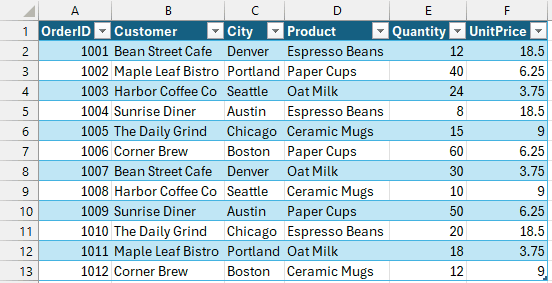
Refresh Data re-imports Orders-February.xml, the last file you imported.
With Append still on, you add the four February orders a second time, while enabling Overwrite replaces the whole table with just the February orders.
Switch back to Overwrite once you’ve finished appending, or avoid Refresh Data.
You can also control how your imports behave through these settings in XML Map Properties:
- Validate data against schema for import and export checks data against the schema. It’s off by default.
- Save data source definition in workbook keeps the connection to your imported file so Refresh Data can use it.
- Adjust column width resizes columns to fit imported values.
- Preserve column filter keeps your existing column filters.
- Preserve number formatting keeps your existing number formats.
- Overwrite existing data with new data replaces the mapped data on import. This is the default.
Exporting Your Data Back to an XML File
You have 12 orders in an XML table linked to Orders_Map. You can edit those values and export them using the original XML structure.
For example, change order 1002’s Quantity from 40 to 45 before exporting.
Here are the steps to export your updated orders:
- Select any cell in the XML table.
- On the Developer tab, click Export.
- In the Export XML dialog box, type a file name, such as Orders-Updated.xml, and click Export.
Here’s the first order from the exported file. Your change to order 1002 appears farther down:
<?xml version="1.0" encoding="UTF-8" standalone="yes"?>
<Orders xmlns:xsi="http://www.w3.org/2001/XMLSchema-instance">
	<Order>
		<OrderID>1001</OrderID>
		<Customer>Bean Street Cafe</Customer>
		<City>Denver</City>
		<Product>Espresso Beans</Product>
		<Quantity>12</Quantity>
		<UnitPrice>18.5</UnitPrice>
	</Order>
Excel writes the original element names, even if you’ve renamed your table headers. It saves the XML file as UTF-8.
If your workbook has several maps and you haven’t selected an XML table, Excel first asks which map you want to export.
To check your map beforehand, click Verify Map for Export at the bottom of the XML Source pane. XML exports are limited to 65,536 rows.
How to Remove an XML Map in Excel
I recommend the XML Maps dialog box for removing one map. Use the VBA macro when you want to remove several maps together.
Method #1: Using the XML Maps Dialog Box
You have Orders_Map and its order table in your workbook. You can remove the XML connection while keeping every row on the sheet.
Here’s how to delete the map:
- On the Developer tab, click Source to open the XML Source pane.
- At the bottom of the pane, click XML Maps…
- Select Orders_Map in the list and click Delete.
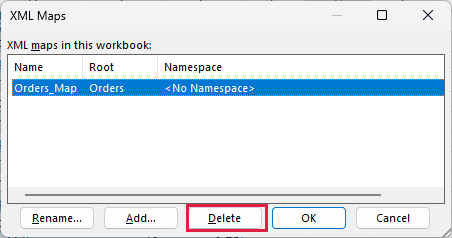
- Excel warns that deleting the map stops you from importing or exporting XML data using it. Click OK.
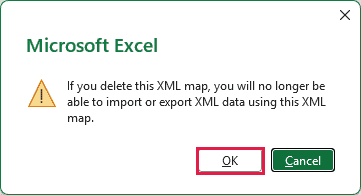
- Click OK to close the XML Maps dialog box.
Your data stays on the sheet as a regular Excel table. Import, Export, and Refresh Data no longer work for that table’s former XML connection.
If you also want the data gone, delete the table or worksheet after you delete the map.
Deleting the worksheet alone leaves the map and any saved data source details in your workbook.
Method #2: Using a VBA Macro
When your workbook contains several XML maps, you can remove them all with one macro.
You can accumulate maps by importing different XML files into the same workbook. Excel creates a new map for each file that doesn’t match an existing one.
This macro works on the active workbook. Make sure that’s the workbook whose maps you want to remove before running it.
Note: You can’t undo map deletion with Ctrl+Z. Save a copy of your workbook before running the macro if you might need its XML connections again.
Here is the VBA code:
Sub RemoveAllXMLMaps()
    Dim i As Long
    For i = ActiveWorkbook.XmlMaps.Count To 1 Step -1
        ActiveWorkbook.XmlMaps(i).Delete
    Next i
    MsgBox "All XML maps have been removed."
End Sub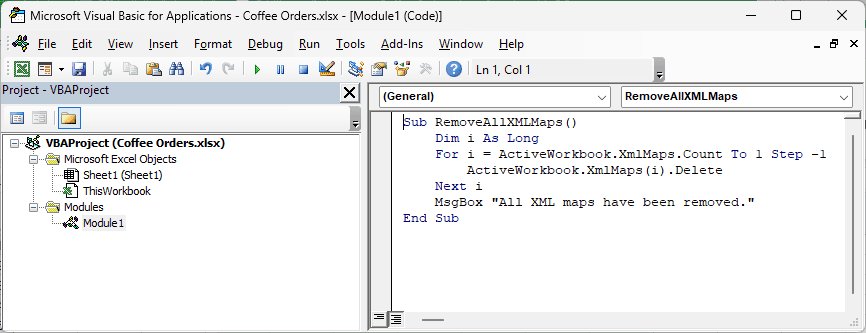
Here are the steps to run the macro:
- Press Alt + F11 to open the VBA editor.
- Click Insert > Module.
- Paste the code above into the module.
- Press F5 to run it. Alternatively, close the editor and run RemoveAllXMLMaps from Developer > Macros.
The loop counts backward from the last map to the first. Deleting a map shifts the numbering of the maps after it, so this avoids skipping any.
Your tables and their values stay in the workbook after the maps are removed.
You don’t need to keep the macro after running it once. Save your workbook as .xlsx without the VBA module, or as .xlsm to keep the code.
Removing a Single Element From an XML Map
Here, you have Orders_Map linked to your order table, with all six fields mapped.
To keep the map but stop importing or exporting one field, remove that element’s worksheet mapping.
For example, you can unlink City while leaving the other five fields connected.
Here’s how to remove that mapping:
- Open the XML Source pane through Developer > Source.
- Right-click the City element and choose Remove element.
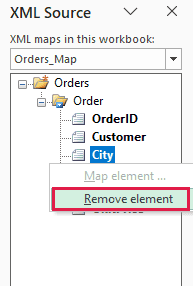
Your City column stays in the table with its current values, but the next import won’t fill it. An export will leave the City element out.
You’ll also see that City is no longer bold in the XML Source pane.
You can use the same approach to protect a formula column inside an XML table. Removing its mapping stops an import from overwriting the formulas.
Additional Notes About XML Maps in Excel
Keep these limits in mind when you build or move a mapped workbook:
- XML maps are a legacy feature for Excel for Windows. Mac and web editions lack the XML map commands, and mapped workbooks may not open in Excel for the web.
- Copying an XML table to a new workbook gives you a regular table. You’ll need to add and map the XML structure again in that workbook.
- Excel can’t save an inferred schema as a separate
.xsdfile. Create the schema outside Excel if another system needs one. - You can’t map
anyoranyAttribute, recursive structures more than one level deep, abstract elements, substitution groups, or the free text inside mixed content. - An XML table only grows downward. Keep other data out of the space below it, or an import or append can fail.
Frequently Asked Questions
Here are answers to a few problems you may run into when working with XML maps.
Why Are the XML Commands Greyed Out in Excel?
If your workbook uses the legacy Share Workbook feature, XML commands aren’t available. Turn off legacy sharing before working with XML maps.
You may also have no XML map or no mapped table selected. Create the map and select a cell in its XML table to access the relevant commands.
Can I Use XML Maps in Excel for Mac or Excel for the Web?
Excel for Mac and Excel for the web don’t include the XML map commands, so you can’t create a map or import, export, or refresh through one there.
You’ll need Windows desktop Excel to create maps or change their worksheet connections.
Should I Use Power Query Instead of an XML Map?
If you’re bringing complex or nested XML into a table, I recommend Power Query. It lets you transform the imported data and refresh the resulting table.
Use an XML map when you need to export edited worksheet data back to XML or connect non-repeating fields to individual cells in a form layout.
Why Does Excel Say My XML Map Can’t Be Exported?
Your map may contain a structure Excel can’t export, such as lists within lists, denormalized data, or a schema choice construct.
Denormalized data repeats a parent value across child rows. A choice construct allows alternative elements in the same position, which can prevent Excel from rebuilding the XML.
Click Verify Map for Export in the XML Source pane to check the structure before exporting.
Conclusion
I recommend creating your map through the XML Source pane, then mapping its fields to cells so you can import orders and export your edits.
When you’re finished with the connection, delete it through the XML Maps dialog box.
For complex XML you only need to bring into Excel, I’d use Power Query to transform and refresh the data in a table.
Other Excel articles you may also like:
