In Power Query, you can use the IF Then Else statement to test conditions and return different outcomes in a custom column based on the results of those tests.
I will show you how to apply the IF Then Else statement in Power Query using Power Query Editor’s Graphical User Interface (GUI) and the Power Query Formula Language (M).
Suppose you have the dataset below in an Excel worksheet listing clients and their dollar potential.
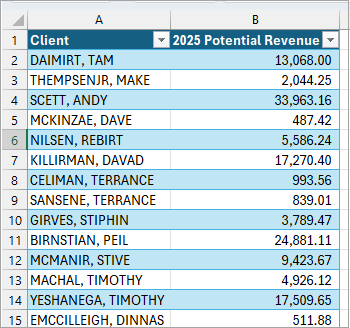
You want to tag the clients as large customers if their dollar potential is 15,000 or more and as small customers if it is less than 15,000.
You can achieve this by applying the IF Then Else statement in a custom column in Power Query using Power Query Editor’s GUI and the Power Query Formula Language (M).
Method #1: Using Power Query Editor’s Interface
Use the Conditional Column option on the Add Column tab of the Power Query Editor to apply the IF Then Else logic on the target data.
Use the steps below:
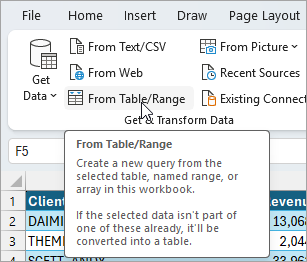
- Load the Excel data table onto the Power Query Editor by selecting any cell in the dataset, opening the Data tab, and clicking the From Table/Range command button on the Get & Transform group.
- On the Power Query Editor, open the Add Column tab and click the Conditional Column command button on the General group.

- The above step opens the Add Conditional Column dialog box.
On the Add Conditional Column dialog box, do the following:
- Enter ‘Large/Small’ on the ‘New column name’ box.
- Open the Column Name drop-down and select ‘2025 Potential Revenue.’
- Open the Operator drop-down and select ‘is greater than or equal to.’
- Enter 15000 on the Value box.
- Enter ‘LARGE’ on the Output box.
- Enter ‘SMALL’ on the Else box.
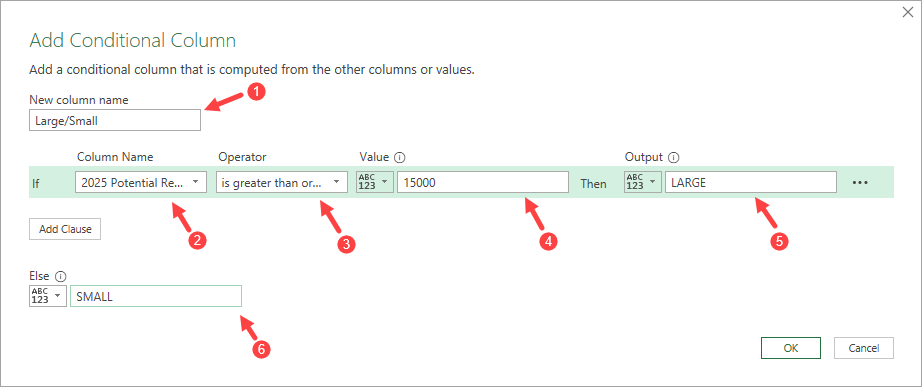
- Click OK.
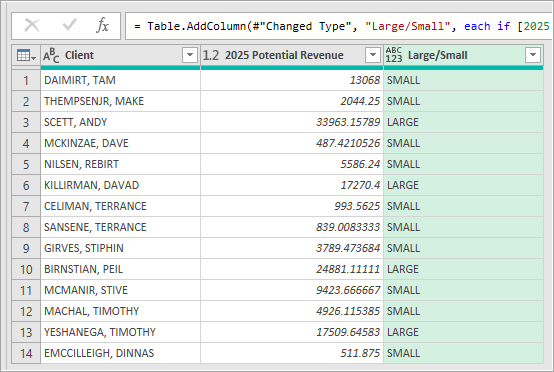
The steps above apply the IF Then Else logic to the query data and add a custom column named ‘Large/Small,’ which contains the ‘LARGE’ tag for customers with a dollar potential of 15,000 or more and ‘SMALL’ for customers with a dollar potential of less than 15,000.
- Load the query data onto an Excel worksheet.
Method #2: Using IF Then Else in M Code
Use the steps below to apply the IF Then Else statement to the target dataset to achieve the desired results.
- Load the table data onto the Power Query Editor as described in Method #1.
- On the Power Query Editor, open the Add Column tab and click the Custom Column command button on the General tab.
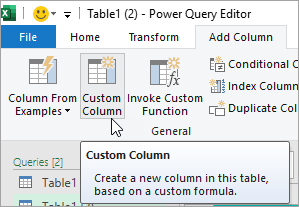
The above step opens the Custom Column dialog box.
- On the Custom Column dialog box, enter ‘Large/Small’ on the ‘New column name’ box and type the below formula after the equal sign on the ‘Custom column formula’ box:
=if [2025 Potential Revenue]>=15000
then "LARGE"
else "SMALL"
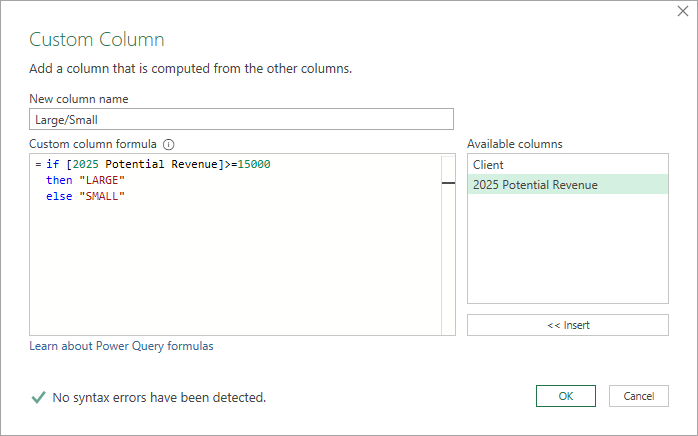
Notice the message ‘No syntax errors have been detected’ at the bottom of the dialog box. Whenever you create or update a formula, ensure this message appears to confirm the formula is error-free.
Note: Power Query Formula Language ignores white space in formulas, so you can use as many spaces or line breaks as you like to break formulas into multiple lines to make them easier to read, as we have done in this example.
- Click OK.
The above steps apply the IF-Then-Else logic to add a custom column called ‘Large/Small’ to the query data.
This column assigns the tag ‘LARGE’ to customers with a dollar potential of 15,000 and ‘SMALL’ to those with less than 15,000.

- Load the query data onto an Excel worksheet.
I have shown you how to apply the IF Then Else statement in Power Query using Power Query Editor’s GUI and the Power Query Formula Language (M). I hope you found the tutorial helpful.
Other Power Query and Excel articles you may also like: