If you often print your work in Excel, you would benefit from knowing how to make sure a row (or multiple rows) print on every page that you print.
This is often needed as you want the data row headers to be visible so that it’s easier to know what a data point represents.
Thankfully, there is an in-built feature in Excel that allows you to set a row to print on every page (or set a column to print on every page).
In this tutorial, I will show you all the steps you need to do to set the headers to show up on every printed page.
How to Set a Row to Print on Every Page in Excel
Suppose you have a dataset, as shown below, where there are hundreds of rows of data with the header in the first row.

If you print this data in the current form, you will only get the header on the first page, and the rest all the pages will have only the data and not the headers.
Below are the steps to make sure the headers repeat on every printed page:
- Click on the Page Layout option in the ribbon

- In the Page Setup group, click on the ‘Print Titles’ option. This will open the ‘Page Setup’ dialog box

- In the Page Setup dialog box, click on the cell selector icon (upward arrow) for the ‘Rows to repeat at top’ option
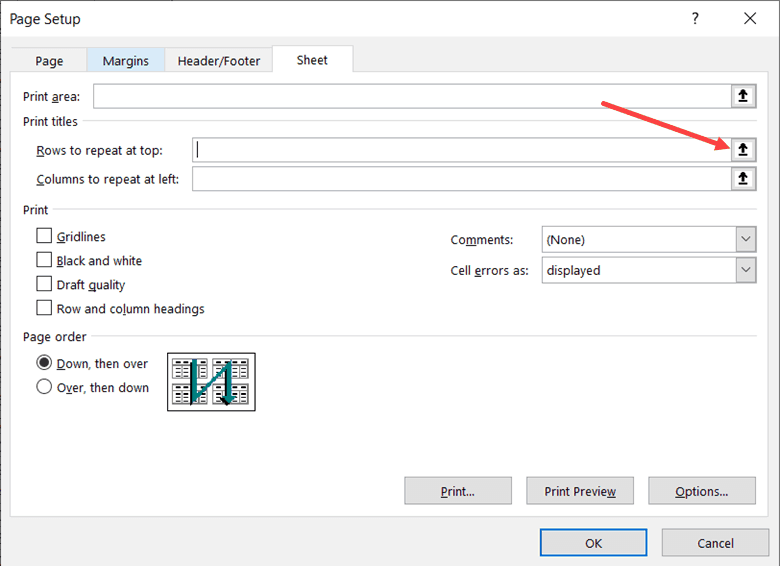
- In the dataset, select the header cells (you can also select the entire row if you want)

- Click OK
Now, when you print the data, you will have the selected header row cells repeat on every page.
You can use the same steps to also repeat multiple rows on each page (in case your headers occupy more than one row), as well as repeat one or more than one column on each page.
Note: It’s best to check the print preview before printing the worksheet. The print preview will show you exactly what will be printed on each sheet. To do this, click on the ‘File’ tab and then click on ‘Print’.
Also, it’s not necessary to always have the rows that you want to repeat at the top.
For example, if you want to repeat row numbers 4 and 5, you can select these rows in step 4.
Now, when Excel is printing your data, it will print the first page as expected, and from the second page onwards, it will have rows #4 and #5 at the top, which will repeat on all pages.
Advanced Concept: When you specify the rows/columns to repeat, Excel creates a named range with the name Print_Titles. This named range holds the range that Excel needs to repeat on each page. So even if you close the workbook and open it later, Excel will remember what rows/columns need to be repeated.
Also read: How to Print Row Numbers in Excel
Using VBA Code to Set Rows to Print on Every Page
If you need to print reports quite often and need to set the row to print on every page, you can use a simple VBA code as well.
With a click of a button, the code will assign the specified rope to be printed on each page and then print your data.
Let me show you how it works with an example.
Below I have an invoice list, and it has 60 records. I need to print this list.
I select the entire list and press “Control + P” to print the list. I can see the print preview of the second page below.

Excel will print the second page without the table headers.
I want to add the header on each page and quickly print the list. For that, I can use the below VBA code.
'Code developed by Steve Scott from https://spreadsheetplanet.com

Sub RepeatHeaders()

Dim LastPage As Long

'GET.DOCUMENT(50) fetches the count of pages in the active worksheet and assigns it to the LastPage variable
LastPage = Application.ExecuteExcel4Macro("GET.DOCUMENT(50)")

With ActiveSheet.PageSetup

'First row is specified to be printed on the top of each page
.PrintTitleRows = "$1:$1"

'Prints the sheet from 1 to the LastPage
ActiveSheet.PrintOut From:=1, To:=LastPage

End With
End SubI can apply the VBA code to my Excel workbook as follows.
- Press ALT + F11 to open the VBA Editor. If the function keys are locked, I have to press ALT + Fn + F11 to open the VBA Editor.

- Go to the “Insert” tab and select “Module” from the expanded list.

- Copy and paste the VBA code given above in the Module.

As I want to repeat only row number 1, I have used:
.PrintTitleRows = "$1:$1"
I can modify this as per the number of rows we need to repeat as headers. For example, if I want to repeat the first 3 rows, then I have to change it as follows.
.PrintTitleRows = "$1:$3"
- I can click the Run button to immediately print the header on each page in Excel or click the “Save” button to save and use it later.

Microsoft VBA does not provide a way to calculate the total number of pages that will print on a worksheet. Luckily, I can get the total number of pages that will be printed on the active worksheet by using the “ExecuteExcel4Macro” method and the “GET.DOCUMENT(50)” macro sheet function.
If I do not want to print the header on the last page, I can simply reduce 1 from the “To: Last Page”. So, that line should be changed to;
ActiveSheet.PrintOut From:=1, To:=LastPage-1
Note: When you run the above code, apart from setting the first row as the header that needs to be printed on each sheet, it will also print your workbook. If you do not want the code to print your work, you can remove the last line (ActiveSheet.PrintOut From:=1, To:=LastPage)
Pro VBA Tip: If you want to use this VB code on all your workbooks on your system, it is best to save it in your personal macro workbook. This is just a one-time setup, and once you have the code in your personal macro workbook, you can run this code on any workbook with a click of a button or by assigning a shortcut key to it.
We now know two easy ways to print the header on each page in Excel.
I hope you found this Excel tutorial useful.
You may also like the following Excel tutorials: