
A stopwatch in Excel lets you time a task or practice run and keep the result alongside your work.
Excel has no built-in stopwatch, though. Its NOW function returns the current date and time, but it doesn’t tick on its own.
I’ll show you how to build a ticking stopwatch with VBA, log task times with checkboxes, and stamp fixed start and end times with F9.
Method #1: Using a VBA Macro (Start, Stop, and Reset Buttons)
I recommend this method when you want a real stopwatch with Start, Stop, and Reset buttons. Your display ticks up every second while it runs.
It’s the only method here that shows a live clock, and you’ll need macros enabled to use it.
Name your sheet Stopwatch, type Elapsed Time in A1, and enter 0 in A2. Use a large, bold font for A2 so it’s easy to read.
The code writes to Stopwatch!A2, so keep that sheet name or change it inside the code. Format A2 as [h]:mm:ss to display 0:00:00.
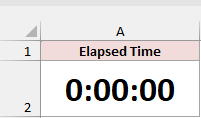
Here are the steps to apply that time format:
- Select A2 and press Ctrl + 1 to open Format Cells.
- On the Number tab, select Custom and type
[h]:mm:ssin the Type box.
![Format Cells dialog shows the Custom category and [h]:mm:ss type on the Number tab.](https://spreadsheetplanet.com/wp-content/uploads/2026/10/sw-02-m1-format-cells.png)
- Click OK.
The brackets in [h] keep the full hour count. With plain h:mm:ss, your display rolls back to 0 after 24 hours.
Here is the VBA code:
Option Explicit

Private StartTime As Double
Private NextTick As Date
Private IsRunning As Boolean

Private Function DisplayCell() As Range
    Set DisplayCell = ThisWorkbook.Worksheets("Stopwatch").Range("A2")
End Function

Sub StartStopwatch()
    If IsRunning Then Exit Sub
    StartTime = Now - DisplayCell.Value
    IsRunning = True
    UpdateStopwatch
End Sub

Sub UpdateStopwatch()
    If Not IsRunning Then Exit Sub
    DisplayCell.Value = Now - StartTime
    NextTick = Now + TimeSerial(0, 0, 1)
    Application.OnTime NextTick, "UpdateStopwatch"
End Sub

Sub StopStopwatch()
    If Not IsRunning Then Exit Sub
    On Error Resume Next
    Application.OnTime NextTick, "UpdateStopwatch", , False
    On Error GoTo 0
    IsRunning = False
    DisplayCell.Value = Now - StartTime
End Sub

Sub ResetStopwatch()
    StopStopwatch
    DisplayCell.Value = 0
End SubHere are the steps to add the code to your workbook:
- Press Alt + F11 to open the Visual Basic Editor.
- Click Insert > Module.
- Paste all the code above into the module window.
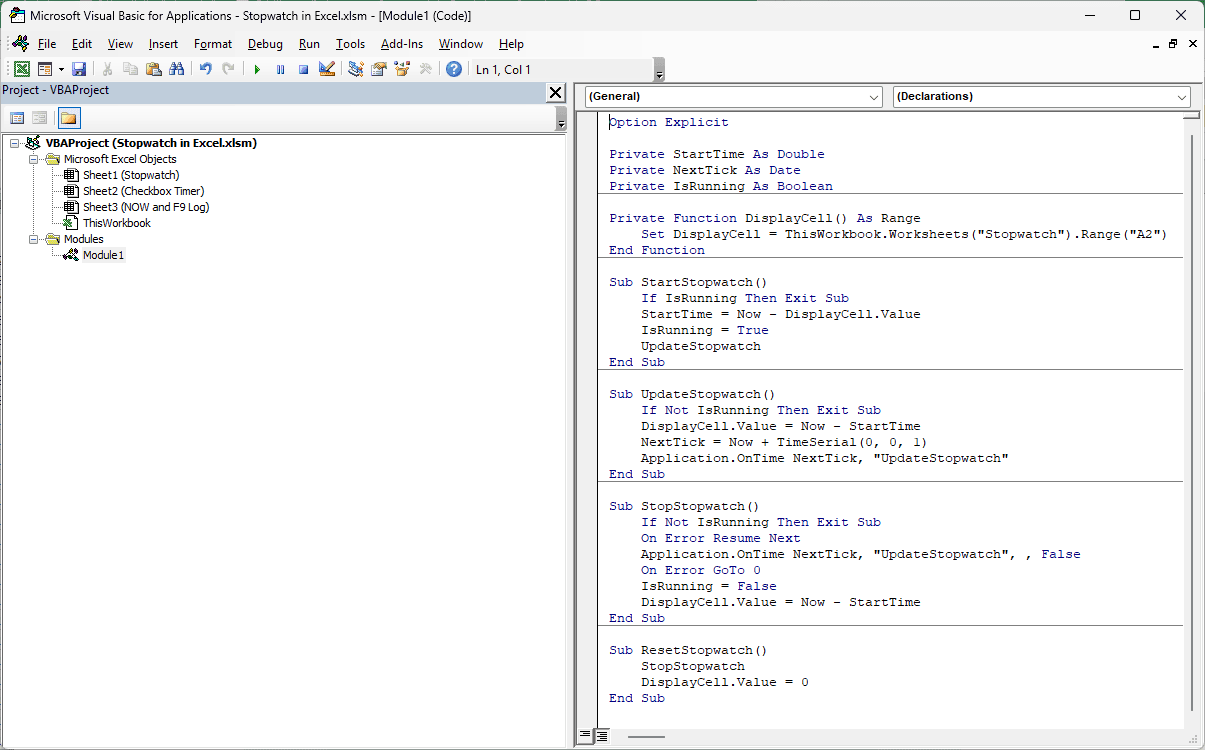
Next, you’ll create three clickable buttons from shapes. You don’t need the Developer tab for this.
Here are the steps to add the buttons:
- Close the Visual Basic Editor. On the Insert tab, click Shapes and choose Rectangle: Rounded Corners.
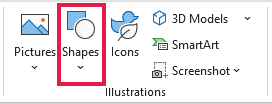
- Draw the shape to the right of your display and type Start in it. Repeat for Stop and Reset.
Color the buttons however you like. I used green for Start, red for Stop, and gray for Reset.

Each button needs a macro assigned to it. Here are the steps to connect them:
- Right-click the Start shape and click Assign Macro. Select StartStopwatch, then click OK.
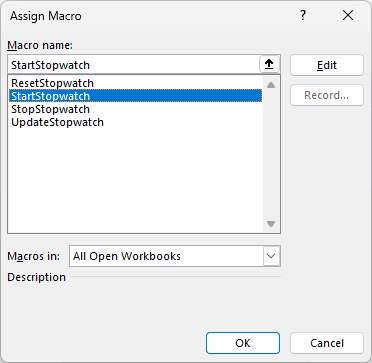
- Repeat for the Stop shape, assigning StopStopwatch.
- Repeat for the Reset shape, assigning ResetStopwatch.
Click any cell first so your shapes aren’t selected. You can now use the buttons:
- Click Start to count up every second.
- Click Stop to pause the stopwatch.
- Click Start again to carry on from where you stopped.
- Click Reset to return to
0:00:00.
Below, you can see the display after 1 minute and 27 seconds.

Save your workbook as an Excel Macro-Enabled Workbook (.xlsm). Otherwise, you’ll lose the code when you close it.
How does this code work?
StartTime stores the moment the stopwatch started.
The Start macro sets StartTime to the current time minus the displayed duration. That’s why clicking Start after Stop carries on instead of starting over.
UpdateStopwatch first checks IsRunning, so a leftover tick does nothing once the stopwatch has stopped.
UpdateStopwatch writes the current time minus StartTime into A2. It then uses Application.OnTime to schedule another update one second later.
That repeating call makes your display tick. Each update calculates the elapsed time from StartTime, rather than adding one second to the previous display.
If a tick runs late, the next update catches up. Your elapsed time doesn’t drift because of that delay.
StopStopwatch cancels the next scheduled tick, then writes the final elapsed time. To cancel it, Excel needs its exact scheduled time, stored in NextTick.
ResetStopwatch stops your stopwatch and puts 0 back in A2. IsRunning prevents a double-click on Start from scheduling two timers at once.
Note: Click Stop before you close the workbook. If a tick is still scheduled, Excel can reopen the file to run it.
Method #2: Using Checkboxes and the NOW Function
If you can’t or don’t want to use macros, you can record task times with checkboxes instead. You won’t see a running clock.
Tick Start to stamp the start time, then Stop to stamp the end time. A third column calculates how long you took, to the second.
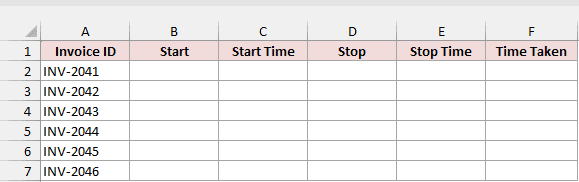
On the Checkbox Timer sheet, I have six invoices to enter into an accounting system. You can time each invoice separately, using these columns:
- A: Invoice ID, with INV-2041 to INV-2046 in A2:A7.
- B: Start.
- C: Start Time.
- D: Stop.
- E: Stop Time.
- F: Time Taken.
Leave B2:F7 empty to start.
Format C2:C7 and E2:E7 as h:mm:ss AM/PM to show seconds, such as 6:46:52 PM. Format F2:F7 as [h]:mm:ss to show durations.
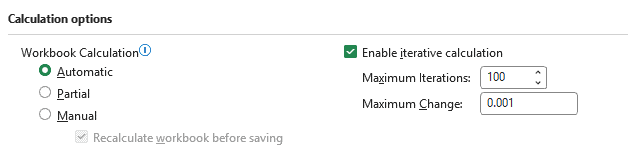
First, you’ll need iterative calculation. Your timestamp formulas refer to their own cells, which Excel normally flags as circular references.
This setting is saved with your workbook and applies to every workbook open at the same time. While it’s on, Excel stops warning about accidental circular references elsewhere.
Excel takes this setting from the first workbook you open in a session. If you see a circular reference warning, turn the option on again.
Here are the steps to turn it on:
- Go to File > Options > Formulas.
- Under Calculation options, tick Enable iterative calculation.
- Click OK.
Next, you’ll add checkboxes directly inside the cells. You’ll find the Checkbox button in Microsoft 365.
Here are the steps to add your Start and Stop checkboxes:
- Select B2:B7. On the Insert tab, click Checkbox.
- Select D2:D7 and click Insert > Checkbox again.
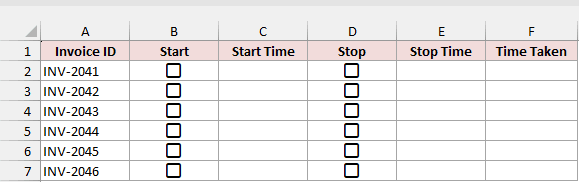
A ticked checkbox holds TRUE; an empty checkbox holds FALSE. Your formulas use those values to capture or clear a time.
Keep the boxes empty while you enter the formulas. In C2, enter this Start Time formula and copy it down to C7:
=IF(B2,IF(C2="",NOW(),C2),"")
Now tick B2 when you start INV-2041. C2 captures the current time:
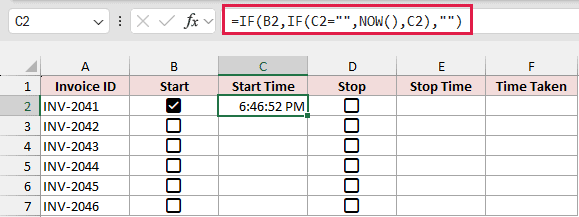
How does this formula work?
When you leave B2 unticked, C2 stays blank.
Once you tick B2, the formula checks C2 itself. If C2 is empty, NOW() captures the current date and time.
If C2 already has a time, the formula returns that same time again. Your timestamp stays put even when NOW returns a later time.
That reference to C2 inside C2 is why you need iterative calculation.
Copying the formula down gives each invoice its own formula, so each row keeps its own timestamp.
In E2, enter this Stop Time formula and copy it down to E7:
=IF(D2,IF(E2="",NOW(),E2),"")
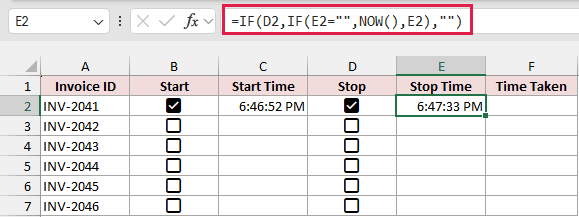
You get the same behavior, using the Stop checkbox in D2. Tick it when you finish the invoice to capture the end time in E2.
In F2, enter this Time Taken formula and copy it down to F7:
=IF(OR(C2="",E2=""),"",E2-C2)
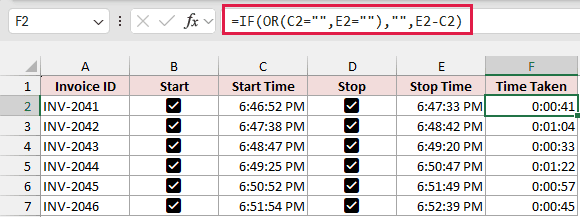
Subtracting the start time from the end time returns your time taken. The OR check keeps F2 blank until both timestamps exist, avoiding #VALUE!.
In my example, the results in F2:F7 are 0:00:41, 0:01:04, 0:00:33, 0:01:22, 0:00:57, and 0:00:45.
To clear a recorded time, untick its checkbox. Tick it again to stamp a fresh time.
Note: Enter or copy the formulas while the boxes are empty. A formula entered into a cell that already shows a time can return 12:00:00 AM. Untick and re-tick the box to fix it.
Method #3: Using NOW and F9 (Static Timestamps)
For a quick time log without macros, you can turn NOW into a fixed value with F9. You can use this method in any Excel version.
The usual Ctrl + Shift + ; shortcut won’t help here because it always records the seconds as 00.
On the NOW and F9 Log sheet, I have the same six invoices to time, with INV-2041 to INV-2046 in A2:A7 under Invoice ID.
Use Start Time in B1 and End Time in C1. Leave B2:C7 empty so you can record each invoice’s times as you work.
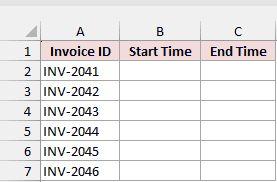
First, format B2:C7 as h:mm:ss AM/PM so your times show seconds.
Here are the steps to record a fixed start and end time:
- Click B2 and type
=NOW(), but don’t press Enter yet.
- Press F9. While you’re still editing the cell, Excel replaces the formula with its current value.
- Press Enter. You now have a fixed date and time, rather than a formula, so it never changes.
- When you finish the invoice, repeat those steps in C2 to record its end time.
Repeat for the remaining invoices in rows 3 to 7.
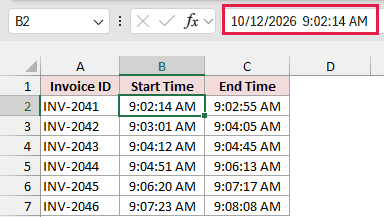
With B2 selected, you can see the fixed value 10/12/2026 9:02:14 AM in the formula bar. There’s no NOW formula left to recalculate.
Here are the recorded start and end times for each invoice:
- INV-2041:
9:02:14 AMto9:02:55 AM. - INV-2042:
9:03:01 AMto9:04:05 AM. - INV-2043:
9:04:12 AMto9:04:45 AM. - INV-2044:
9:04:51 AMto9:06:13 AM. - INV-2045:
9:06:20 AMto9:07:17 AM. - INV-2046:
9:07:23 AMto9:08:08 AM.
Add Time Taken in D1. Enter this formula in D2 and copy it down to D7 to calculate each invoice’s duration:
=C2-B2
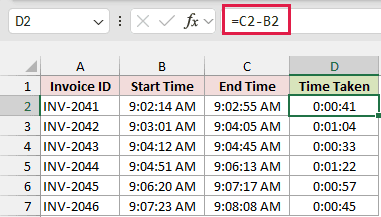
Format D2:D7 as [h]:mm:ss. In this example, the durations are 0:00:41, 0:01:04, 0:00:33, 0:01:22, 0:00:57, and 0:00:45.
Additional Notes About Creating a Stopwatch in Excel
Keep these points in mind when you use your recorded times:
NOW()doesn’t tick on its own. It updates when your sheet recalculates, such as when you edit a cell or press F9. A live display needs VBA.- All three methods display whole seconds. VBA’s
Nowonly counts whole seconds, so use another tool if you need hundredths of a second. - Use
[h]:mm:ssfor durations. Your total hours stay visible even when the elapsed time exceeds 24 hours. - Your Time Taken results are time values. You can total them with
SUMand format the total as[h]:mm:ss. - Macros in a workbook downloaded from the internet are blocked by default. If Excel shows a red Security Risk bar, close the file, right-click it, choose Properties, tick Unblock, and click OK.
Frequently Asked Questions
Here are answers to a few questions you might have while using your stopwatch.
Why Can’t I Undo While the Stopwatch Is Running?
Each tick runs a macro that changes a cell, and that clears Excel’s undo history.
Stop the stopwatch before you edit anything you might want to undo.
Why Does the Stopwatch Pause While I’m Typing in a Cell?
Excel holds scheduled macros while you’re editing a cell. Press Enter or Esc, and your ticks resume.
When the ticks resume, your display jumps straight to the correct time.
Does the Stopwatch Keep Running If I Switch to Another Sheet?
Yes. You can switch sheets while it runs because the code always writes to A2 on the Stopwatch sheet, rather than whichever sheet is active.
Can I Use the Checkbox Method in Older Versions of Excel?
The Checkbox button is only in Microsoft 365. In older versions, type TRUE in column B or D instead of ticking a box.
Your formulas treat that value the same way. Keep iterative calculation enabled so they can retain the timestamps.
Conclusion
I’ve shown you a VBA stopwatch with buttons, a checkbox timer with NOW, and fixed timestamps with NOW and F9.
I’d reach for the VBA stopwatch by default because it’s the only method that shows a running clock.
I hope you found this article helpful.
Other Excel articles you may also like:
