
Your Excel macro finishes copying and pasting, but a moving dotted border is still running around the copied cells.
People call that border the “marching ants.” One line, Application.CutCopyMode = False, switches it off.
The line also clears the copied data, so you need to put it after your paste. Run it too early, and there’s nothing left to paste.
I’ll show you how to remove the border, check whether you’ve copied cells, and prevent the large clipboard warning when your macro closes a workbook.
What Does Application.CutCopyMode = False Do?
After you copy cells, Excel is still holding them, ready for you to paste. That’s what being in Copy mode means.
You see the moving dotted border around those cells. After a copy, the status bar says “Select destination and press ENTER or choose Paste”.
You can read Application.CutCopyMode to find out which state Excel is in:
False(0): Nothing is cut or copied.xlCopy(1): You’ve copied cells, and Excel is in Copy mode.xlCut(2): You’ve cut cells, and Excel is in Cut mode.
Setting the property to False cancels either mode, removes the border, and empties what Excel copied to the clipboard. You can’t paste that data afterward.
When you record a copy and paste, Excel adds Application.CutCopyMode = False after the paste. That’s probably where you’ve seen it before.
Example #1: Removing the Marching Ants After a Paste
Suppose you want to replace your Revenue formulas with plain values. You can copy D2:D11 and paste the values back into the same cells.
On Bakery Sales, you have Item, Price, Units Sold, and Revenue. Column D contains =B2*C2, filled down from D2 to D11.
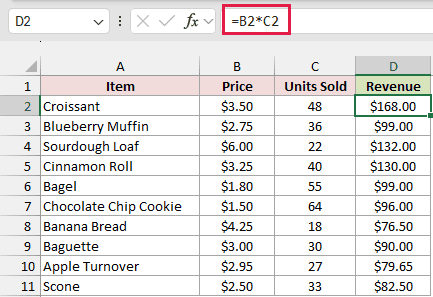
These macros work on whichever sheet is active, so keep Bakery Sales selected when you run them.
Your practice file is an .xlsx with data only. To add the macros, press Alt + F11, choose Insert > Module, and paste the code there.
Save as .xlsm to keep your macros. To run a macro, click inside it in the VBA editor and press F5.
Undo doesn’t work after a macro runs. Reopen the practice file to get the Revenue formulas back before trying another example.
I’ll start with the copy and paste alone:
Sub ConvertRevenueToValues()
    Range("D2:D11").Copy
    Range("D2:D11").PasteSpecial Paste:=xlPasteValues
End Sub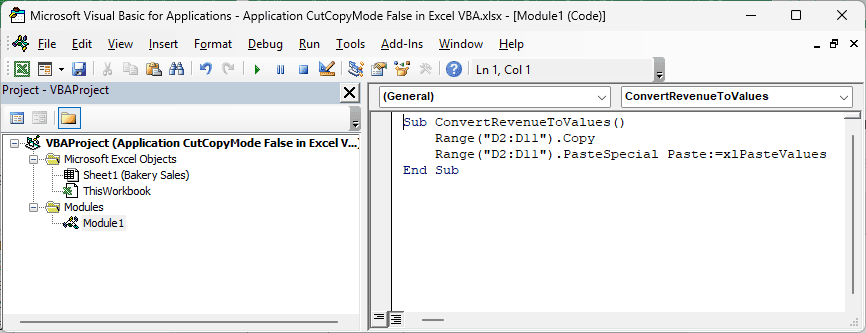
The first line copies your Revenue cells.
The second line pastes only the values into the same range. You keep the calculated amounts, but the formulas are replaced.
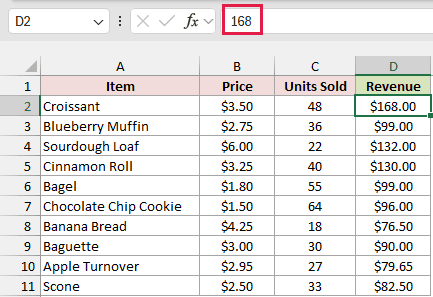
For the Croissant, D2 now holds the number 168. However, the moving dotted border remains around D2:D11, because pasting doesn’t end Copy mode.
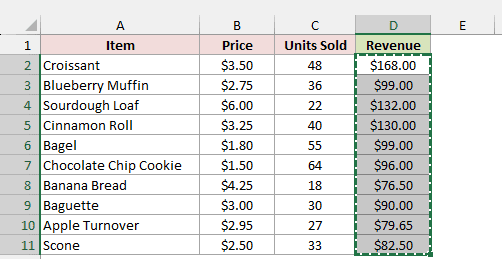
To remove that border, I add Application.CutCopyMode = False after the paste:
Sub ConvertRevenueToValuesClean()
    Range("D2:D11").Copy
    Range("D2:D11").PasteSpecial Paste:=xlPasteValues
    Application.CutCopyMode = False
End Sub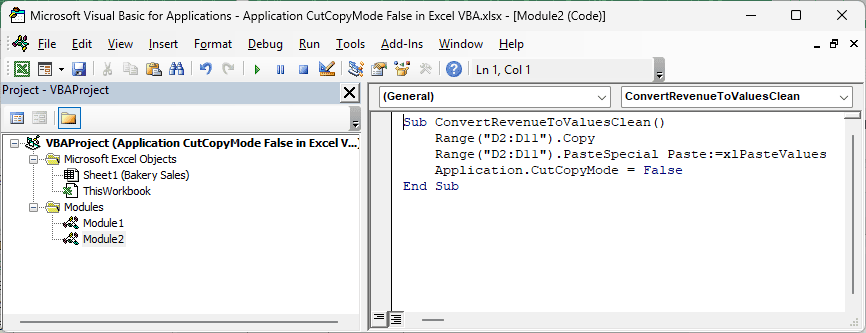
Run this version, and you get the same Revenue values without the border.
Select D2, and the formula bar shows 168 instead of =B2*C2.
Note: Never put Application.CutCopyMode = False between Copy and PasteSpecial. It clears the copied cells, so the macro stops with run-time error 1004, “PasteSpecial method of Range class failed”.
Example #2: Checking Whether Excel Is in Cut or Copy Mode
Sometimes you need a macro to check whether you’ve copied anything before it continues. You can read Application.CutCopyMode instead of changing it.
On Bakery Sales, your table has Item, Price, Units Sold, and Revenue in A1:D11.
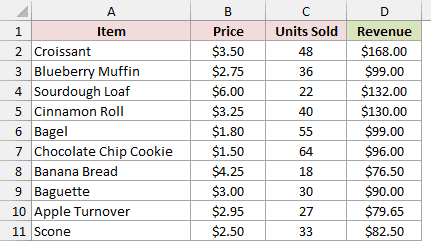
Here’s a macro that shows you the current state:
Sub CheckCutCopyMode()
    Select Case Application.CutCopyMode
        Case False
            MsgBox "Not in Cut or Copy mode"
        Case xlCopy
            MsgBox "In Copy mode"
        Case xlCut
            MsgBox "In Cut mode"
    End Select
End Sub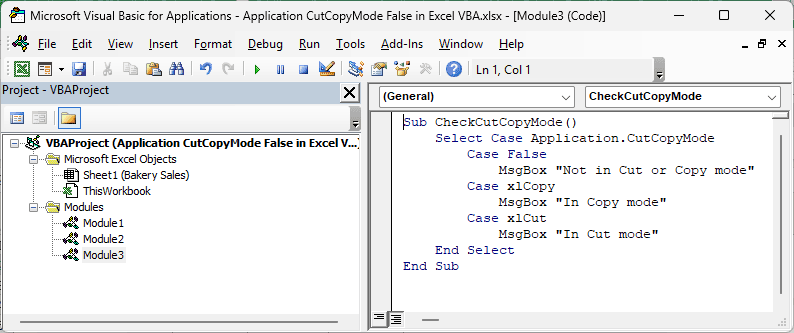
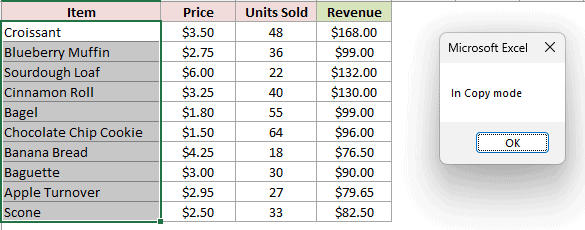
To see the message after copying your bakery item names:
- Press Alt + F8, select CheckCutCopyMode, click Options, and type an uppercase M in the Shortcut key box for Ctrl + Shift + M. Click OK, then close the Macro dialog before copying anything.
- Select A2:A11 on Bakery Sales and press Ctrl + C.
- Press Ctrl + Shift + M.
Opening the Macro dialog cancels Copy mode, so running the macro from Alt + F8 after copying would always show “Not in Cut or Copy mode”.
The message box shows “In Copy mode”, and Excel stays in Copy mode because the macro only reads the property.
You can use that check to avoid trying to paste when there’s nothing copied. This next macro displays a message and exits unless you’re in Copy mode:
Sub PasteValuesOnly()
    If Application.CutCopyMode <> xlCopy Then
        MsgBox "Copy the cells you want to paste first."
        Exit Sub
    End If
    Selection.PasteSpecial Paste:=xlPasteValues
    Application.CutCopyMode = False
End SubCopy your cells, select the destination, and run PasteValuesOnly. It pastes the values there, then clears Copy mode.
I check specifically for xlCopy, rather than just checking that the property isn’t False. Paste Special works with copied cells, but fails after a cut.
Example #3: Avoiding the Large Clipboard Warning on Close
Removing the border is useful, but clearing Copy mode also prevents a warning from interrupting a macro that closes a workbook.
Suppose your macro opens another workbook, copies a large range, pastes the values into your workbook, and closes the source.
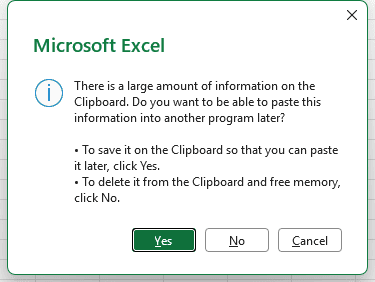
With more than 100 cells still copied, closing the source can trigger this message. Your macro waits until someone clicks a button:
“There is a large amount of information on the Clipboard. Do you want to be able to paste this information into another program later?”
I put the cleanup line before closing the source workbook:
Sub CopyOrdersAndCloseSource()
    Dim SourceWb As Workbook
    Set SourceWb = Workbooks.Open("C:\Reports\Bakery Orders.xlsx")
    SourceWb.Worksheets(1).Range("A1:D201").Copy
    ThisWorkbook.Worksheets("Orders").Range("A1").PasteSpecial Paste:=xlPasteValues
    Application.CutCopyMode = False
    SourceWb.Close SaveChanges:=False
End Sub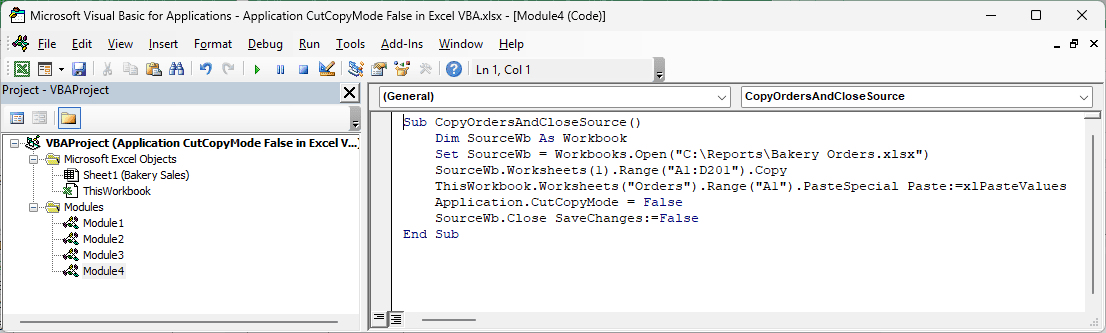
Change the file path, copied range, and Orders sheet name to match your files.
It won’t run in the practice file, since that file has no Orders sheet or Bakery Orders workbook.
The cleanup runs before SourceWb.Close. You no longer have a large range waiting on the clipboard, so the source closes without that question.
You could also hide the prompt with Application.DisplayAlerts = False. I prefer clearing Copy mode here because it removes the cause instead of suppressing every alert.
Example #4: Blocking Copy and Paste in a Workbook
Because Application.CutCopyMode = False throws away what you’ve copied, you can use it to make pasting awkward in a workbook you share.
For this example, put the code in the ThisWorkbook module:
- Press Alt + F11 to open the VBA editor.
- In the Project Explorer, double-click ThisWorkbook for your workbook.
- Paste the code below into that module.
- Save the workbook as
.xlsm.
Private Sub Workbook_SheetSelectionChange(ByVal Sh As Object, ByVal Target As Range)
    Application.CutCopyMode = False
End Sub

Private Sub Workbook_SheetActivate(ByVal Sh As Object)
    Application.CutCopyMode = False
End Sub

Private Sub Workbook_Deactivate()
    Application.CutCopyMode = False
End Sub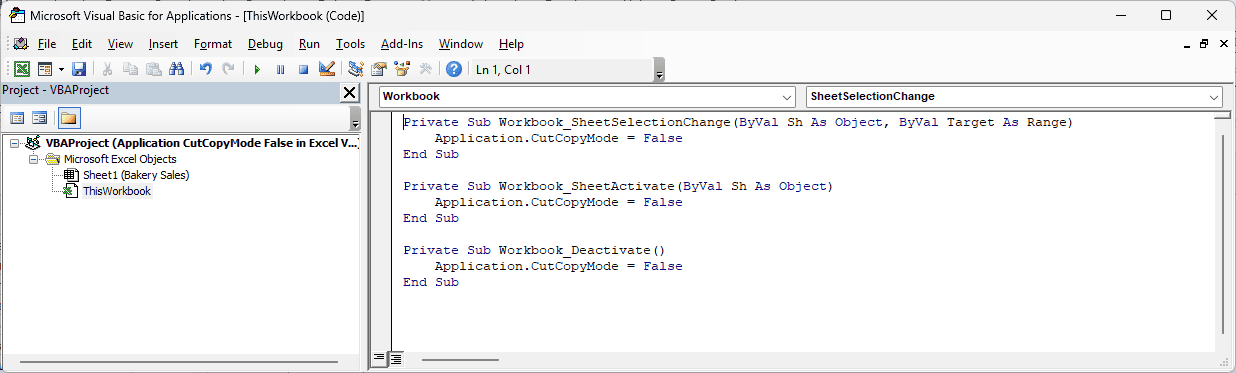
When you click a destination cell, switch sheets, or switch to another workbook, the corresponding event cancels Copy mode, so Paste is no longer available.
That stops pasting within this workbook and into other open workbooks. However, you can still switch to another program and paste there.
You also need macros enabled for the events to run. Treat this as a deterrent, not security.
A Worksheet_SelectionChange version would only cover its own sheet. You could still copy and paste on another sheet or workbook, which is why I use workbook events.
These events also clear your own copies, so test this in a separate workbook.
Any macro in that workbook that copies, then selects a cell, loses its copy too. For example, PasteValuesOnly can’t paste after you select the destination.
Copying Without the Clipboard (No CutCopyMode Needed)
When you write your own macro, you can often skip the clipboard entirely. Then you have no Copy mode to clean up.
Reopen the practice file first so column D has formulas again.
On Bakery Sales, Revenue in D2:D11 holds =B2*C2 again, filled down through the column in your freshly reopened practice file.
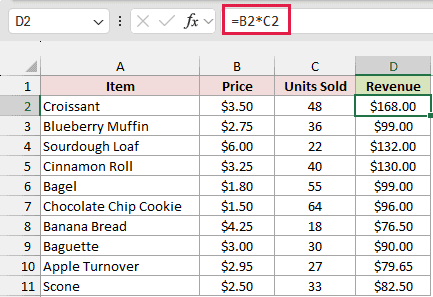
To replace those formulas with plain values, assign the cells’ values back to themselves:
Sub ConvertRevenueWithoutClipboard()
    Range("D2:D11").Value = Range("D2:D11").Value
End Sub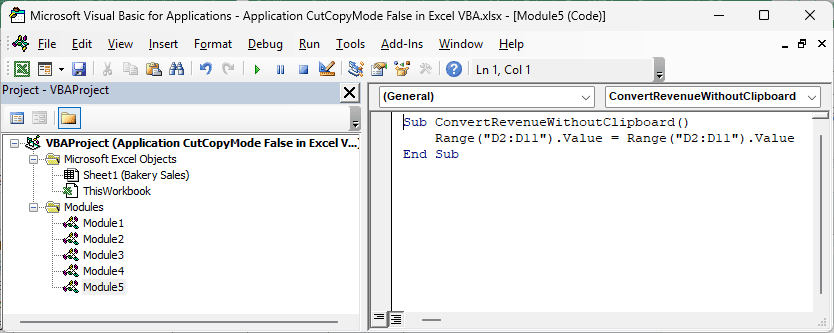
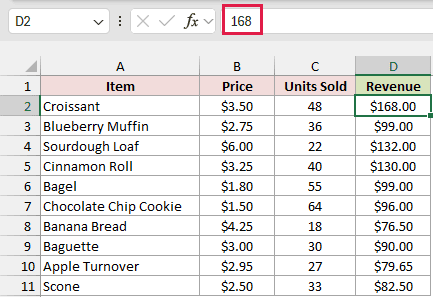
You get plain values, with D2 showing 168 in the formula bar. No moving border appears, and the macro puts nothing on the clipboard.
Use that version when you only want the calculated values.
To copy the whole table with its formulas and formatting, reopen the practice file again, then supply a destination:
Sub CopySalesTable()
    Range("A1:D11").Copy Destination:=Range("F1")
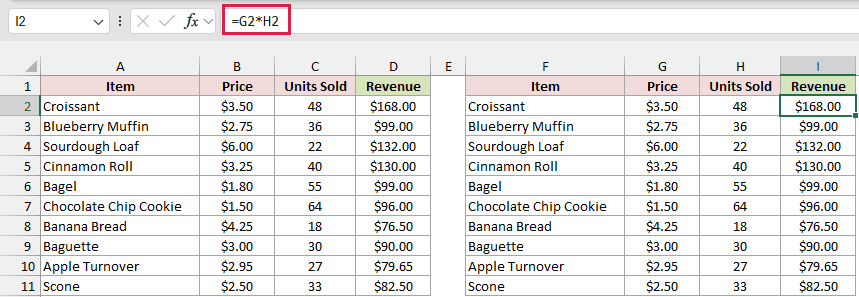
End SubThis copies your Bakery Sales table from A1:D11 to F1 in one step. You get the values, formulas, and formatting without entering Copy mode.
The formulas adjust as they would with a normal paste. Your Revenue formula in I2 becomes =G2*H2.
Because it copies the formulas too, use the .Value version when you only want plain numbers.
Your copied table is in F1:I11, with I2 selected and the formula bar showing =G2*H2.
Additional Notes About Application.CutCopyMode in VBA
Here are a few details to remember when you add this property to your macros:
- Setting it to
Truedoesn’t start Copy mode. Despite Microsoft’s reference description, it cancels an existing copy just likeFalse, so useFalsefor cleanup. - Clearing Copy mode also empties what Excel put on the clipboard. You can’t paste that copied data into Word or Outlook afterward.
- You can safely set it to
Falsewhen nothing is copied. The line doesn’t cause an error just because there’s nothing to clear. - Pressing Esc cancels Cut or Copy mode and removes the moving border by hand.
Frequently Asked Questions
Here are answers to a few questions you might have before adding the line to your code.
Is Application.CutCopyMode = False Necessary?
You don’t need it for the paste itself to work. It cleans up afterward by removing the border and clearing the copied data.
Include it before closing a workbook with a large copied range, or whenever you want the moving border gone after your macro finishes.
Does Application.CutCopyMode = False Undo a Cut?
No harm is done. After a cut, setting it to False just cancels the cut.
Your cells stay where they were, because Excel moves cut cells only when you paste.
Where Do I Put Application.CutCopyMode = False in a Loop?
Once, after the loop. Each new Copy replaces the previous one, so you only need to clear Copy mode after the last paste.
For example, this copies your bakery item names from column A to column F, one cell at a time:
Sub CopyNamesOneByOne()
    Dim i As Long
    For i = 2 To 11
        Range("A" & i).Copy
        Range("F" & i).PasteSpecial Paste:=xlPasteValues
    Next i
    Application.CutCopyMode = False
End SubWhy Do I Get ‘PasteSpecial Method of Range Class Failed’?
Two common causes are clearing Copy mode too soon, or cutting the cells instead of copying them.
Check that your cleanup line runs after the paste. Also use Copy rather than Cut, since Paste Special works only after a copy.
Conclusion
You can use Application.CutCopyMode = False to remove the moving border and avoid the large clipboard warning when closing a workbook.
I recommend putting the line right after your last paste and skipping the clipboard with .Value = .Value when you only need values.
I hope you found this article helpful.
Other Excel articles you may also like:
