
Custom keyboard shortcuts in Excel let you run a command you use often without finding it on the ribbon each time.
Windows Excel has no screen for picking a command and assigning new keys, unlike Word. You build shortcuts through other features instead.
I’ll cover the Quick Access Toolbar and a custom ribbon tab. I’ll also cover macro shortcuts (recording, Macro Options, Application.OnKey) and AutoCorrect for text.
Method #1: Using the Quick Access Toolbar
For most built-in commands, I recommend adding a button to the small row at the top-left of Excel. That’s the Quick Access Toolbar.
You get an Alt + number shortcut without writing code. I’ll use Clear Formats, which removes cell formatting while keeping the values.
The toolbar can also sit below the ribbon. If yours is hidden, right-click the ribbon and click Show Quick Access Toolbar.
Here are the steps to give Clear Formats its own toolbar shortcut:
- On the Home tab, in the Editing group, click the Clear drop-down. Right-click Clear Formats and click Add to Quick Access Toolbar.
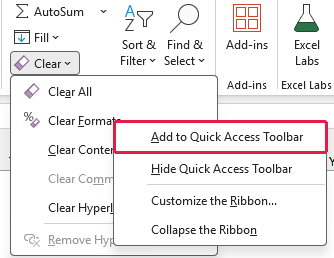
- Tap Alt. Excel displays little number badges on the toolbar buttons. These badges are called KeyTips. Clear Formats shows 7.

From now on, select your cells and press Alt, then 7, to clear their formatting. Tap the keys one after the other.
Your number depends on how many buttons are already on the toolbar.
Alt + 7 is much shorter than Clear Formats’ ribbon route: Alt, H, E, F.
You can change that number by moving the button to a different position.
Changing the Number Excel Assigns
Here are the steps to move Clear Formats on the toolbar:
- Click the Customize Quick Access Toolbar arrow at the right end of the toolbar, then click More Commands.
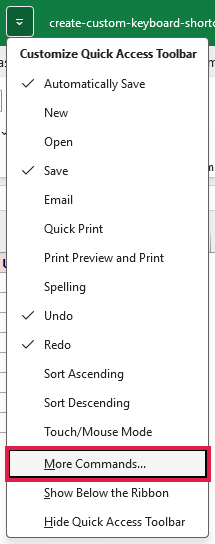
- In the right-hand list, select Clear Formats. Click the Move Up arrow on the right until it sits where you want it, then click OK.
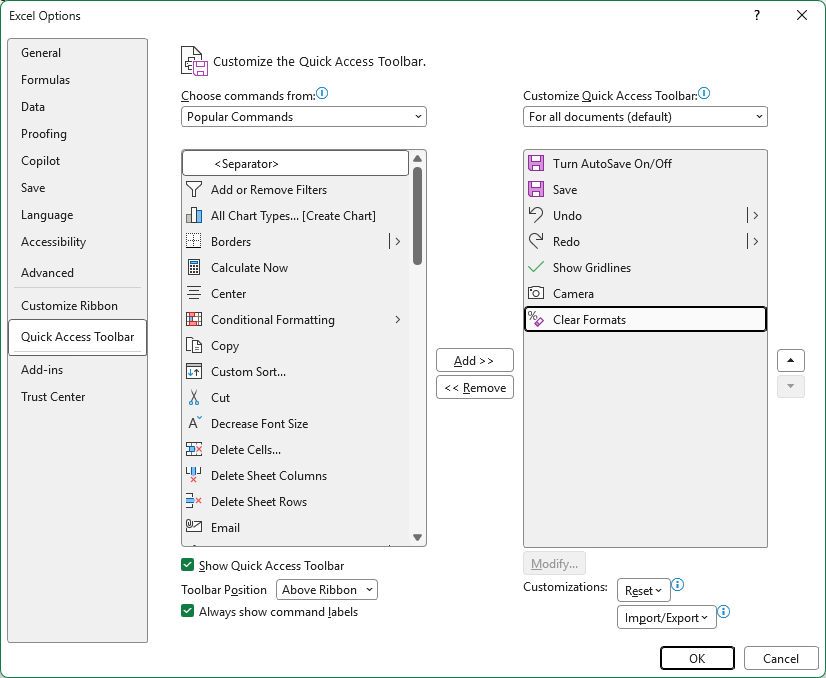
The first nine positions get Alt + 1 through Alt + 9. After that, Excel uses two-digit badges: 09 for position ten, then 08 for eleven.
For 09, press Alt, then 0, then 9, one after the other.
Tap Alt again after moving the button to check its new number.
Note: The Choose commands from drop-down on this page includes All Commands and Commands Not in the Ribbon. You can select a command that isn’t on any tab and click Add >> to put it on the toolbar.
Method #2: Using a Custom Ribbon Tab
If you’d like a whole tab of your own commands, you can add one to the ribbon. You’ll use a longer Alt sequence than the toolbar shortcut.
I’ll add Clear Formats to a new tab. It removes formatting from selected cells and leaves their values in place.
Here are the steps to create the tab and check its shortcut:
- Right-click the ribbon and click Customize the Ribbon. Below the right-hand list, click New Tab. Excel adds New Tab (Custom) with New Group (Custom) inside it.
- Select New Group (Custom), since commands can only go inside a group. Set Choose commands from to All Commands, select Clear Formats, and click Add >>.
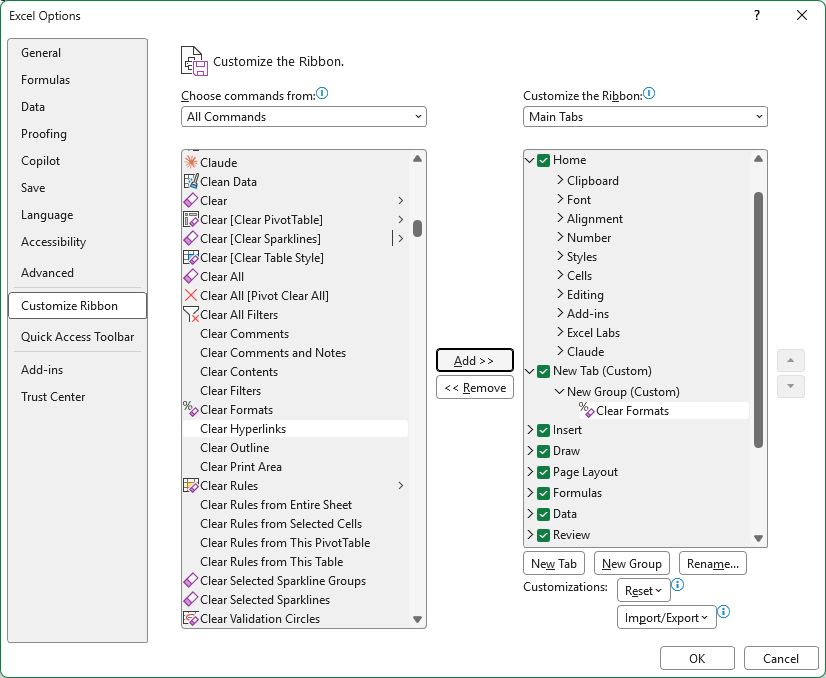
Click OK.
- Tap Alt. Excel shows little letter or number badges, called KeyTips, on the tabs. Your new tab shows Y1.

- Press Y, then 1, to open the tab. The Clear Formats button shows F.
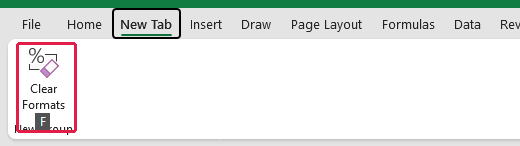
Select your cells, then press Alt, Y, 1, F, one after the other, to run Clear Formats. Don’t hold the keys together.
Excel assigns these KeyTips; you can’t type your own. Rearranging tabs or adding buttons can change them, so check the badges after making changes.
Method #3: Recording a Macro With a Shortcut Key
For a few actions you repeat together, you can record them and run them with one shortcut. Excel calls that saved sequence a macro.
You don’t need to write code. I’ll record a shortcut that highlights a cell for follow-up.
Below I have a dataset of orders on the Orders sheet. Column E contains the Total for each order.
I want one shortcut that gives a Total cell a yellow fill and makes it bold.
Excel records everything you do between starting and stopping the recording, so stick to the actions you want in the shortcut.
Note: Use Ctrl + Shift + letter for a macro shortcut. A macro can override a built-in shortcut while its workbook is open. Assigning Ctrl + Z, for example, takes away your usual Undo shortcut.
Here are the steps to record the highlighting shortcut:
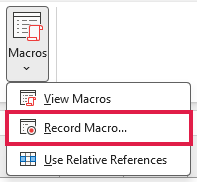
- Select E4. On the View tab, click the Macros drop-down at the far right, then click Record Macro.
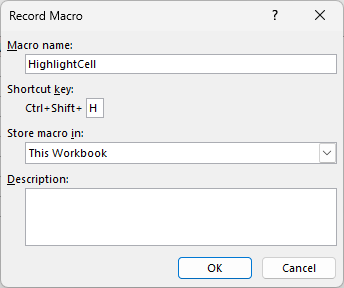
- Type HighlightCell in Macro name. Click the Shortcut key box and hold Shift while pressing H. The label changes to Ctrl+Shift+. Keep Store macro in set to This Workbook.
- Click OK to start recording. On the Home tab, choose a yellow Fill Color, then press Ctrl + B to make E4 bold.
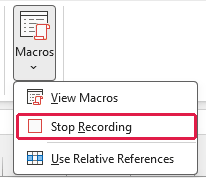
- On the View tab, click the Macros drop-down, then click Stop Recording.
- Select E9 and press Ctrl + Shift + H.
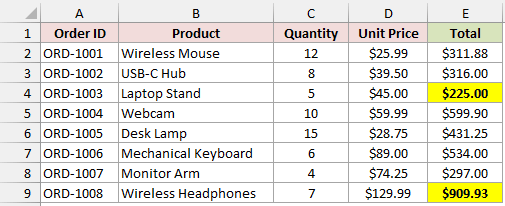
E9 now has the same yellow fill and bold text as E4. Your shortcut applies both formatting changes together.
Because you selected This Workbook, save the file as Excel Macro-Enabled Workbook (.xlsm) to keep the macro and its shortcut.
For a shortcut you can use in every workbook, choose Personal Macro Workbook when recording instead.
Excel stores it in PERSONAL.XLSB, a hidden workbook that opens whenever Excel starts. Click Save when Excel asks whether to save it on exit.
Method #4: Using the Macro Options Dialog
If you already have a macro, you can give it a shortcut without recording it again. I use the Macro Options dialog to assign or change the keys.
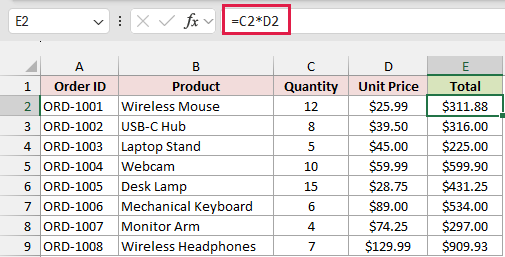
Below I have a dataset of orders on the Orders sheet. The Total column uses =C2*D2 in E2, filled down to E9.
I want a shortcut that replaces the selected formulas with their current results, leaving plain values.
Here is the macro I’ll use:
Sub ConvertToValues()
    Selection.Value = Selection.Value
End SubThe line sets the selected cells’ values equal to their own values. Formula results stay in the cells, and the formulas disappear.
Press Alt + F11, click Insert > Module, and paste the code into that regular module. Save the file as .xlsm to keep it.
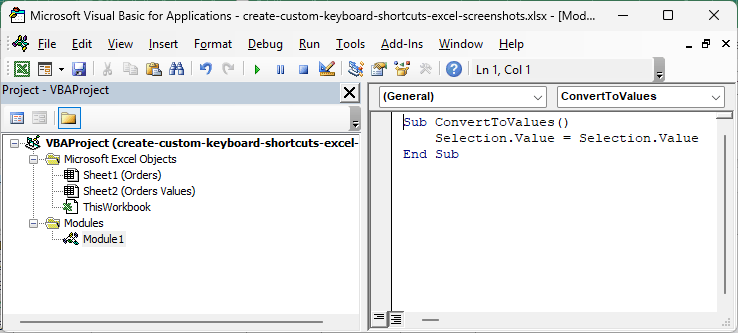
Here are the steps to assign the shortcut and convert the totals:
- Return to Excel and press Alt + F8. Select ConvertToValues in the Macro dialog, then click Options.
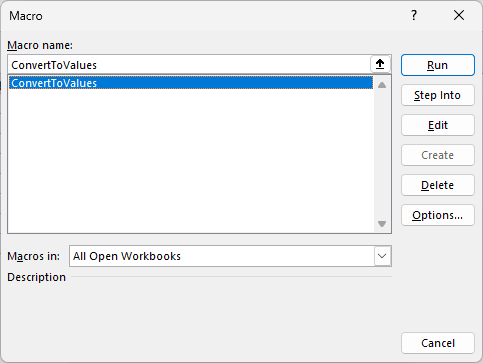
- Click the Shortcut key box and hold Shift while pressing Q. It shows Ctrl+Shift+ with Q in the box. Click OK, then close the Macro dialog.
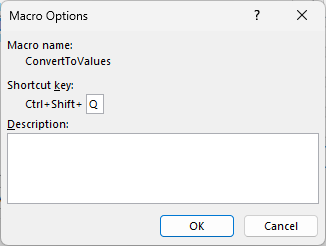
Note: You can’t undo a macro with Ctrl + Z. Save your workbook first or try this conversion on a copy before replacing formulas you might need later.
- Select E2:E9 and press Ctrl + Shift + Q.
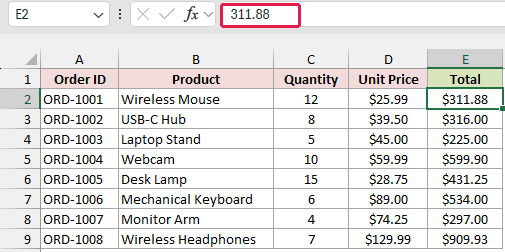
The Total column keeps the same numbers. Select E2 to check the formula bar: it now shows 311.88 instead of =C2*D2.
Method #5: Using Application.OnKey in VBA
Macro Options only accepts Ctrl + letter or Ctrl + Shift + letter.
Application.OnKey in VBA lets you use Alt combinations and function keys. You can also switch a key off.
I’ll assign Ctrl + Alt + K to ConvertToValues and turn off F1, which normally opens Help.
Here are the symbols you use to describe the keys in the code:
^means Ctrl.+means Shift.%means Alt.- Braces identify named keys, such as
{F1},{F12}, or{DELETE}.
So ^%k means Ctrl + Alt + K.
Keep ConvertToValues in a regular module of the same workbook:
Sub ConvertToValues()
    Selection.Value = Selection.Value
End Sub
The following code runs when the workbook opens and resets the keys when it closes. It belongs in ThisWorkbook, rather than a regular module.
For each Application.OnKey line, here’s what the text after the comma does:
- A macro name assigns the key to that macro.
- Empty quotes (
"") switch the key off. - Leaving it out puts the key back to normal.
Here are the steps to install it:
- Press Alt + F11. In the Project Explorer on the left, double-click ThisWorkbook for your file. Paste the following code into its code window.
Private Sub Workbook_Open()
    Application.OnKey "^%k", "ConvertToValues"
    Application.OnKey "{F1}", ""
End Sub

Private Sub Workbook_BeforeClose(Cancel As Boolean)
    Application.OnKey "^%k"
    Application.OnKey "{F1}"
End Sub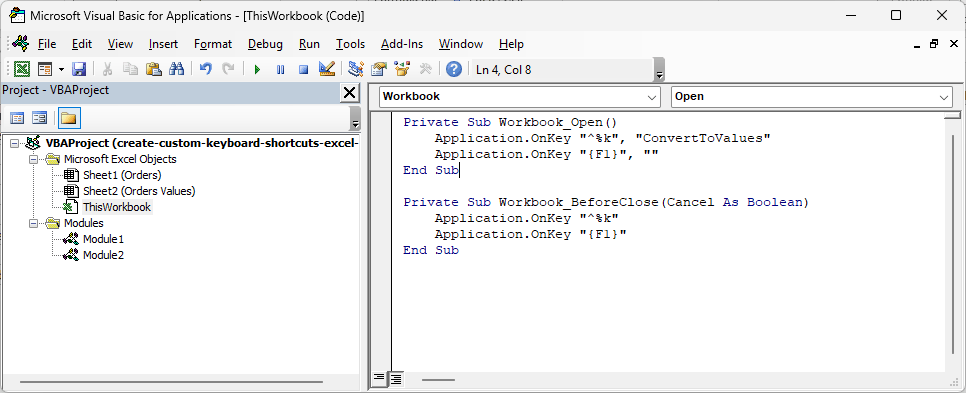
- Save the workbook as .xlsm, then close and reopen it so the opening code runs.
You can’t undo this conversion with Ctrl + Z.
Select E2:E9 and press Ctrl + Alt + K. The formulas turn into values.
Here’s what each assignment does:
Application.OnKey "^%k", "ConvertToValues"makes Ctrl + Alt + K run ConvertToValues.Application.OnKey "{F1}", ""makes F1 do nothing. That can help if you hit Help when you meant to press F2 to edit a cell.Application.OnKey "^%k"restores Ctrl + Alt + K to its normal behavior when the workbook closes.Application.OnKey "{F1}"restores F1 when the workbook closes.
The assignment affects every open workbook and lasts until you reset it or close Excel. That’s why I’ve included the reset in the closing procedure.
Workbook_BeforeClose runs before Excel asks you to save. If you click Cancel at that prompt, the keys are already reset.
Reopen the file to turn them back on.
Method #6: Using AutoCorrect for Text Shortcuts
For text you type often, you can use a short code that Excel expands into the full text. AutoCorrect handles this kind of shortcut.
You aren’t assigning keys to a command here. I’ll make addr expand into an address so you don’t have to type the address each time.
Here are the steps to add that typing shortcut:
- Click File > Options > Proofing, then click AutoCorrect Options.

- On the AutoCorrect tab, type addr in Replace. In With, type 1250 Market Street, Denver, CO 80202. Click Add, then click OK twice.
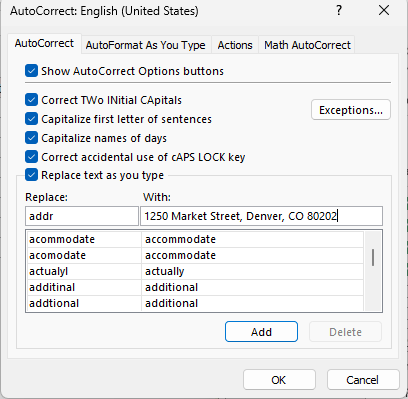
Type addr in a cell and press Enter. Excel replaces it with 1250 Market Street, Denver, CO 80202. Pressing Space also triggers the replacement.
Pick a code that isn’t a real word, or Excel will replace that word whenever you type it.
Your AutoCorrect list is shared with other Office apps, including Word and Outlook. You can use it for company names or long labels too.
Additional Notes About Custom Keyboard Shortcuts in Excel
Keep these points in mind when you set up your shortcuts:
- Keep the workbook containing the macro open. An .xlsm file opens with macros off. Click Enable Content in the yellow security bar, or none of the macro shortcuts or Workbook_Open will work.
- Everything here is for desktop Excel. Excel for the web doesn’t run VBA macros and doesn’t have the Customize the Ribbon or AutoCorrect Options screens.
- A macro in the Personal Macro Workbook loads every time Excel starts. A shortcut that takes over Ctrl + C or Ctrl + V would change it in every workbook.
Frequently Asked Questions
Here are answers about changing built-in shortcuts, removing custom ones, and getting macro shortcuts to work.
Can I change the keyboard shortcut for a built-in Excel command?
Not directly in Windows Excel. It has no Customize Keyboard dialog like Word’s.
Put the command on the Quick Access Toolbar or a custom tab. You can also wrap it in a macro and assign that a shortcut.
How do I remove a custom shortcut?
- Quick Access Toolbar: Right-click the button and click Remove from Quick Access Toolbar.
- Macro: Press Alt + F8, select the macro, click Options, and clear the Shortcut key box. Click OK.
- Application.OnKey: Run it with only the key, such as
Application.OnKey "^%k", or close Excel.
Why does my macro shortcut not work?
The workbook containing the macro may be closed, or macros may be disabled.
Saving the file as .xlsx also drops its macros. Save it as .xlsm to keep them.
Can I create custom keyboard shortcuts in Excel for Mac?
Yes. Click Tools > Customize Keyboard, choose a command, press your new shortcut, and click Add.
Can I give the same macro more than one shortcut?
Yes. For ConvertToValues, keep its Ctrl + Shift + Q shortcut in Macro Options. Assign Ctrl + Alt + K with Application.OnKey too.
Conclusion
I recommend the Quick Access Toolbar for built-in commands, with a custom ribbon tab when you want to group buttons.
For macros, I’d start with Ctrl + Shift + letter, whether you record the actions or assign keys through Macro Options.
Use Application.OnKey for other keys, and AutoCorrect when your shortcut needs to insert text.
Other Excel articles you may also like:
