
Sorting by multiple columns in Excel VBA lets you repeat the same sorting rules without setting them up manually each time.
The first sort key controls the main order. Excel uses the next key only when the earlier values match. You also need to sort the whole record range so the other columns move with each row.
I’ll show you two ways to do this: a short Range.Sort macro and a Worksheet.Sort macro that defines each sorting level separately.
Method #1: Using the Range.Sort Method
Range.Sort is a good choice when you need to sort a worksheet range by two or three columns. You can set the sorting levels in one statement.
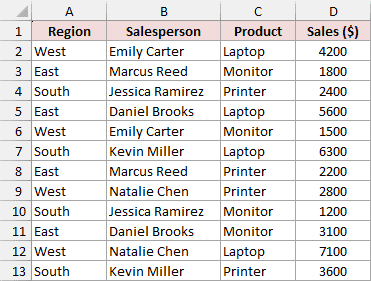
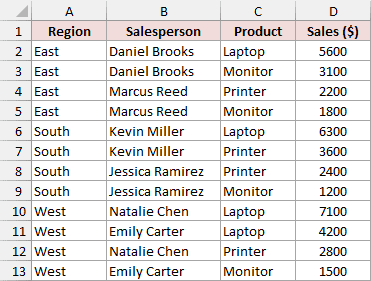
In the data above, each row shows a product sale. I want to group the rows by Region, from A to Z, then put the largest Sales amount first within each region.
The data occupies A1:D13, including the header row. In the example file, it is on the Sales sheet. Here is the VBA code:
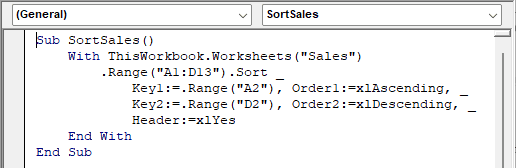
Sub SortSales()
    With ThisWorkbook.Worksheets("Sales")
        .Range("A1:D13").Sort _
            Key1:=.Range("A2"), Order1:=xlAscending, _
            Key2:=.Range("D2"), Order2:=xlDescending, _
            Header:=xlYes
    End With
End SubHere are the steps to run it in desktop Excel for Windows. Keep a copy of your original data first, since the macro rearranges the rows in place and cannot be reversed with Ctrl + Z.
- Press Alt + F11 to open the Visual Basic Editor. Select your workbook in the Project Explorer.
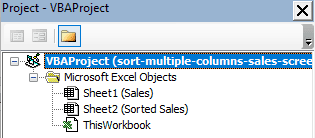
- Choose Insert > Module, then paste the code above into the new module.
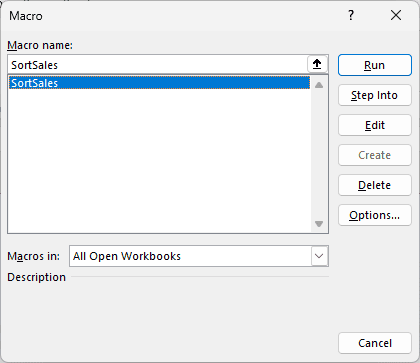
- Return to Excel with Alt + F11. Press Alt + F8, select SortSales, and click Run.
Here is the sorted result:
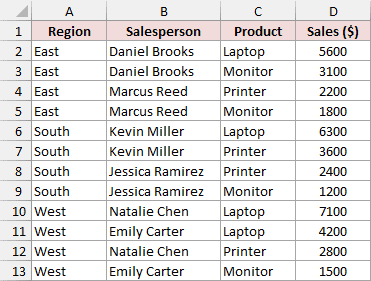
The East region comes first, with sales of $5,600, $3,100, $2,200, and $1,800. South and West follow in the same largest-to-smallest order within their own groups. Each salesperson and product stays with the correct sales amount.
To keep the VBA code for later: choose File > Save As and select Excel Macro-Enabled Workbook (*.xlsm). You can paste and test the code while the workbook is still an .xlsx file. Saving as .xlsx will not retain the VBA code.

How does this code work?
ThisWorkbook.Worksheets("Sales") identifies the worksheet in the workbook containing the code. If you use your own file, replace "Sales" with your worksheet name.
.Range("A1:D13") is the entire range Excel rearranges. It includes all four columns, so the salesperson and product move along with the region and sales amount.
Key1:=.Range("A2") makes Region the first sorting level. Order1:=xlAscending sorts the regions alphabetically. The cell A2 identifies the column; it does not mean that only that cell is sorted.
Key2:=.Range("D2") makes Sales the second level. Order2:=xlDescending puts larger amounts first, but only within rows that have the same region.
Header:=xlYes tells Excel that row 1 contains column headings and should stay at the top.
Method #2: Using the Worksheet.Sort Object
Worksheet.Sort lets you define each sorting level separately through its SortFields collection. This is useful when you expect to add more levels, especially beyond the three keys supported by Range.Sort.
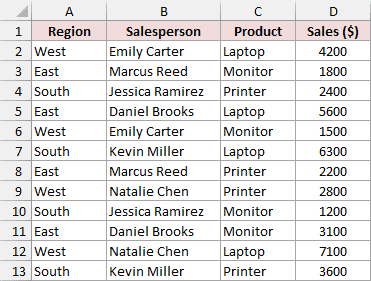
For the sales data above, I want Region sorted from A to Z and Sales sorted largest to smallest within each region. The range is A1:D13 on the Sales sheet.
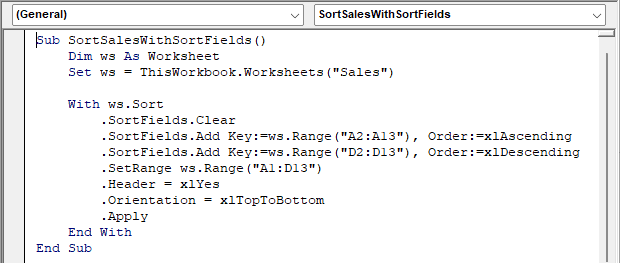
Here is the complete code. You can run this procedure on its own:
Sub SortSalesWithSortFields()
    Dim ws As Worksheet
    Set ws = ThisWorkbook.Worksheets("Sales")

    With ws.Sort
        .SortFields.Clear
        .SortFields.Add Key:=ws.Range("A2:A13"), Order:=xlAscending
        .SortFields.Add Key:=ws.Range("D2:D13"), Order:=xlDescending
        .SetRange ws.Range("A1:D13")
        .Header = xlYes
        .Orientation = xlTopToBottom
        .Apply
    End With
End Sub- Press Alt + F11, select your workbook, and choose Insert > Module. Paste the code above. If you already have a module from Method #1, you can paste this procedure below the first one.
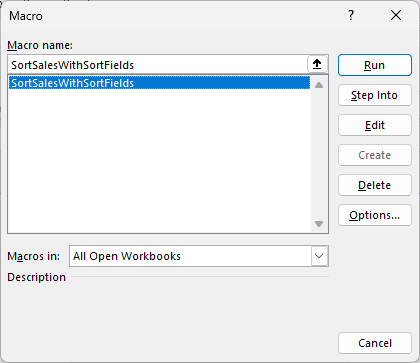
- Return to Excel with Alt + F11. Press Alt + F8, select SortSalesWithSortFields, and click Run.
The result has the same order as Method #1. If you already ran that method, the rows are already in the required order, so this macro will leave that order unchanged.
How does this code work?
.SortFields.Clear removes any previously defined sorting fields. Each .SortFields.Add line then adds a sorting level. Their order matters: Region is added first, followed by Sales.
.SetRange ws.Range("A1:D13") includes the entire set of records. .Header = xlYes keeps the headings in place, and .Orientation = xlTopToBottom makes the sort run down the rows. Finally, .Apply performs the sort.
To add another level, add another .SortFields.Add line before .Apply. Excel uses that level only when the values in all earlier levels match.
Additional Notes About Sorting Multiple Columns in VBA
Include every related column. Sorting only D2:D13 would rearrange the amounts without moving the region, salesperson, or product. Always use the complete record range.
Update the ranges when your data grows. These examples stop at row 13. If you add records, extend the main range and, for Method #2, both sort-field ranges. If you add a column, extend the main range to include it too.
Keep a copy before sorting. The download opens with the unsorted data on Sales. Sorted Sales shows the expected result for comparison. You can reopen a fresh copy of the download to try the original order again.
Use desktop Excel. Excel for the web cannot run VBA. The shortcuts above are for Windows. On a Mac, open Developer > Visual Basic, paste the code into a module, click inside the procedure, and choose Run > Run Sub/UserForm.
Use the right sort object for Excel Tables. These examples use an ordinary worksheet range. For a formatted Excel Table, use its ListObject.Sort object; Worksheet.Sort.SetRange cannot be used for a range inside a Table.
Frequently Asked Questions
Here are answers to common questions about adapting these sorts to your worksheet.
Why Do Numbers Stored as Text Sort Incorrectly?
Numbers and text are different value types, so text entries may not follow the numeric order you expect. Convert the affected source values to real numbers before sorting. Changing the display format alone does not convert stored text.
Can I Keep the Original Range Unchanged?
Yes. Copy the records to a separate area or worksheet, then qualify both the sort range and all key ranges against that destination. Range.Sort changes the cells it acts on; it does not return a separate sorted result.
Why Does SetRange Fail With an Excel Table?
SetRange is for a worksheet-range sort, not a range inside an Excel Table. Reference the Table through its ListObject and use that object’s Sort property instead. The ordinary ranges in the download do not require Table objects.
Why Does the Macro Fail on a Protected Sheet or Merged Cells?
Sheet protection can restrict sorting, and merged cells can prevent Excel from rearranging the range. Work with an unmerged record grid and confirm you have permission to sort the sheet. Keep the original file before changing its layout or protection.
Conclusion
I’ve shown you how to sort by multiple columns using Range.Sort and Worksheet.Sort, with the full records moving together. You can adapt either macro by changing the worksheet name, range, and sorting keys. I hope you found this article helpful.
Other Excel articles you may also like: