When working with Excel, you may sometimes want to rearrange your data and shift some cells down to make room for new cells.
There are multiple ways to do this, and in this article, I am going to show you all the different methods you can use to shift cells down in Excel (including a simple keyboard shortcut as well as a drag-and-drop method).
Shift Cells Down Using a Keyboard Shortcut
If you are a keyboard enthusiast, you can use the keyboard shortcut below to shift cells down in Excel.
CTRL + Shift + =
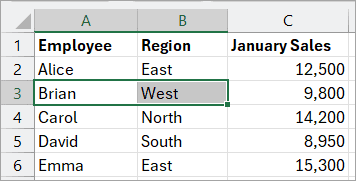
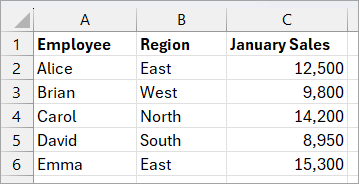
Imagine you have the dataset below.

You want to shift the cell range A3:B3 down to create room for new data.
Here are the steps to do this using the keyboard shortcut.
- Select the cell range A3:B3.
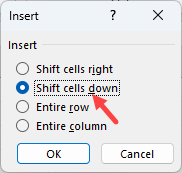
- Press the CTRL + Shift + = shortcut (all the keys together). This opens the Insert dialog box.
- Press the ‘D’ key on the keyboard to select the ‘Shift cells down’ option on the dialog box.
Note: The underlined letters on the dialog box are called accelerator keys. You can press them on your keyboard to select the corresponding options.
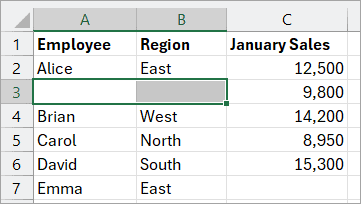
- Press Enter.
The above step moves the target cells down and inserts new cells in their place.
Shift Cells Down Using Options in the Ribbon
The Home tab on the Ribbon contains options that you can use to shift cells down in a worksheet.
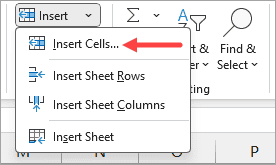
Using the Insert Cells Option
On the Ribbon’s Home tab, the Insert drop-down on the Cells group has an Insert Cells option that allows you to shift cells down in your dataset.
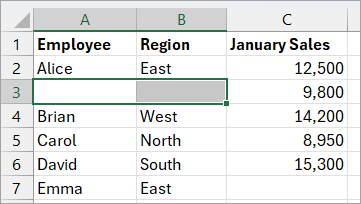
Suppose you have the dataset below.
You want to shift the cell range A3:B3 down to create room for new data.
Here’s how you do it:
- Select the cell range A3:B3.

- Click the Home tab.
- Open the Insert drop-down on the Cells group and click the Insert Cells option.
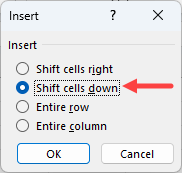
The above step opens the Insert dialog box.
- On the Insert dialog box, select the ‘Shift cells down’ option and click OK.
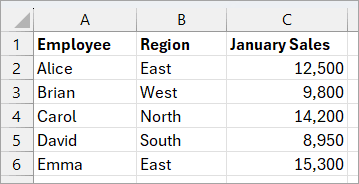
The above step shifts the target cells down and inserts new cells in their place.
Note: If you select a whole row and then do step 3 above, Excel pushes the selected row down and replaces it with a new one without prompting you.
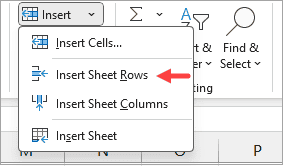
Using the Insert Sheet Rows Option on the Ribbon
Another method for shifting cells down is to insert a row. Doing so forces all cells below the inserted row to move down.
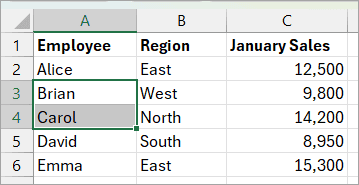
Imagine you have the dataset below.
You want to insert two new rows at rows 3 and 4, pushing the existing data downwards.
Here’s how you do it:
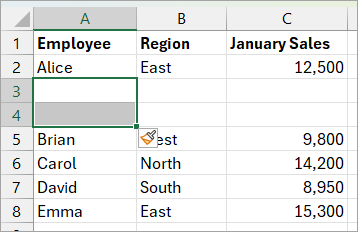
- Select the first cells in the range you want to push down (A3 and A4 in this case).
- Click the Home tab.
- Open the Insert tab on the Cells group and choose the Insert Sheet Rows option.
The above step inserts two rows at rows 3 and 4, pushing the existing range downwards.
Shift Cells Down Using Options on Right-click Menu
You can use the right-click menu to shift cells down in Excel.
It’s often more convenient than the Ribbon because you don’t have to navigate through tabs to find the Insert command.
Using the Insert Option on the Right-click Menu
Imagine you have the dataset below.

You want to shift the cell range A3:B3 down to create room for new data.
Use the steps below to achieve that:
- Select the cell range A3:B3.

- Right-click the selection and select Insert on the context menu.
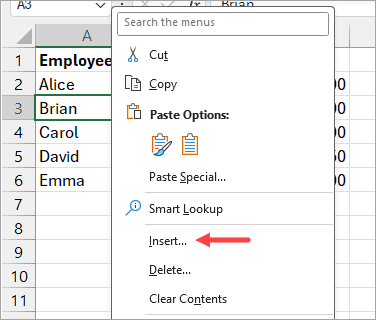
The above step opens the Insert dialog box.
- On the Insert dialog box, select the ‘Shift cells down’ option and click OK.

The above step moves the target cells down and inserts new cells in their place.

Using the Insert Cut Cells Option on the Right-click Menu
You can shift cells down by cutting and inserting cells. The Insert Cut Cells option lets you move selected cells to a new location and shift existing cells to make space without overwriting anything.
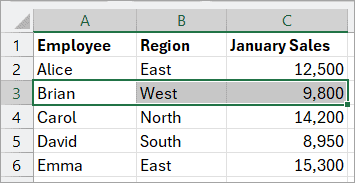
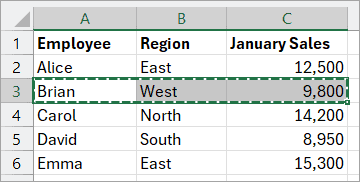
Imagine you have the dataset below.
You want to move the data in the cell range A3:C3 to the cell range A2:C2 without overwriting the existing data in the cell range A2:C2.
This is how you do it:
- Select the cell range you want to move (A3:C3 in this case).
- Press CTRL + X to cut the data.
- Right-click the destination cell (A2 in this case).
- Select the Insert Cut Cells on the context menu.
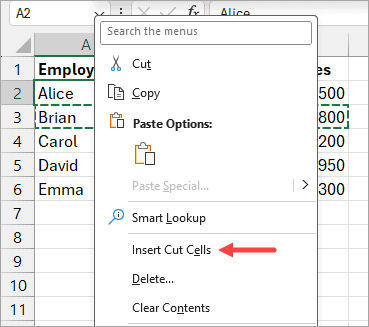
The above step inserts the cut cells at the destination cell and pushes the existing cells down.

Using the Insert Copied Cells Option on the Right-click Menu
Copying a range and choosing Insert Copied Cells lets you shift cells down. Excel inserts the copied cells in the new destination and pushes existing cells down without replacing any data.
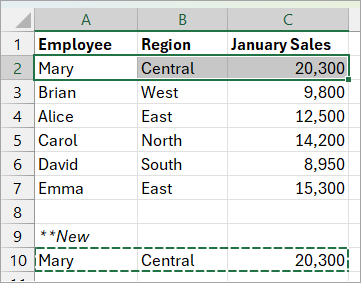
Imagine you have the dataset below.
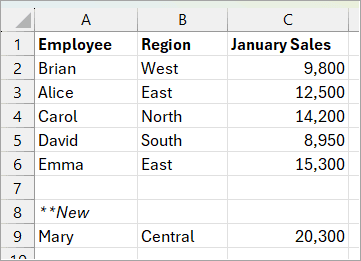
You want to copy the data in the cell range A9:C9 and paste it above the data in A2:C2, making it the first entry on the list.
Here’s how you can do it:
- Select the cell range A9:C9 and press CTRL + C to copy it.
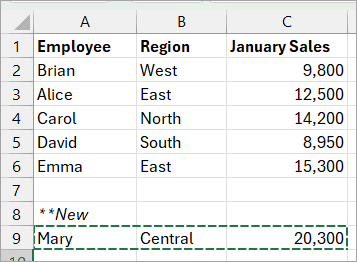
- Select the first cell in the destination range (A2 in this case).
- Right-click the selection and choose the Insert Copied Cells option on the context menu.
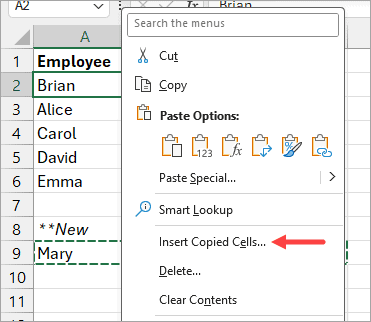
The above step opens the Insert dialog box with only two relevant options.
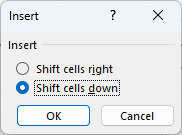
- Select the Shift cells down option and click OK.
The source range is copied to the destination range. The cells in the destination are pushed down to make room for the copied range.
Shift Cells Down Using Drag and Drop Techniques
You can use various drag-and-drop techniques to shift cells down in Excel.
Using Shift + Drag and Drop
You can shift cells down by dragging a selection while holding down the Shift key.
Like the Insert Cut Cells option on the right-click menu, this operation lets you move selected cells to a new location and shift existing cells to make space without overwriting existing data.
Suppose you have the dataset below.

You want to move the data in A3:C3 into A2:C2 without overwriting the existing values in A2:C2.
Here’s how you do it:
- Select the cell range you want to move (A3:C3 in this case).
- Hover over the border until the cursor becomes a 4-arrow move cursor.
- Hold down the Shift key.
- Drag the selection and drop it at the new location indicated by the horizontal green bar (in this case, the green bar appears between row 1 and row 2).
Excel shifts the cell range A2:C3 down to make room for the cell range being moved without inserting new cells.

Using Right-click + Drag and Drop
You can shift cells down by right-clicking a selection and dragging it to a different location.
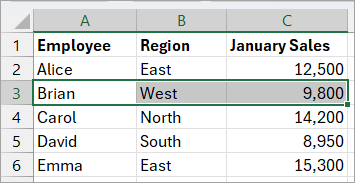
Let’s say you have the dataset below.

You want to move the data in the cell range A3:C3 to the cell range A2:C2 without overwriting the existing data in the cell range A2:C2.
Here’s how you do it:
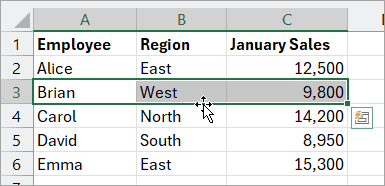
- Select the cell range you want to move (A3:C3 in this case).

- Hover over the border until the cursor becomes a 4-arrow move cursor.

- Right-click and drag to the destination cell range (A2:C2 in this case).
- Release the right-click.
The above step opens a context menu that allows you to select from several options.
- Select the Shift Down and Move option on the context menu.
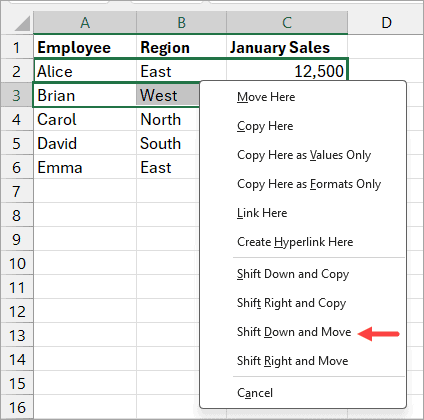
This action pushes the cells in A2:C3 down to make room for the moved range without inserting new cells.

I have shown you how to shift cells down in Excel using Ribbon commands, right-click options, drag-and-drop methods, and a keyboard shortcut. I hope you found the tutorial helpful.
Other Excel articles you may also like: