
If you have a column of values in Excel and you want to turn it into a single comma-separated list, there are a few quick ways to get there.
Copying each value by hand works for three or four cells, but it falls apart fast once the list gets long.
The good news is that Excel can join a whole column into one line for you in seconds. In this tutorial, I’ll show you four ways to do it: the TEXTJOIN function, CONCATENATE, Power Query, and a short VBA macro.
Method #1: Using the TEXTJOIN Function
TEXTJOIN is the cleanest way to do this. You give it a separator, tell it to skip blanks, point it at the column, and it hands back one joined string.
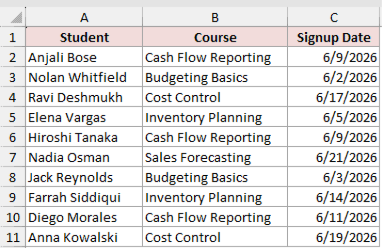
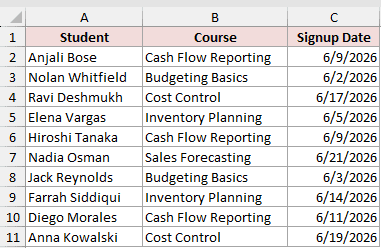
Below I have a dataset of online course signups. Column A has the student name, column B has the course, and column C has the signup date. I want to pull every name in column A into one comma-separated list.
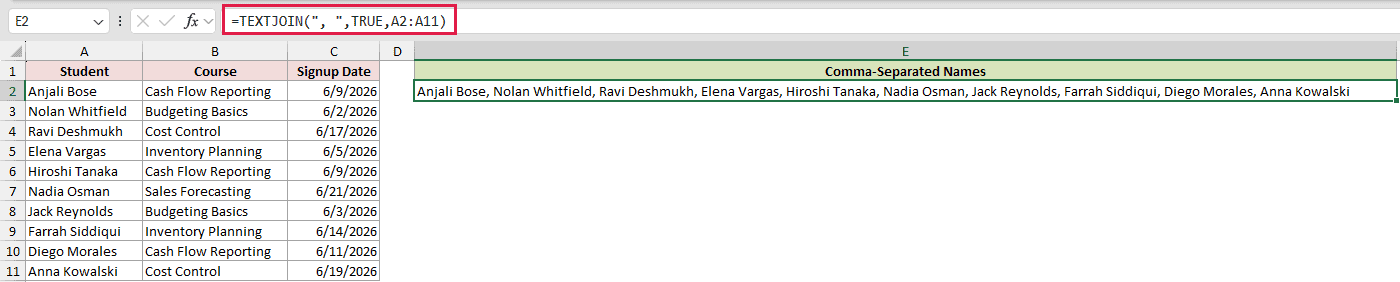
In an empty cell such as E2, enter this formula:
=TEXTJOIN(", ",TRUE,A2:A11)
How does this formula work?
TEXTJOIN takes three parts. The first is the delimiter you want between values, which is a comma and a space (“, “) here. The second is TRUE, which tells Excel to ignore any empty cells so you don’t get double commas.
The third part is the range you want to join, A2:A11. Excel walks down that range and stitches every name together into one string, dropping a comma and a space between each one. The result sits in a single cell.
Note: TEXTJOIN is available in Excel 2019, Excel 2021, and Microsoft 365. If you are on Excel 2016 or earlier, it won’t show up, so use Method #2 instead.
Method #2: Using the CONCATENATE Function
If you are on an older version of Excel that doesn’t have TEXTJOIN, CONCATENATE gets you the same result. The catch is that it can’t take a whole range, so you reference each cell one by one.
I’m using the same online course signups here. Column A has the student names, and I want them joined into one comma-separated list.
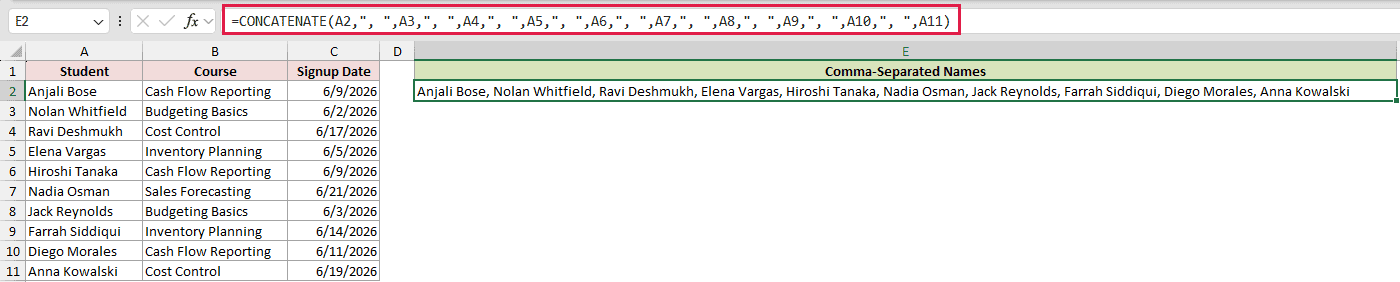
In an empty cell such as E2, enter this formula:
=CONCATENATE(A2,", ",A3,", ",A4,", ",A5,", ",A6,", ",A7,", ",A8,", ",A9,", ",A10,", ",A11)
How does this formula work?
CONCATENATE joins everything you pass to it into one string, in order. I hand it A2, then a comma and space (“, “), then A3, and so on down to A11. The literal “, ” between each cell reference is what gives you the separators.
You can get the exact same result with the ampersand operator, like =A2&", "&A3&", "&A4, which is a bit shorter to type.
The downside of both is real: with a long column you have to list every cell, so TEXTJOIN is easier when you have it.
Excel 2019 and later also has CONCAT, which does accept a whole range. It has no delimiter argument though, so you have to bolt the separator on yourself with =CONCAT(A2:A11&", "), and that leaves a trailing comma at the end. TEXTJOIN is still the better pick when it’s available.
Method #3: Using Power Query
If you’d rather not write a formula, Power Query can build the list for you. It’s a good fit when the data changes often, since you can rebuild the list with a refresh instead of editing a formula.
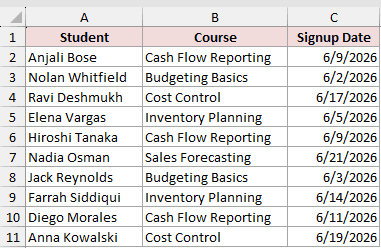
Here is the same signups dataset. I want the names in column A combined into one comma-separated list on a new sheet.
Here are the steps to convert the column using Power Query:
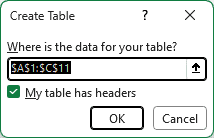
- Select any cell in the data and press Control + T to convert it into an Excel Table, then click OK.
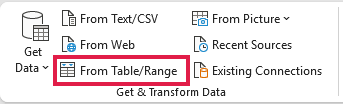
- With the table selected, go to the Data tab and click From Table/Range to open the Power Query Editor.
- Click the fx button to the left of the formula bar. This adds a new step where you can write your own formula.
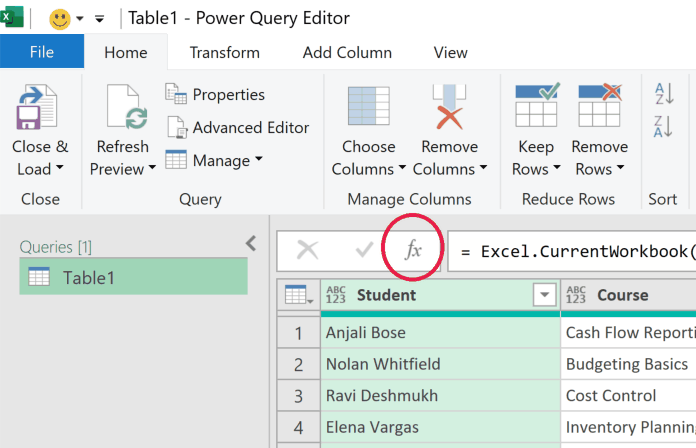
- Replace whatever is in the formula bar with the formula below and press Enter.
= Text.Combine(Source[Student],", ")

- Go to Home > Close & Load to send the result to a new sheet.
Source is the name of the first step in the query, so Source[Student] grabs the Student column out of it as a list of names. Text.Combine then joins that list into one piece of text, putting a comma and a space between each name. What lands on the new sheet is a single cell holding your comma-separated list.
One thing to watch out for. Text.Combine only accepts text, so a column of numbers or dates will throw an error. Wrap the column in Text.From and it works fine: = Text.Combine(List.Transform(Source[Student],Text.From),”, “)
Note: Power Query does not update on its own. If you add or change names in the source table, go to the Data tab and click Refresh All to rebuild the comma-separated list.
Method #4: Using VBA
If you do this often, a small macro saves you from rewriting formulas every time. This one asks you to select the column, then loops through it and builds the comma-separated string.
Here is the same online course signups dataset, with the student names in column A that I want to join.
Here is the VBA code:
Sub ConvertColumnToCommaList()
    Dim rng As Range
    Dim cell As Range
    Dim result As String

    On Error Resume Next
    Set rng = Application.InputBox("Select the column of values", Type:=8)
    On Error GoTo 0
    If rng Is Nothing Then Exit Sub

    For Each cell In rng
        If Trim(cell.Value) <> "" Then
            result = result & cell.Value & ", "
        End If
    Next cell

    If Len(result) > 0 Then
        result = Left(result, Len(result) - 2)
    End If

    MsgBox result
End SubHere are the steps to run this macro:
- Press Alt + F11 to open the VBA editor, then go to Insert > Module.
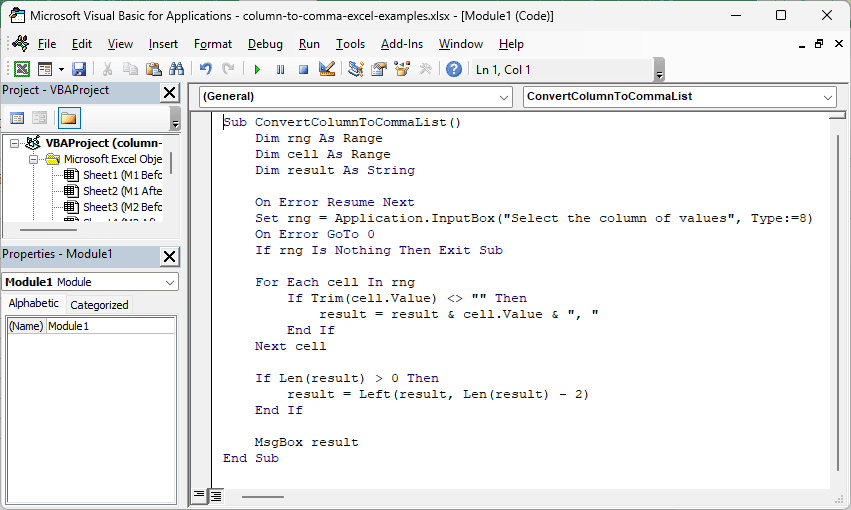
- Paste the code into the module, press F5 to run it, select the range of names when prompted, and click OK.
The macro walks down each cell in the range you picked, skips any blanks, and adds the value plus a comma and a space to a running string.
At the end it trims off the last comma and shows the finished list in a message box so you can read the result.
Note: To keep the macro, save the file as a Macro-Enabled Workbook (.xlsm). A regular .xlsx file will drop the code when you close it.
Additional Notes About Converting a Column to a Comma-Separated List in Excel
- If you want the list without any spaces after each comma, use just “,” as the separator instead of “, “. This matters when another system needs a tight comma-separated format.
- TEXTJOIN and CONCATENATE join the underlying value, not how a cell looks, so a formatted date or currency comes through as its raw number. Wrap those cells in TEXT() first, like TEXT(C2,”dd-mmm-yyyy”), to keep the format you see.
- Watch for values that already contain a comma, like “Patel, Nina”. They’ll blend into the separators and make the list hard to split back apart later.
- If your list needs to go back into separate cells one day, this is the reverse of splitting a comma-separated value across columns, so keep a copy of the original column.
- If the list is headed for a database query, wrap each value in quotes with
=TEXTJOIN(", ",TRUE,CHAR(34)&A2:A11&CHAR(34)). CHAR(34) is a double quote, so you get “Anjali Bose”, “Nolan Whitfield” and so on.
Frequently Asked Questions
Can I convert a column to a comma-separated list without writing a formula?
Yes. Power Query (Method #3) does it through the interface with no formula in the sheet, and the VBA macro (Method #4) does it with a single click once it’s set up.
How do I add both commas and line breaks between the values?
Use TEXTJOIN with CHAR(10) added to your delimiter, like =TEXTJOIN(", "&CHAR(10),TRUE,A2:A11), then turn on Wrap Text for the result cell so the line breaks show.
How do I build a separate comma-separated list for each group?
Add a condition inside TEXTJOIN. =TEXTJOIN(", ",TRUE,IF(B2:B11="Cash Flow Reporting",A2:A11,"")) joins only the students on the Cash Flow Reporting course. In Power Query, do it by grouping on the real Course column in Method #3 instead of the constant Group column, which gives you one list per course in a single table.
Does TEXTJOIN work in older versions of Excel like 2016?
No. TEXTJOIN starts in Excel 2019 and is in Excel 2021 and Microsoft 365. On Excel 2016 or earlier, use the CONCATENATE method or the ampersand operator instead.
Conclusion
Turning a column into a comma-separated list is quick once you know the routes. Reach for TEXTJOIN first if you have Excel 2019 or later, and fall back to CONCATENATE on older versions.
Use Power Query or VBA when the data changes often, or when you find yourself doing this a lot.
Other Excel articles you may also like:
