
A pipe-delimited text file puts each row on its own line, with | between values.
A bank or payroll system may ask for this format when you send it data from Excel.
Excel’s Save As list has no pipe-delimited option, so you need a workaround to create the file.
I’ll cover copying into Notepad and changing the Windows list separator to save as CSV. You can also use a TEXTJOIN formula or a VBA macro.
Method #1: Copying the Data Into Notepad
I’d use Notepad for most exports. You don’t need to change settings or write formulas, and copying doesn’t wrap values containing commas in quote marks.
When you copy cells, Excel puts a tab between their values. I’ll replace those tabs with pipes in Notepad.
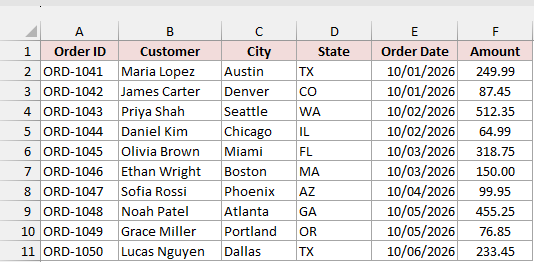
Below I have a dataset of orders in A1:F11, and I want to send the order list as a pipe-delimited text file.
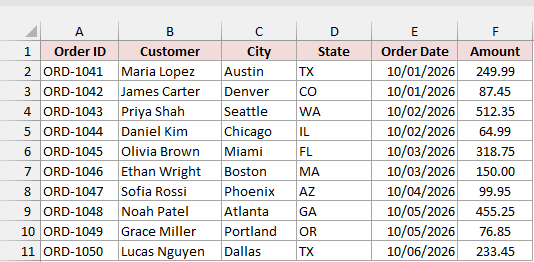
Here are the steps to turn the copied data into a pipe-delimited file:
- Select the data, including the headers (A1:F11 here), and press Ctrl + C.
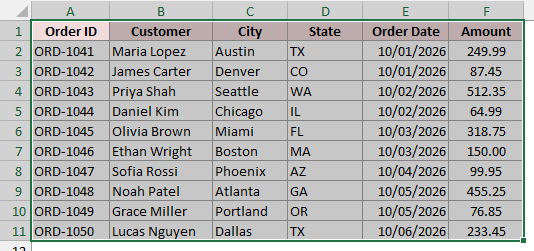
- Open Notepad and press Ctrl + V. The data lands with a tab between the values.
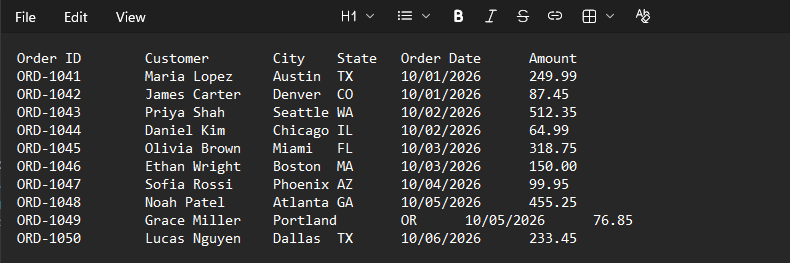
- Click just after Order ID in the first line and press Shift + Right Arrow to select the tab. Press Ctrl + C to copy it.
- Press Ctrl + H, click in the Find box, and press Ctrl + V to paste the tab. The Find box looks empty because the tab is invisible, but it’s there. Type
|in the Replace box, then click Replace all. On a US keyboard, type|with Shift + the backslash key above Enter.
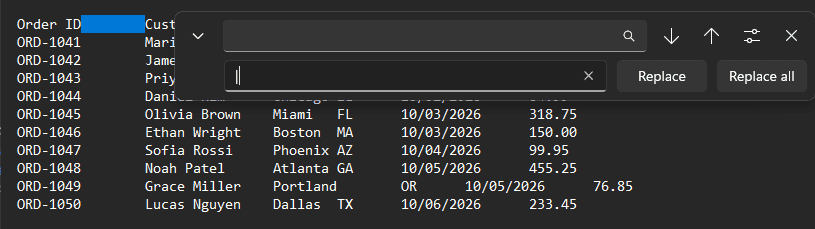
Every tab turns into a pipe, so each row now has a | between its values.
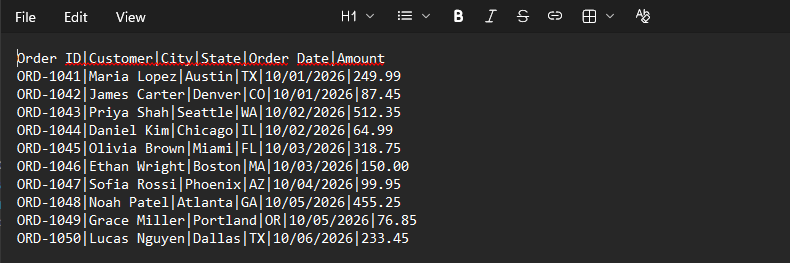
- Press Ctrl + S, type a name such as Orders.txt, and click Save.
Note: When Excel saves a CSV or tab-delimited file, it wraps values containing commas or quote marks in double quotes, such as “Smith, John”. Replacing separators afterward leaves those added quotes in your pipe file. Copying the cells into Notepad doesn’t add them.
Method #2: Changing the Windows List Separator
If you want Excel itself to write the file, you can change the character Windows uses to separate values in CSV files.
Windows calls this the list separator. Set it to |, and Excel’s Save As CSV option uses pipes between the values.
Below I have a dataset of orders in A1:F11, and I want to save the order list as a pipe-delimited file using Excel’s CSV option.
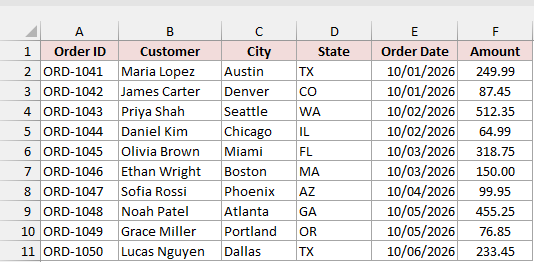
Here are the steps to change the separator and save the file:
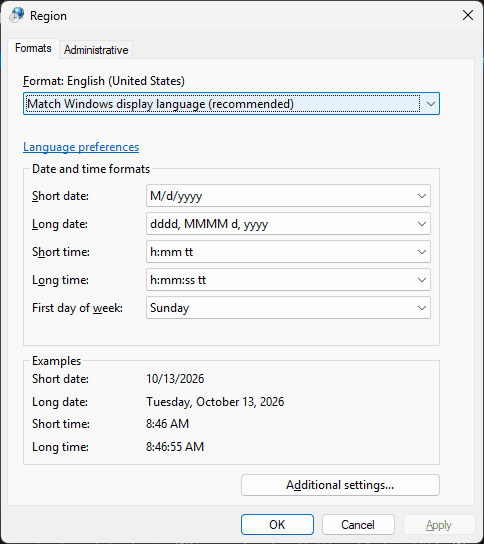
- Press Windows + R, type intl.cpl, and press Enter. In the Region dialog, click Additional settings…
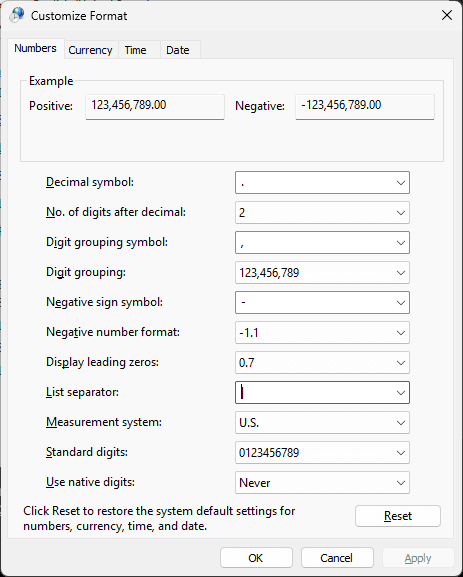
- On the Numbers tab, replace the current character (a comma on US settings) in the List separator box with
|. Click OK, then OK again.
- If Excel was open, close it and open your workbook again so it picks up the changed separator.
Excel saves only the active sheet to CSV, so select the sheet you want to export before saving.
- Press F12, set Save as type to CSV (Comma delimited) (*.csv), name the file Orders, and click Save.
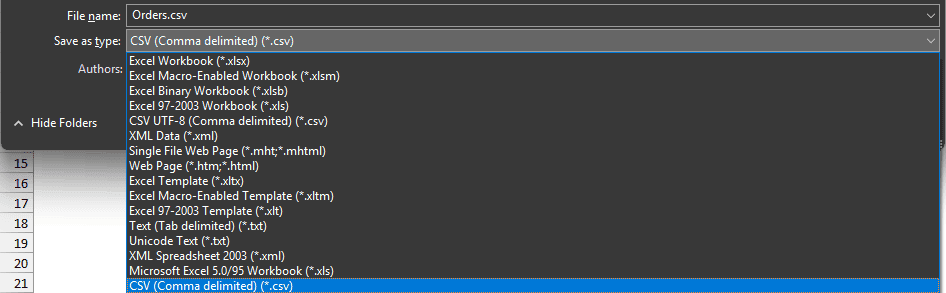
- If Excel warns about losing features or saving only the active sheet, click OK or continue. The warning only affects this CSV copy.
Open the saved file in Notepad, and you’ll see pipes between the values, despite the CSV option’s “Comma delimited” name.
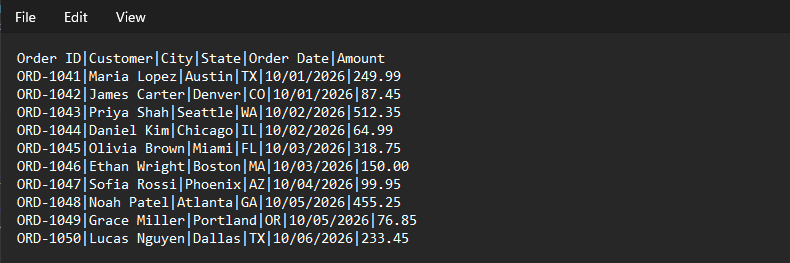
The file ends in .csv. Rename its extension to .txt in File Explorer if the receiving system asks for a .txt file.
Note: Change the list separator back to a comma when you’re done, using the same dialog. It’s a machine-wide setting, so other programs that read or write CSV files use | too. Excel also expects | between formula arguments: =SUM(A1,B1) would need to be typed as =SUM(A1|B1).
Method #3: Using the TEXTJOIN Function
When the receiving system wants dates such as 2026-10-01 or amounts with two decimal places, I use a formula to build each export line.
TEXTJOIN combines values into one line with a separator between them. The lines update when your data changes, which helps when you export the same layout repeatedly.
Below I have a dataset of orders in A1:F11 on the TEXTJOIN Method sheet, with dates shown as 10/01/2026.
I want to build one pipe-delimited line per row.
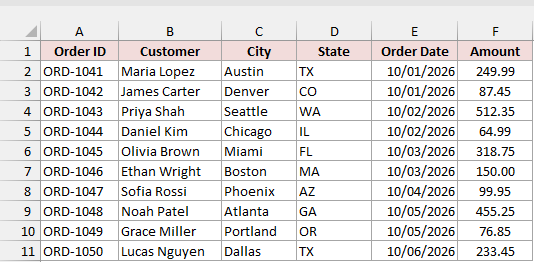
Enter this formula in G1 and copy it down to G11:
=TEXTJOIN("|",FALSE,A1:D1,TEXT(E1,"yyyy-mm-dd"),TEXT(F1,"0.00"))
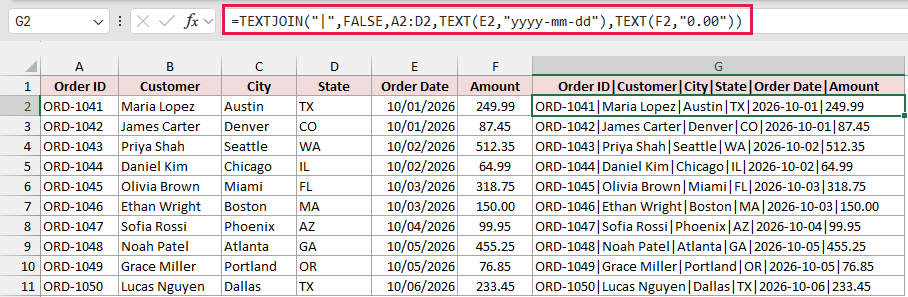
The formula returns one line for its own row, so I copy it down column G. It doesn’t spill.
G1 returns the header line, and G2 returns ORD-1041|Maria Lopez|Austin|TX|2026-10-01|249.99.
How does this formula work?
I use "|" as the separator, so TEXTJOIN puts a pipe between the values it joins.
FALSE keeps empty cells in their positions. A blank creates two pipes in a row; using TRUE would skip it and shift later values left.
A1:D1 covers the text columns, from Order ID through State. I can join those values without changing their format.
For the date column, TEXT(E1,"yyyy-mm-dd") returns text in the format 2026-10-01. For the amount, TEXT(F1,"0.00") keeps two decimal places.
TEXT leaves the header text unchanged, so I can use the same formula for the headers and all ten orders.
Here are the steps to save the lines as a text file:
- Select G1:G11 and press Ctrl + C.
- Open Notepad and press Ctrl + V. Press Ctrl + S, name the file Orders.txt, and click Save.
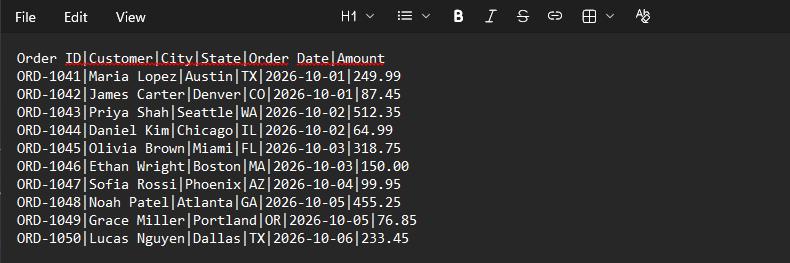
Copying formula cells into Notepad pastes their results, so the file contains the eleven export lines rather than Excel formulas.
Note: TEXTJOIN joins the underlying cell values, not what the cells show. Without TEXT, the ORD-1046 line would read ORD-1046|Ethan Wright|Boston|MA|46298|150. The date becomes a serial number, and 150.00 becomes 150.
TEXTJOIN needs Excel 2019 or later, including Microsoft 365.
Method #4: Using a VBA Macro
If you export pipe-delimited files often, you can run a VBA macro to write the file without opening Notepad.
A macro is code you run inside Excel. I’ll use it to write one text line for each row on the active sheet.
Below I have a dataset of orders in A1:F11 on the Orders sheet, and I want to export the list to Orders.txt.
Here is the VBA code:
Sub ExportPipeDelimited()
    Dim ws As Worksheet
    Dim dataRange As Range
    Dim filePath As String
    Dim lineText As String
    Dim r As Long, c As Long
    Dim fileNum As Integer

    If ActiveWorkbook.Path = "" Then
        MsgBox "Save the workbook first, then run this macro again."
        Exit Sub
    End If

    Set ws = ActiveSheet
    Set dataRange = ws.UsedRange
    filePath = ActiveWorkbook.Path & "\" & ws.Name & ".txt"

    fileNum = FreeFile
    Open filePath For Output As #fileNum

    For r = 1 To dataRange.Rows.Count
        lineText = ""
        For c = 1 To dataRange.Columns.Count
            If c > 1 Then lineText = lineText & "|"
            lineText = lineText & dataRange.Cells(r, c).Text
        Next c
        Print #fileNum, lineText
    Next r

    Close #fileNum
    MsgBox "Saved " & filePath
End SubSave the workbook before running the macro.
Save it in a folder on your computer; OneDrive or SharePoint paths return web addresses, which stop the macro with a “Bad file name or number” error.
It writes into the workbook’s folder and overwrites any existing text file with the same sheet name.
Here are the steps to use this macro:
- Press Alt + F11 to open the VBA editor.
- Click Insert > Module.
- Paste the code.
- Go back to the sheet you want to export (Orders here). Press Alt + F8, select ExportPipeDelimited, and click Run.
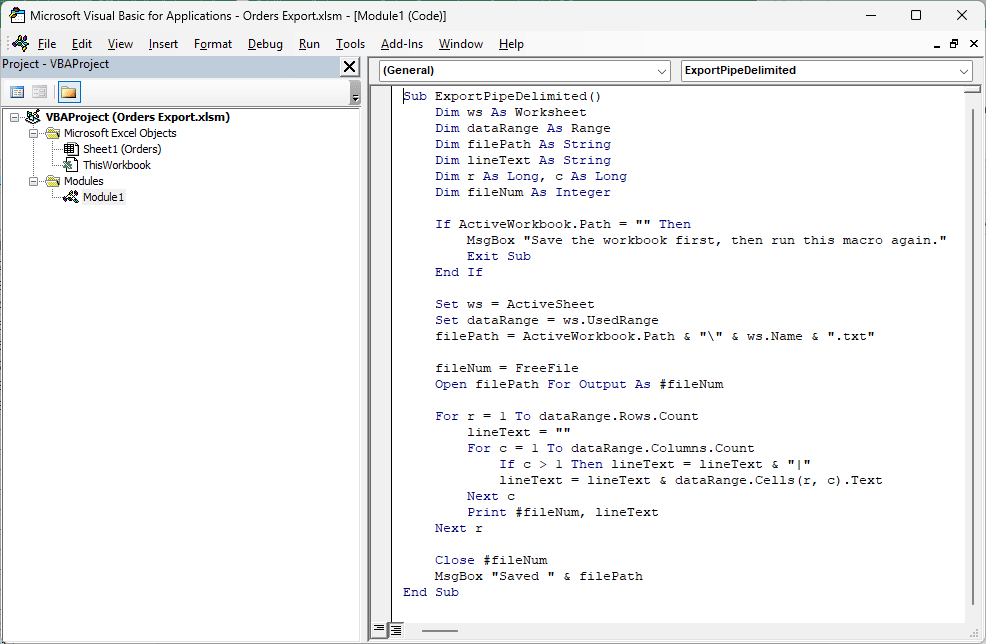
The macro works through every row in the active sheet’s used range. For each row, it joins the cells’ displayed text with | and writes a line.
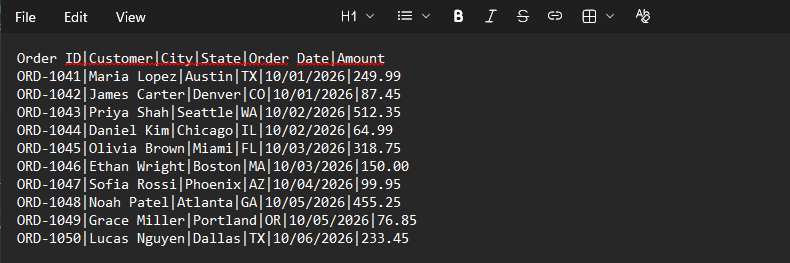
It names the text file after the sheet, so you get Orders.txt in the workbook’s folder. A message shows you the saved file’s path.
Orders.txt now has one pipe-delimited line per row.
Save your workbook as .xlsm to keep the macro.
The code uses .Text, which exports what each cell shows. Widen any column showing #### before running it, or those hashes will appear in the file.
Additional Notes About Exporting Excel to a Pipe-Delimited File
- Every method exports values rather than formulas, and only one sheet at a time.
- Check for a
|inside any value before exporting. Press Ctrl + F and search for|, since the receiving system would treat it as another column break. - Methods #1, #2, and #4 export values as displayed. Set your date and number formats before you export.
- Method #2 and VBA use the system’s ANSI character set, so Chinese characters or emoji can become question marks. I’d use Method #1 because Notepad saves UTF-8.
Frequently Asked Questions
Here are answers to a few questions about pipe-delimited files.
Can Excel save a pipe-delimited file directly?
No. Excel’s Save as type list has no pipe-delimited option. You need one of the workarounds above to create the file.
How do I open a pipe-delimited file in Excel?
On the Data tab, click From Text/CSV and pick your file. If Excel doesn’t split the columns automatically, choose –Custom– in the Delimiter list and type |.
Should the file be .txt or .csv?
Use the extension the receiving system asks for. The pipe-delimited content is the same either way; you can rename the extension if needed.
Conclusion
I’ve covered Notepad and the Windows list separator, plus a TEXTJOIN formula and a VBA macro.
I’d use Notepad for most exports and VBA when it’s a regular job.
I hope you found this article helpful.
Other Excel articles you may also like:
