You should remove the headers and footers from your Excel reports when they add no value to the printed document or make it look cluttered and unprofessional.
As shown in the example report below, the header and footer add no value and should be removed because the same information is already clearly displayed in the worksheet itself.
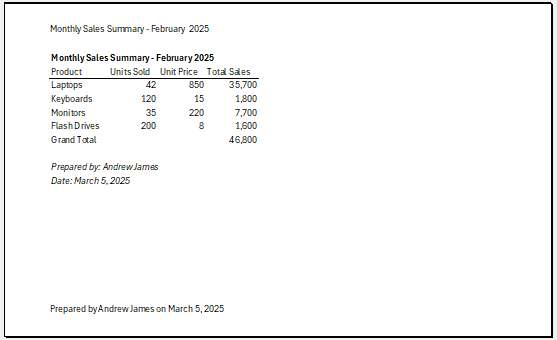
I will show you how to remove unnecessary headers and footers in Excel by deleting or hiding them from view using the example report above.
Remove Header and Footer by Deleting Them
You can delete the header and footer from your Excel report manually or using VBA.
Manually Delete Header and Footer
You can use the steps below to delete the header and footer from the current sheet:
- Open the View tab.
- Click the Page Layout command button on the Workbook Views group.
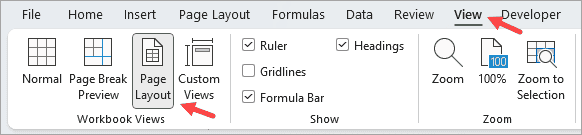
Alternatively, click the Page Layout icon on the bottom left of the Status bar.

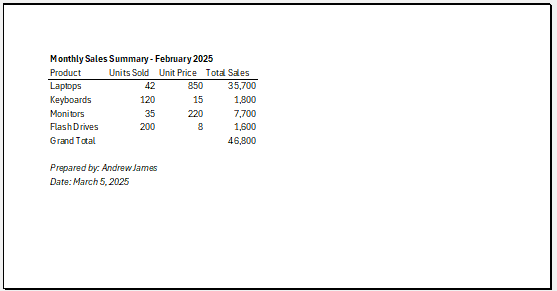
The above steps switch the worksheet to Page Layout view, where the header and footer become visible and editable.
Notice that the header or footer has three sections: Left, Center, and Right.
Header:

Footer:

- Click inside the header and footer sections with text or codes like &[Page], &[Date].
- Select the text or codes and press the Delete or Backspace key.
- Switch to Normal view as needed.
The above step removes the header and footer, leaving your report clean and professional.
Deleting the Header and Footer from Multiple Sheets
If you want to delete the header and footer from multiple sheets, first group the sheets, then follow the same steps as above.
To group sheets, click the tab of the first sheet, hold down the CTRL key, and click the tabs of the other sheets you want to include in the group.
Remember to ungroup the sheets when you’re finished by clicking any tab outside the grouped selection.
Delete Header and Footer Using VBA
Use the VBA code below to delete the header and footer from the active sheet:
Sub DeleteHeaderAndFooter()
    With ActiveSheet.PageSetup
        .LeftHeader = ""
        .CenterHeader = ""
        .RightHeader = ""
        .LeftFooter = ""
        .CenterFooter = ""
        .RightFooter = ""
    End With
End Sub
You can use the VBA code below to delete the header and footer from all sheets in the workbook:
Sub RemoveHeadersAndFootersFromAllSheets()
Dim ws As Worksheet
    For Each ws In ThisWorkbook.Worksheets
        With ws.PageSetup
            .LeftHeader = ""
            .CenterHeader = ""
            .RightHeader = ""
            .LeftFooter = ""
            .CenterFooter = ""
            .RightFooter = ""
        End With
    Next ws
End Sub
Remove Header and Footer by Hiding Them
You may prefer to hide the header and footer rather than delete them, so you can reinstate them later if needed.
Hide Header and Footer from Page Layout View
You can follow the steps below to hide the header and footer from Page Layout view:
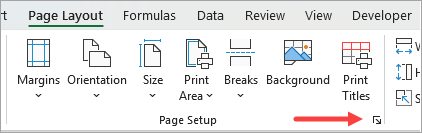
- Open the Page Layout tab.
- Click the Page Setup dialog box launcher on the bottom right of the Page Setup group.
The above step opens the Page Setup dialog box.
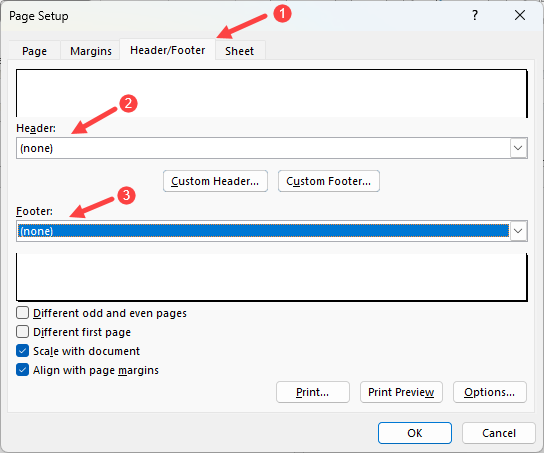
- Do the following on the Page Setup dialog box:
- Open the Header/Footer tab.
- Open the Header drop-down and select ‘none’.
- Open the Footer drop-down and select ‘none’.
- Click OK.
The above steps prevent the header and footer from being displayed during printing without deleting their underlying content.
Hide the Header and Footer from Print Preview
You can follow the steps below to hide the header and footer from Print Preview:
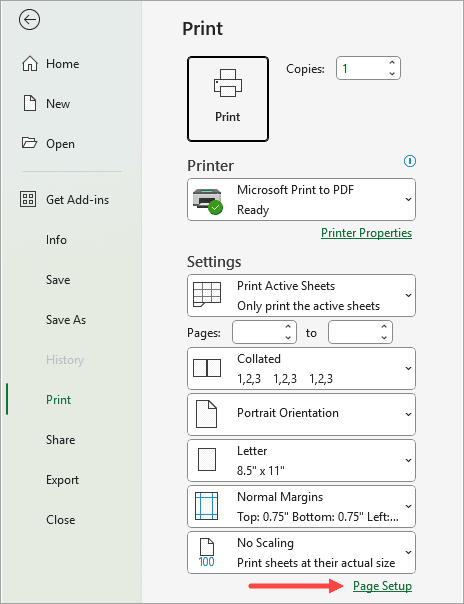
- Press CTRL + P to open Print Preview.
- Click Page Setup on the Print panel.
The above step opens the Page Setup dialog box.
- Do the following on the Page Setup dialog box:
- Open the Header/Footer tab.
- Open the Header drop-down and select ‘none’.
- Open the Footer drop-down and select ‘none’.
- Click OK.
I have shown you how to remove the header and footer in Excel. I hope you found the tutorial helpful.
Other Excel articles you may also like: