There may be instances where you need to add the same text to all cells in a column.
You might need to add a particular title before names in a list, or a particular symbol at the end of the text in every cell.
The good thing is you don’t need to do this manually.
Excel provides some really simple ways in which you can add text to the beginning and/ or end of the text in a range of cells.
In this tutorial we will see 4 ways to do this:
- Using the ampersand operator (&)
- Using the CONCATENATE function
- Using the Flash Fill feature
- Using VBA
So let’s get started!
Method 1: Using the ampersand Operator
An ampersand (&) can be used to easily combine text strings in Excel.
Let’s see how you use it to add text at the beginning or end or both in Excel.
Using the ampersand Operator to Add Text to the Beginning of all Cells
The ampersand (&) is an operator that is mainly used to join several text strings into one.
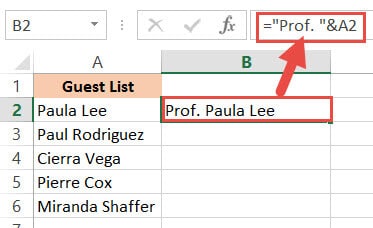
Here’s how you can use it to add text to the beginning of all cells in a range. Let us assume you have the following list of names and want to add the title “Prof.” before every name:

Below are the steps to add a text before a text string in Excel:
- Click on the first cell of the column where you want the converted names to appear (B2).
- Type equal sign (=), followed by the text “Prof. “, followed by an ampersand (&).
- Select the cell containing the first name (A2).
- Press the Return Key.
- You will notice that the title “Prof.” is added before the first name in the list.

- It’s now time to copy this formula to the rest of the cells in the column. Simply double click the fill handle (located at the bottom right of cell B2). Alternatively, you can drag down the fill handle to achieve the same effect.
That’s it, all your cells in column B should now contain the title “Prof.” preceding each name.

Using the ampersand Operator to Add Text to the End of all Cells
Now let us see how to add some text to the end of every name in the dataset. Let us say you want to add the text “(MD)” at the end of every name. In that case, here are the steps you need to follow:
- Click on the first cell of the column where you want the converted names to appear (C2 in our case).
- Type equal sign (=)
- Select the cell containing the first name (B2 in our case).
- Next, insert an ampersand (&), followed by the text “ (MD)”.
- Press the Return Key.
- You will notice that the text “(MD).” added after the first name in the list.

- It’s now time to copy this formula to the rest of the cells in the column. Simply double click the fill handle (located at the bottom right of cell C2). Alternatively, you can drag down the fill handle to achieve the same effect.

All your cells in column C should now contain the text “(MD”) at the end of each name.

Also read: How to Convert to Sentence Case in Excel?
Method 2: Using the CONCATENATE Function
CONCATENATE is an Excel function that you can use to add text at the beginning and end of the text string.
Let’s see how to use CONCATENATE to do this.
Using CONCATENATE to Add Text to the Beginning of all Cells
The CONCATENATE() function provides the same functionality as the ampersand (&) operator. The only difference is in the way both are used.
The general syntax for the CONCATENATE function is:
=CONCATENATE(text1, [text2], …)
Where text1, text2, etc. are substrings that you want to combine together.
Let’s apply the CONCATENATE function to the same dataset as above:
- Click on the first cell of the column where you want the converted names to appear (B2).
- Type equal sign (=).
- Enter the function CONCATENATE, followed by an opening bracket (.
- Type the title “Prof. ” in double-quotes, followed by a comma (,).
- Select the cell containing the first name (A2)
- Place a closing bracket. In our example, your formula should now be: =CONCATENATE(“Prof. “,A2).
- Press the Return Key.
- You will notice that the title “Prof.” is added before the first name on the list.

- It’s now time to copy this formula to the rest of the cells in the column. Simply double click the fill handle (located at the bottom right of cell B2). Alternatively, you can drag down the fill handle to achieve the same effect.

That’s it, all your cells in column B should now contain the title “Prof.” preceding each name.

Using CONCATENATE to Add Text to the End of all Cells
Now let us see how to add some text to the end of every name in the dataset. Let us say you want to add the text “(MD)” at the end of every name. In that case, here are the steps you need to follow:
- Click on the first cell of the column where you want the converted names to appear (C2 in our example).
- Type equal sign (=).
- Enter the function CONCATENATE, followed by an opening bracket (.
- Select the cell containing the first name (B2 in our example).
- Next, insert a comma, followed by the text “ (MD)”.
- Place a closing bracket. In our example, your formula should now be: =CONCATENATE(B2,” (MD)”).
- Press the Return Key.
- You will notice that the text “(MD).” added after the first name in the list.

- It’s now time to copy this formula to the rest of the cells in the column. Simply double click the fill handle (located at the bottom right of cell C2).

All your cells in column C should now contain the text “(MD”) at the end of each name.

Notice that since you’re using a formula, your column C depends on columns A and B. So if you make any changes to the original values in column A, they get reflected in column C.
If you decide to only retain the converted names and delete columns A and B, you will get an error, as shown below:

To make sure that this does not happen, it’s best to first convert the formula results to permanent values copying them and pasting them as values in the same column (Right-click and select Paste Options->Values from the Popup menu).

Now you can go ahead and delete columns A and B if you need to.
Also read: How to Remove First Character in Excel?
Method 3: Using the Flash Fill Feature
Flash fill is a relatively new feature that looks at the pattern of what you are trying to achieve and then does it for all the cells in a column.
You can also use Flash fill to so text manipulation as we will see in the following examples.
Using Flash Fill to Add Text to the Beginning of all Cells
The Excel flash fill feature is like a magical button. It is available if you’re on any Excel version from 2013 onwards.
The feature takes advantage of Excel’s pattern recognition capabilities. It basically recognizes a pattern in your data and automatically fills in the other cells of the column with the same pattern for you.
Here’s how you can use Flash Fill to add text to the beginning of all cells in a column:
- Click on the first cell of the column where you want the converted names to appear (B2).
- Manually type in the text Prof. , followed by the first name of your list.

- Press the Return Key.
- Click on cell B2 again.
- Under the Data tab, click on the Flash Fill button (in the ‘Data Tools’ group). Alternatively, you can just press CTRL+E on your keyboard (Command+E if you’re on a Mac).


This will copy the same pattern to the rest of the cells in the column… in a flash!

Using Flash Fill to Add Text to the End of all Cells in a Column
If you want to add the text “ (MD)” to the end of the names, follow the same steps:
- Click on the first cell of the column where you want the converted names to appear (C2).
- Manually type in or copy the text from column B2 into C2.
- Add the text “(MD)” after that.

- Under the Data tab, click on the Flash Fill or press CTRL+E on your keyboard (Command+E if you’re on a Mac).

That’s all, you get every cell filled in with the same pattern!

We especially like this method because it is simple, quick, and easy. Moreover, since it’s formula-free, the results do not depend on the original columns.
So they remain unchanged even if you delete rows A and B!

Also read: Remove the Last 4 Characters in Excel
Method 4: Using VBA Code
And, of course, if you’re comfortable with VBA, you can also add text before or after a text string using it.
Using VBA to Add Text to the Beginning of all Cells in a Column
If coding with VBA does not intimidate you then this method can help get your work done quickly too.
Here’s the code we will be using to add the title “Prof. “ to the beginning of all cells in a range. You can select and copy it:
Sub add_text_to_beginning()
Dim rng As Range
Dim cell As Range
Set rng = Application.Selection
For Each cell In rng
cell.Offset(0, 1).Value = "Prof. " & cell.Value
Next cell
End SubFollow these steps to use the above code:
- From the Developer Menu Ribbon, select Visual Basic.
- Once your VBA window opens, Click Insert->Module. Now you can start coding. Type or copy-paste the above lines of code into the module window. Your code is now ready to run.
- Select the range of cells containing the text you want to convert. Make sure the column next to it is blank because this is where the code will display the results.
- Navigate to Developer->Macros-> add_text_to_beginning->Run.
You will now see the converted text next to your selected range of cells.
Note: You can change the text in line 6 from “Prof. ” to whatever text you need to add to the beginning of all cells.
Using VBA to Add Text to the End of all Cells in a Column
Now, what if you want to add text to the end of all the cells, instead of the beginning? This only involves making a tweak to line 6 of the above code. So if you want to add the text “ (MD)” to the end of all cells, change line 6 to:
cell.Offset(0, 1).Value = cell.Value & “ (MD)”
So your full code should now be:
Sub add_text_to_end()
Dim rng As Range
Dim cell As Range
Set rng = Application.Selection
For Each cell In rng
cell.Offset(0, 1).Value = cell.Value & " (MD)"
Next cell
End SubHere’s the final result:
You can now delete the first two columns if you need to. Do remember to keep a backup of your sheet, because the results of VBA code are usually irreversible.
Note: You can change the text in line 6 from “ (MD)” to whatever text you need to add to the end of all cells in the range.
In this tutorial, we showed you four ways in which you can add text to the beginning and/ or end of all cells in a range.
There are plenty of other methods that you can find online too, and all of them work just as well as the ones shown here.
You may feel free to choose whatever method suits you, your requirement, and your version of Excel. In the end, what matters is getting what you need to be done quickly and effectively.
Other Excel tutorials you may like:
- How to Remove Text after a Specific Character in Excel
- How to Reverse a Text String in Excel
- How to Count How Many Times a Word Appears in Excel
- How to Remove Commas in Excel (from Numbers or Text String)
- How to Remove a Specific Character from a String in Excel
- How to Change Uppercase to Lowercase in Excel
- How to Separate Address in Excel?
- How to Concatenate with Line Breaks in Excel?
- How to Separate Names in Excel
Hi Steve, love your two websites. I have an apps script query and tried emailing you but it bounced. Wondering if you may be open to helping me troubleshoot my current issue. I’d like to look at the previous value of a cell and copy that value into another cell on another sheet. I am sure its simple – sorry wasnt sure where to put this comment as geosheets doesn’t have a comment section. Thanks!