In Excel, you can change the cell color based on the value of another cell using conditional formatting.
For example, you can highlight the names of sales reps in column A based on whether their sales are more than 450,000 or not (which is a value we have in cell D2).
This tutorial covers three techniques for changing cell color based on the value of another cell in Excel.
Change Cell Color Based on Value in Another Cell (Using Formula)
Conditional Formatting is a feature in Excel that allows you to format cells based on particular criteria or conditions.
If the specified criteria are met, conditional formatting will highlight the cell; else, it will not.
While in most cases, conditional formatting is used to highlight cells based on the values in the cells themselves, you can also color these cells based on values in some other cell or column.
Let’s see two methods you can use to apply conditional formatting to change cell color based on the value in another cell.
Method 1 – Using Formula within Conditional Formatting
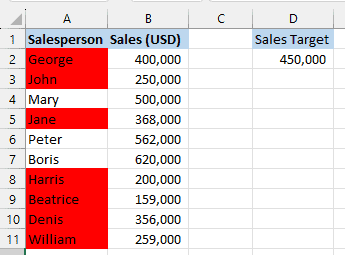
Suppose we have the following dataset showing the sales data of particular salespeople.

In the above data set, I want to highlight the name of those salespersons whose sale value is less than the sales target (the value of which is in cell D2)
So we want conditional formatting to compare the sales values of each sales rep with the value in cell D2 and then highlight the cell in red color if the sales of that person are less than the value in cell D2.
Let’s learn how to do this in Excel using a simple formula in conditional formatting:
- Select the cell range A2:A11 containing the names of salespeople.

- On the Home tab, open the Conditional Formatting drop-down on the Styles group and click on the New Rule option:

- On the New Formatting Rule dialog box, select ‘Use a formula to determine which cell to format‘ option on the Select a Rule Type box:

- Enter the following formula on the Format values where this formula is true box:
=$B2<$D$2

- Click the Format button next to the Preview box, open the Fill tab on the Format Cells dialog box that pops up, select the red background color on the color palette, and click OK.

- Click OK on the New Formatting Rule dialog box.
The process above compares the sales figure of each salesperson in column B to the value in cell D2, and if the sales figure is less than the value in cell D2, the cell containing the name of the salesperson is highlighted in red (as shown below):
One good thing about Conditional Formatting is that it’s dynamic. So, if you change the target sales in cell D2, the formatting in the dataset will change accordingly.
For example, if we change the target sales figure to 350,000, the formatting updates as depicted below:

Explanation of the Formula
=$B2<$D$2
Note: We have applied the formula to column C of the dataset so that we can explain how it works:

We selected the names in column A and then applied the conditional formatting rule to it.
Now, Conditional Formatting goes through each cell in the selected range and checks whether the condition is TRUE for that cell or not.
If the condition is TRUE, the selected cell color is applied, else it’s not.
In this example, the formula compares each sales figure in column B with the sales target value in cell D2. If the sales figure is less than the target sales value, the formula returns TRUE, and the conditional formatting feature highlights the cell containing the salesperson’s name in red.
Otherwise, the formula returns FALSE, and the conditional formatting feature leaves the cell containing the salesperson’s name as is.
The dollar sign in the cell reference $B2 locks down column B so that it does not change as the formula is copied down the column.
However, row reference 2 does not have a dollar sign and is, therefore, relative and changes to refer to different rows as the formula is copied down the column.
The dollar signs in the cell reference $D$2 make it absolute, so the formatting feature will refer to the same cell containing the target sales as the formula is copied down the column.
Note: In this example, I have used the value in cell D2 To compare the sales values in column B. You can also hard code this value in the formula and condition formatting. For example, you can use the following formula =$B2<$D$2
Also read: Using Conditional Formatting with OR Criteria in Excel
Method 2 – Using the ‘Format Cells that Contain’ Option
Conditional formatting also has an option called ‘Format Cells that Contain’ that allows you to highlight cells that have values that is more than, less than, or equal to a value in any other cell (or in between two values)
Let’s consider the dataset below showing the sales figures of various salespeople.
In this data set, I want to compare the sales values in column B with the sale value in cell D2 And highlight all those cells that have a value more than that of D2.
Below are the steps you can follow to do this:
- Select the cell range B2:B11 containing the sales values:

- On the Home tab, open the Conditional Formatting drop-down on the Styles group and choose New Rule:
- On the New Formatting Rule dialog box, select the “Format only cells that contain” option on the Select a Rule Type box:

- On the Edit the Rule Description box, open the comparison drop-down and choose less than:

- Type the following formula in the box next to the comparison drop-down:
=$D$2

- Click the Format button next to the Preview box, open the Fill tab on the Format Cells dialog box that pops up, select the red background color on the color palette, and click OK.
- Click OK on the New Formatting Rule dialog box.
The process above compares the sales figure of each salesperson in column B to the value in cell D2, and if the sales figure is less than the value in cell D2, the cell containing the value is highlighted in red:

Since conditional formatting is dynamic, in case you change the sales target value in cell D2, the highlighting in the sales in column B would automatically update.
Note: One benefit you have when using the formula method is that you can select any range of cells and highlight them based on the values in any other column or cell. For example, we were able to highlight the names of the salespeople based on the sales value when we compared the sales value with the sales target. That can only be done using a formula and not by using ‘Format cells that contain’ feature
In this article, I have covered two methods you can use to color cells based on the value in another cell. This can easily be done using a simple formula in Conditional Formatting or using the inbuilt ‘Format Cells that Contain feature óf conditional formatting.
I hope you found this tutorial useful. If you have any questions, kindly leave me a note in the comment section.
Other Excel articles you may also like:
- Highlight Cell If Value Exists in Another Column in Excel
- How to Hide Rows based on Cell Value in Excel
- How to Change Cell Color Using VBA in Excel
- How to Hide Columns Based on Cell Value in Excel
- Highlight Every Other Row in Excel
- Change Font Color Based on Cell Value in Excel
- Change Cell Color Based on Text Input in Excel
I am looking to fill F:9 with a color, and it will also have and contain a specific number, when i enter any text in sheet 2 G:15. Is this possible?
I found this very useful and easy to follow! Thank you!