When working with Excel, you may sometimes have a need to align objects or size the rows and columns to precision.
One way to do this is by using the Excel Ruler.
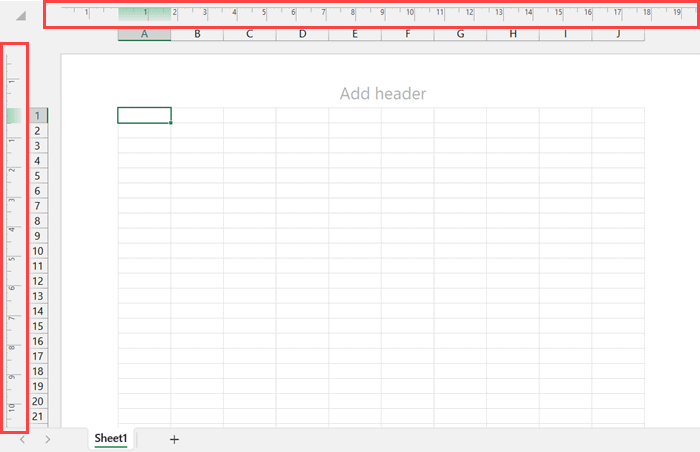
When you enable Excel Ruler, it shows the ruler at the left of the rows headers and top of column headers (as shown below).

In this short tutorial, I will show you how to enable and use the ruler feature in Microsoft Excel. I will also cover possible reasons the Excel Ruler option is greyed out and how to fix that.
How to Show Ruler in Excel?
By default, the ruler is not visible in Excel.
Below are the steps to enable and show the ruler in your Excel worksheet:
- Activate the worksheet in which you want to show the ruler
- Click the ‘View’ tab in the ribbon

- In the ‘Workbook Views’ group, click on the ‘Page Layout’ option

- Check the ‘Ruler’ check box in the ‘Show’ group

The above steps would show two rulers in your worksheet – one for the columns and one for the rows.

Remember that the ruler option is only available when you have activated the Page Layout option in the ‘Workbook Views’ group.
If the ‘Page Layout’ view is not activated, the ruler checkbox will be grayed out.
A couple of things to know when using a ruler in Excel:
- The ruler will only show up for the active sheet. So if you select a cell in some other worksheet, the ruler for that worksheet would start showing.
- When you select a cell or range of cells, the ruler will be highlighted in a different color to indicate the size of the selection.
Also read: Excel Scroll Bar Too Long (How to Reset it)
How to Change the Ruler Units (Inches, Centimeter, Millimeter)
The default measurement unit in the ruler in Excel is automatically picked up from your operating system.
For example, in my system, the default ruler measurement unit is in centimeters.
You can also change the ruler measurement unit and choose from three options – inches, centimeters, and millimeters.
Below are the steps to change the Ruler measurement unit in Excel:
- Click the ‘File’ tab in the ribbon
- Click on ‘Options’.
- In the ‘Excel Options’ dialog box, select the ‘Advanced’ option

- Scroll down to the ‘Display’ options
- From the ‘Ruler units’ select from the three available options (inches, centimeters, and millimeters)

Also read: How To Set Column Width in Inches (or Centimeters) in Excel?
Why is My Ruler Option in Excel Grayed Out?
Although I mentioned this earlier as well, I thought I’d reiterate it as this is one of the common questions many Excel users have.
By design, the Ruler checkbox would only become available when you are in the Page Layout view. If you’re not in the page layout view, the ruler option would be grayed out.
How to Remove Ruler in Excel?
If you don’t want the ruler to show anymore, you need to go to the view tab and uncheck the Ruler option.

Adjusting the Page Margins Using the Ruler
The Ruler in Excel can also be used to adjust the page margins while printing your worksheets.
You will notice that there is some white space on all the sides of the worksheet (left, right, top, and bottom)
If I place my cursor on the ruler before the worksheet area starts, you’ll notice that the cursor changes into a double-pointed arrow icon.

I can now click and drag this to the left or right to adjust the page margins.
You can do this to change the page margins on all four sides (left, right, top, and bottom)
A practical use case of this could be when you have a logo or some text in your header or the footer area, and you want some distance between the header/footer and the contents of the worksheet.
In this tutorial, I showed you how to enable and show the ruler in Excel. I also covered how you can change the ruler measurement unit by using the Excel Options dialog box. I also covered how to remove the ruler, and how to fix the issue in case you the rules option is greyed out.
I hope you found this Excel tutorial helpful.
Other Excel tutorials you may also like:
