A neat looking worksheet is always better than a shabby and unorganized one. You can tell if a sheet has been handled repeatedly by different people by just one look at it.
You will find it unorganized and shabby, often with rows and columns of varying sizes. Nobody likes that!
Maybe you were the one destined to put the sheet back in shape and make it nice and neat with trimmed cells that are evenly sized! In this Excel tutorial, we will help you do just that.
We will show you how you can set the column width and row height of all your cells so that they are all the same size. We will also show you how you can make sure that all the cells are well fitted around the content for added neatness.
In the end, we will show you how you can speed up this process by using simple VBA macro codes.
Setting the Column Width and Row Height of All Cells to a Specific Size
When you open a fresh Excel worksheet, you will always find the cells to be of a specific width and height by default. The default row height is 15 and the default column width is 8.43.
However, as you work on these cells, the heights and widths of the cells keep expanding to accommodate the contents of your cells.
In the end, what you get is a hodgepodge of cells of varying heights and widths.
Giving these cell sizes some uniformity though is quite easy. Here’s how you can achieve this.
If you want to resize your entire worksheet, do the following:
- Click on the ‘Select All’ button on the top-left of the Excel window.

- Set the Column width for all the cells. Right-click on any column header. Select ‘Column Width’ from the popup menu. Enter the size to which you want to set all the columns.
- Set the Row height for all the cells. Right-click on any row, select ‘Row Height’ from the popup menu. Enter the size to which you want to set all the rows.
That’s all. You will get all your cells uniformly adjusted to your required size.

Setting the Column Width and Row Height of Selected Cells to a Specific Size
If you want to resize only selected cells, do the following:
- Drag and select all your required cells. If there are a lot of cells that you need to select, click on the cell at the top left corner of your required selection, then pressing down on the SHIFT key, click on the cell at the bottom right corner of your required selection.
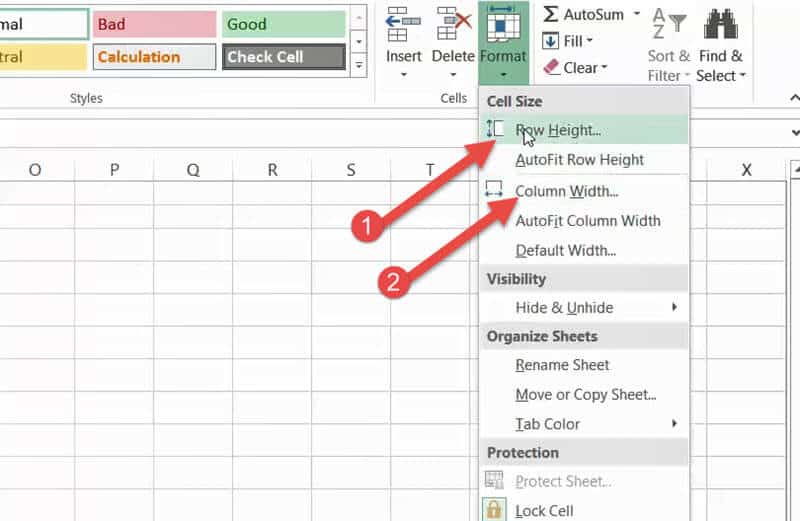
- Set the column width for the selected cells. Under the Home tab, select ‘Format’ (from the Cells group). Select ‘Column Width’ and enter the size to which you want to set all the columns in the small ‘Column Width’ window that appears.
- Set the row height for the selected cells. Under the Home tab, select ‘Format’ (from the Cells group). Select ‘Row Height’ and enter the size to which you want to set all the columns in the small ‘Row Height’ window that appears.
Your selected cells will now be equally resized to your requirement.
Applying the Same Column Width and Row Height by Using a Mouse
- Apply the same column width by selecting the column headers of all the cells you want to adjust.
- Drag the boundary of any one of the selected column headers to the width you like. When you release the mouse button, you will find all the other selected columns resized to the same width.

- Similarly, you can apply the same row height by selecting the row headers of all the cells you want to adjust.
- Drag the boundary of any one of the selected row headers to the height you like. When you release the mouse button, you will find all the other selected rows resized to the same height.
Changing the Column Width and Row Height to Auto-fit the Contents
In case you want to further make your sheet look neat, you can adjust the cell sizes to the height/ width of the cell with the highest height/ width.
- Select the column headers of the cells you want to adjust.
- Double click the boundary of any one of the selected column headers. You will find all the selected columns adjusted to fit the contents of the widest cell in each column.
- Similarly, select the row headers of the cells you want to adjust
- Double click the boundary of any one of the selected row headers. You will find all the selected rows adjusted to fit the contents of the cell with the most height in each row.
Also read: Excel Autofit Row Height Not Working – Fix
Using VBScript
If you are comfortable using VBScript, you can easily speed up the above processes by copying and pasting a short script into your developer window.
- Select the rows and columns that you want to adjust.
- From the Developer Menu Ribbon, select Visual Basic.
- Once your VBA window opens, Click Insert->Module. Now you can start adding your code.
Using VBScript to Set the Selected Cells to a Specific Size
Let us assume that you want to set all the selected cells to a column width of 10 and a row height of 20.
You can then copy and paste the following lines to your Developer window:
Sub makeequalsize()
Selection.ColumnWidth = 10
Selection.RowHeight = 20
End SubYou can also choose to specify the range of cells that you want to set to a specific size.
For example, if you want to set the size for the range A2 to G12, you can use the following code:
Sub makeequalsize()
Range("A2:G12").ColumnWidth = 10
Range("A2:G12").RowHeight = 20
End SubNote: You can replace the column width and row height according to your preference.
Using VBScript to Set the Selected Cells to the Same Size as a Specific Cell
If you have a reference cell with the perfect size that you want to copy to all other cells in your selection, say cell B5, then copy and paste the following lines:
Sub makeequalsize()
Selection.ColumnWidth = Columns("B").ColumnWidth
Selection.RowHeight = Rows("5").RowHeight
End SubYou can also choose to specify the range of cells that you want to set to the size of a particular cell.
For example, if you want to set the size for the range A2 to G12 to the size of cell B5, you can use the following code:
Sub makeequalsize()
Range("A2:G12").ColumnWidth = Columns("B").ColumnWidth
Range("A2:G12").RowHeight = Rows("5").RowHeight
End SubNote: You can replace the column name “B” and row number “5” with the corresponding column name and row number of your preferred cell.
Using VBScript to Auto-fit the Contents of All Selected Cells
To adjust the cell sizes to the height/ width of the cell with the highest height/ width, you can use AutoFit as follows:
To autofit the column width of the selected cells, copy-paste the following lines:
Sub autofitColumns()
Selection.Columns.AutoFit
End SubTo autofit the row height of selected cells, copy-paste the following lines:
Sub autofitRows()
Selection.Rows.AutoFit
End SubTo autofit both, you can combine the two commands as follows:
Sub autofitAllCells()
Selection.Columns.AutoFit
Selection.Rows.AutoFit
End SubConclusion
In this tutorial, you saw how you can adjust cell sizes to make your worksheet look uniform and neat.
We have shown you how you can either set the cells to a specific height and width or adjust the height and width to match that of a specific cell.
In the end, we also showed how you can use VBA Script to programmatically and quickly get this done so that you can get this done for multiple sheets quickly.
Other Excel tutorials you may find useful:
- How to Find Merged Cells in Excel
- How to Subtract Multiple Cells from One Cell in Excel
- How to Select Every Other Cell in Excel
- How to Select Alternate Columns in Excel (or every Nth Column)
- How to Set a Row to Print on Every Page in Excel
- How to Press Enter in Excel and Stay in the Same Cell?
- How to Show Ruler in Excel? (Excel Ruler Greyed Out)
- Autofit Column Width in Excel (Shortcut)