You may have come across situations where you needed to add a certain number of days to a date. It’s a common use case for people to add 7 days or 30 days to an existing date to find out the date in the future.
Say, you have a company policy that allows you to dispatch an ordered item for delivery only after a fixed number of days.
Or, you might have a payroll system that allows you to only dispatch a person’s salary after a certain security period. That means you will need to calculate the date for dispatch of the salary for each employee and put it in a separate column.
Under these circumstances, it is impractical to manually calculate the delivery date for every row of your data. Fortunately, MS Excel has provided an easy way to add a specific number of days to a date.
Here are three ways you can add days to a date in Excel.
Adding Days to Dates by Value
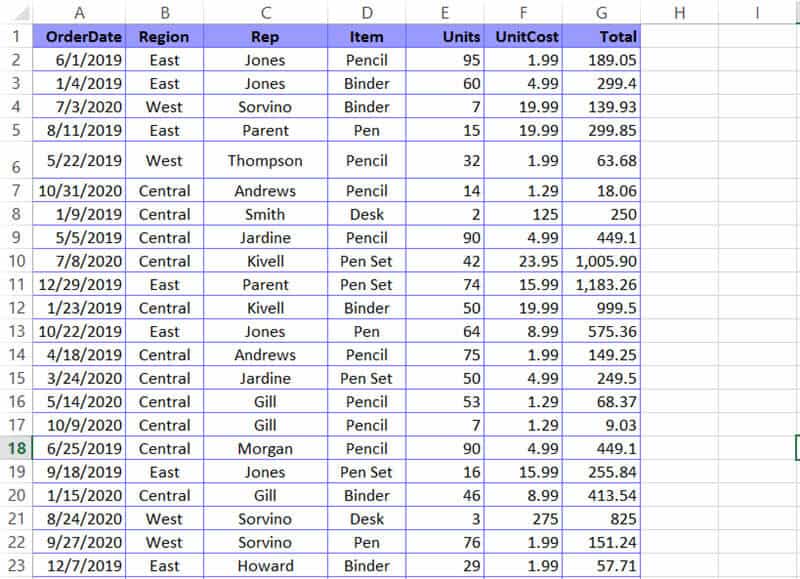
For this tutorial, we will be using the dataset shown below:
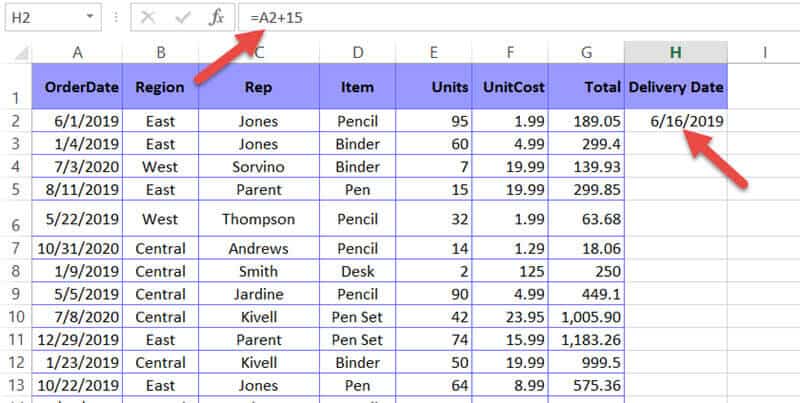
Let us assume you want to add a fixed number of days (say 15 days) to every date in column A and store the result of the addition in Column H.
- Select the first cell of the column you want to store the result in (in our example, cell H2).
- Type ‘=’ and select the first cell of the column containing the dates you want to add days to (cell A2).
- Next, type ‘+’ followed by the number of days you want to add. So, if you want to add 15 days, type ‘+15’ in the same cell. This means, your cell H2 should have the formula =A2+15.
- Press the Return Key on your keyboard. You will get the result of adding 15 days to the date in cell A2.

- Since you want the same number of days added to all the dates in Column A, simply drag down the fill handle (at the bottom right of cell H2) to copy the formula to all the rows of Column H.
Also read: Calculate Days Left in the Year (Formula)
Adding Days from a Cell Location
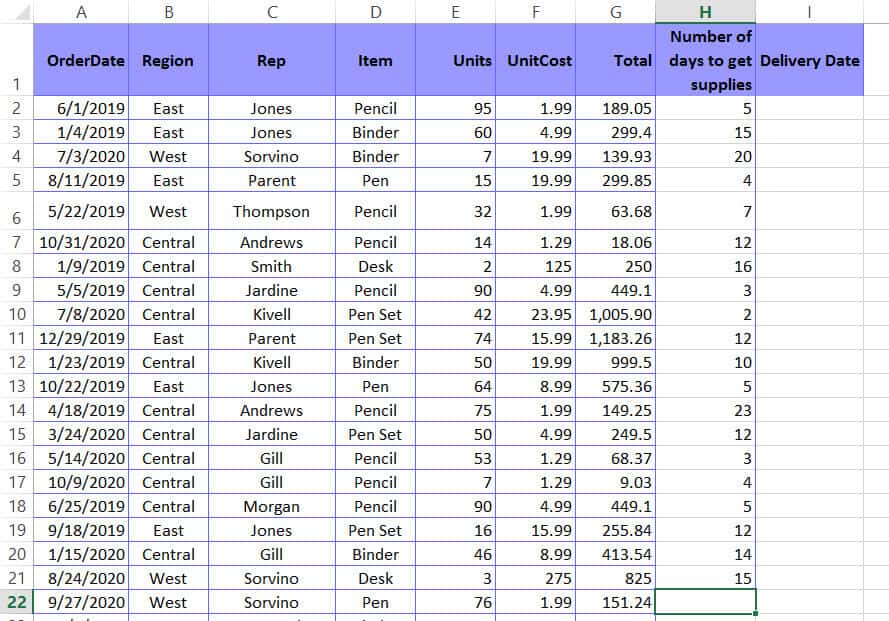
If you need to add a different number of days to each date, you can type out the number of days you need to add to each row in a separate column (as shown below).
Next, follow the steps given below:
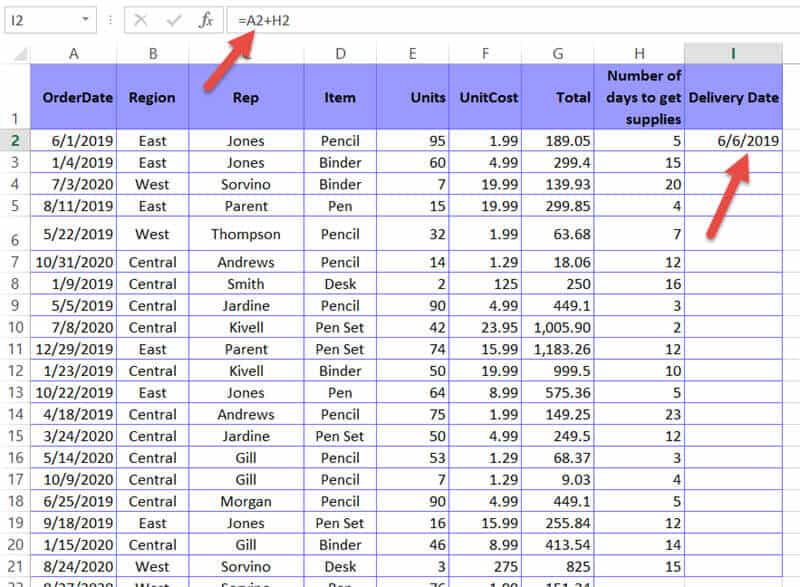
- Select the first cell of the column you want to store the result in (in our example, cell I2).
- Type ‘=’ and select the first cell of the column containing the dates you want to add days to (cell A2).
- Next, type ‘+’ .
- After that, select the first cell of the column containing the number of days to add (in our example, cell H2. This means, your cell I2 should have the formula =A2+H2.
- Press the Return Key on your keyboard. You will get the result of adding the number of days in cell H2 to the date in cell A2.

- Drag down the fill handle (at the bottom right of cell I2) to copy the formula to all the rows of Column I. This will add the cell in column H to the cell in column A for every row.
Explanation of the above Formulas
Although we used a simple addition formula to add days to dates, intuitively we know that’s not how you add dates. In essence, dates are inherently represented as serial numbers in Excel, where serial 1 starts from January 1, 1900.
For each day since this date, the serial number keeps increasing by 1. That means, the date June 1, 2019, is actually serial 43617, because it is exactly 43,617 days after January 1, 1900.
When you are adding days to a date in Excel, it is actually adding the number of days to the serial number of that date. For example, in our example, here’s a breakdown of what’s actually happening:
= A2+H2
= 43617 + 15
= 43632
If you convert the serial number 43632 to date, you get June 16, 2019!
In rare cases, your result might appear as a serial number, instead of being in a Date format. This might happen if the format of your result cell is in a Number or Text format. In such cases, you can easily convert the serial to a Date format as follows:
- Right-click the cell or entire column.
- Select Format Cells from the popup menu. This will open the Format Cells dialog box.
- Under the Number tab, select Date from the options in the Category list.
- Select the format that you want your date to appear from the Type list on the right side of the dialog box.
- Click OK.
This should convert all your cells to the Date format.
Also read: Count Days from a Date to Today in Excel (Formula)
Adding Days using the DATE() Function
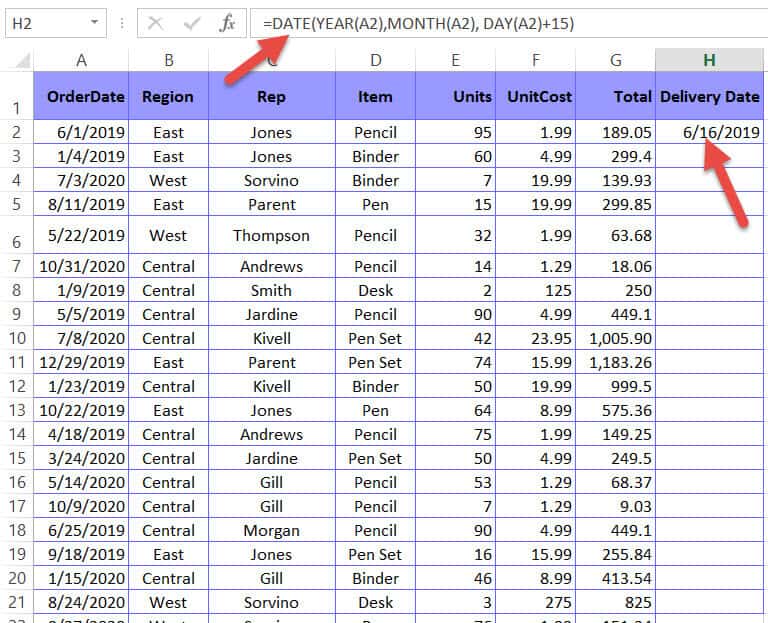
There is another way in which you can add days to a date in Excel. This is by using the DATE() function. Let us use the same dataset that we used earlier:
Here’s what you need to do:
- Select the first cell of the column you want to store the result in (in our example, cell H2).
- Type the following formula in the cell: =DATE(YEAR(A2),MONTH(A2), DAY(A2)+15). Let us break this formula down to understand it:
- The YEAR function extracts just the year of the date in cell A2. So YEAR(A2) in our case, will return 2019.
- The MONTH function extracts just the month of the date in cell A2. So MONTH(A2) in our case, will return 6.
- The DAY function extracts just the day part of the date in cell A2. So DAY(A2) returns 1. When you add 15 to this result, you get 1 + 15 = 16.
- Finally, the DATE() function combines the three values returned (2019, 6, and 16) into a Date. So, it returns the date 16/6/2019! You might ask why we need the Month and year functions when we just want to add 15 days to the original date. The reason is that the DATE functions format requires all three parameters to perform the calculation.
- Press the Return Key on your keyboard. You will get the result of adding 15 days to the date in cell A2.

- Drag down the fill handle (at the bottom right of cell H2) to copy the formula to all the rows of Column H.
With this method, you can even add months and years to your date. For example, say you want to add 1 year, 3 months, and 15 days to a date. You can easily accomplish this by the above method.
Just add 1 to the first parameter, 3 to the second and 15 to the third parameter, so that your formula becomes:
=DATE(YEAR(A2)+1,MONTH(A2)+3, DAY(A2)+15)
Adding Days to the Current Date
Finally, if you want to add a specific number of days (say 15 days) to the current date, depending on whenever you open the file, here’s what you need to do:
- Select the cell you want to store the result in.
- Type the formula: =TODAY() + 15. The TODAY() function returns the current date, formatted as Date. It takes no parameters.
- Press the Return key on your keyboard. You will get the result of adding 15 days to the current date.
Note that this value will change depending on the current date on which the Excel file is opened.
So, no matter when you open the Excel file, the cell will always display the date 15 days from that date.
Conclusion
In this tutorial, we demonstrated how you can add days to a date in Excel.
We hope you found it helpful. Do let us know in the comments if the above methods worked for you. If you face any issues applying the above, feel free to let us know.
Other Excel tutorials you may find useful:
- How to Sort by Date in Excel (Single Column & Multiple Columns)
- How to Remove Leading Zeros in Excel
- How to Get Total Days in Month in Excel?
- How to Unsort in Excel (Revert Back to Original Data)
- How to Convert Date to Month and Year in Excel
- How to Convert Serial Numbers to Date in Excel
- How to Convert Date to Day of Week in Excel
- How to Convert Days to Years in Excel
- Calculate Days Between Two Dates in Excel (Workdays/Weekends)
- Add Years to a Date in Excel
- Days Between Dates Calculator
I have a spreadsheet that we use for tracking dates for government reporting. There is a column of dates (lets say it is column F), that needs to be changed every 3 months to add 90 days to the date in that column. I want the new date to remain in the same column (column F)
Can this be done with just one click (ctrl+shift+D)
Great article! I found the methods for adding days to dates very useful.