Sometimes, you may have a dataset where there are empty/blank cells in a dataset that should have been filled with the same value.
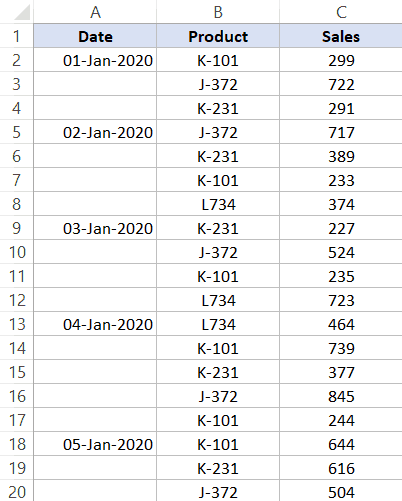
Below is a common example where the date is only mentioned one time and all the remaining records for that same date have the date cells blank.
While this type of data may look cleaner (especially when printed), it’s not great when you try to use this for calculations or create a Pivot Table using it.
In many cases, you would need to fill these blank cells with the value in the above cell.
How to Fill Blank Cells with Value above in Excel
In this Excel tutorial, I will show you three really easy ways to fill the blank cells with the value above in Excel.
- Using Go To Special with a formula
- Using Find and Replace with a formula
- Using VBA
The tricky part of this entire process is actually selecting the blank cells. Once you have the blank cells selected, there are multiple ways to copy cell values from above.
So let’s get started!
Fill Cells with Value Above Using ‘Go To Special’ + Formula
The first step in filling blank cells from the value above is to select these blank cells. And this can easily be done using the ‘Go To Special’ option in Excel.
Suppose you have a dataset as shown below and you want to fill all the blank cells in column A with the date from the cell above.
Below are the steps to select all these blank cells at one go:
- Select the dataset in which you have these blank/empty cells
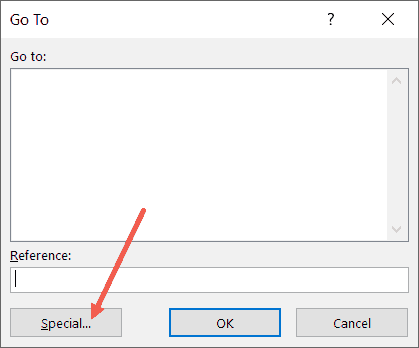
- Hit the F5 key on your keyboard (use ⌃ + G if you’re using a Mac). This will open the ‘Go To’ dialog box
- Click on the Special button.
- In the ‘Go To Special’ dialog box, select the ‘Blanks’ option
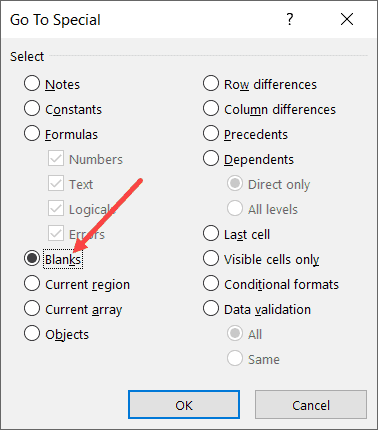
- Click OK.
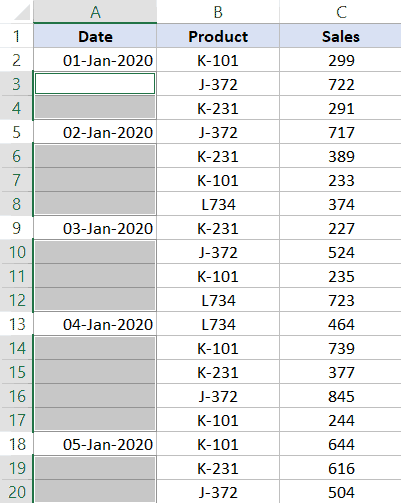
The above steps would select all the blank cells in this dataset.
Now that you have all the blank cells selected, the next step is to fill all these blank cells from the value above.
Follow the following steps to use a formula to copy the value from the cell above:
- Enter = (equal to sign). by default, this will enter the equal to sign in the active cell only
- Press the up-arrow key. This will select the cell right above the active cell
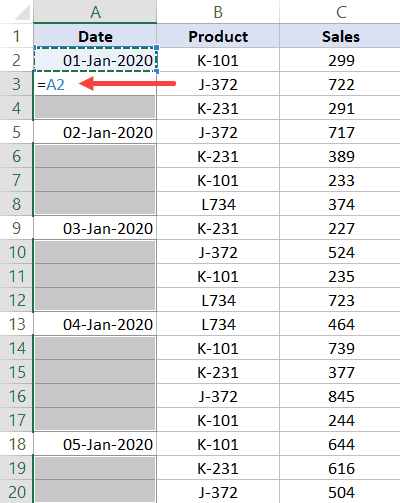
- Hold the Control key and press the enter key (Command + Enter if you’re using a Mac)
That’s it!
The above steps would apply the same formula (which is simply to refer to the cell above) to all the selected blank cells.
Once you have all these blank cells filled, remember to convert the formulas to values.
Note that for this method to work, the cells need to be completely empty. In case there are space characters, the ‘Go-To’ feature will not consider these as blank cells and these wouldn’t be selected.
Also read: How to Add Text to Beginning of Cell in Excel
Fill Cells with Value Above Using ‘Find and Replace’ + Formula
The above (Go To Special) method works well when you only have the blank cells that you want to fill-down.
But what if you get a dataset where the cells are not really blank (but may have a dash in it or some text such as NA).
In such a case, you can also use the Find and Replace method.
This method works similar to Go To Special, but with an added advantage of being able to select cells based on the value.
With this method, you can select blank cells or you can select cells that have any specific text/value in it.
Let me show you how this would work taking an example of blank cells only.
Suppose you have a dataset as shown below and you want to fill all the blank cells in column A with the date from the cell above.
Below are the steps to select all the blank cells using Find and Replace:
- Select the dataset in which you have these blank/empty cells
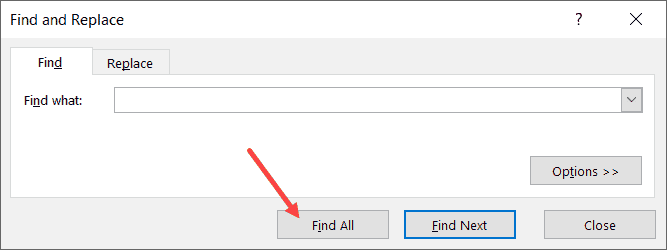
- Hold the Control key and press the F key (or Command + F if you’re using Mac)
- In the Find and Replace dialog box that opens up, click on the ‘Find All’ button. This will find all the cells that are blank and you will also see a list of these cells addresses.
- Hold the Control key and press the A key (or Command + A if you’re using Mac). This will select all these blank cells
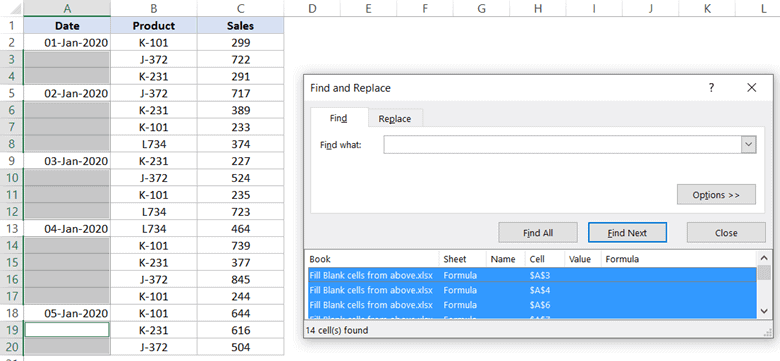
- Close the Find and Replace dialog box.
By the end of these steps, you will have all the empty cells selected.
Now, you can use the formula to get the value from the above cell and fill in the blank cells in Excel.
Follow the following steps to use a formula to copy the value from the cell above:
- Enter = (equal to sign). by default, this will enter the equal to sign in the active cell only
- Press the up-arrow key. This will select the cell right above the active cell
- Hold the Control key and press the enter key (Command + Enter if you’re using a Mac)
One of the benefits of using Find and Replace it works when you have blank cells that you want to fill, and you can also use it to find and select cells that have specific values.
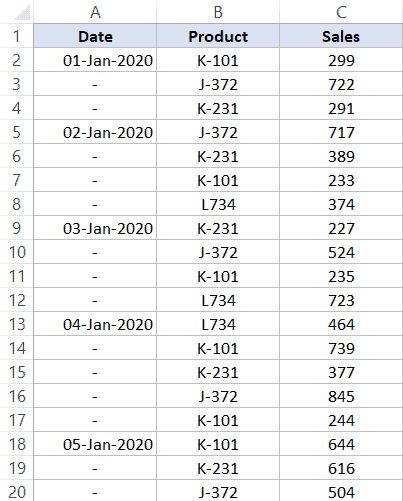
For example, suppose you have a dataset as shown below where instead of the blank cells, we have dashes instead.
To do this, follow the below steps:
- Select the dataset
- Hold the Control key and press the F key (or Command + F if you’re using Mac)
- In the Find and Replace dialog box that opens up, enter – (dash) in the ‘Find what’ field.
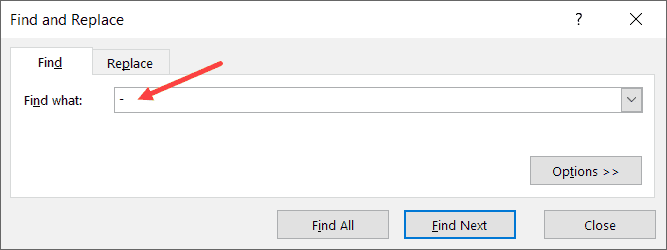
- Click on the Find All button. This will find all the cells that have the dash symbol and you will also see a list of these cells’ addresses.
- Hold the Control key and press the A key (or Command + A if you’re using Mac). This will select all these cells
- Close the Find and Replace dialog box.
Once you have these cells selected, you can use the formula steps shown above to fill values from cells above (or even full cell values from below/right/left).
Also read: How to Replace Zero with Dash in Excel?
Fill Cells with Value Above Using VBA
While these two above methods work perfectly fine, in case you have to do this quite often, you can also use a simple VBA code to get this done.
And if you want to be super-efficient and get this done with a single click, you can add the VBA macro to the Quick Access Toolbar (QAT) and simply click on it to fill the blank cells in the selection with the cell value from the above cell.
Below is the VBA code that will get this done:
Sub FillCellFromAbove()
For Each cell In Selection
    If cell.Value = "" Then
        cell.Value = cell.Offset(-1, 0).Value
    End If
Next cell
End Sub
To use this code, first, select the dataset where you want to copy the value from the above cell, and then run this code.
The above code uses the FOR EACH loop where it goes through each and every cell in the selection. As soon as it finds a cell that’s empty (checked using the IF statement), it copies the value from the cell above (done using OFFSET).
In this specific example, you may notice that
Note: In case you want to save a workbook that has the macro code, you need to save it in the .XLSM (macro enabled) format.
The best thing about using this VBA code is that it doesn’t require you to convert the formulas into values. With this method, you get static values only. This makes it a really efficient method (of all the three covered in this tutorial).
There are however two things you need to know when using VBA to get fill the blank cells with a value from the above cell:
- You can’t undo this once you have run the macro code. So make sure you create a backup copy before you run the VBA code
- If you have a huge dataset (thousands of rows with multiple columns), this is likely to slow down your system. Since the VBA code above goes through and analyzes each cell, it takes more time than the remaining two methods. When using with a few hundred (or even a few thousand data points), you’ll likely not notice any difference in speed.
To use this VBA macro code, you need to put it into a regular module.
So these are three ways you can use to fill the blank cells with data from the cell above it.
Hope you found this tutorial useful!
You may also like the following Excel tutorials:
- How to Compare Two Columns in Excel (using VLOOKUP & IF)
- How To Set Column Width in Inches (or Centimeters) in Excel?
- How to Find Merged Cells in Excel (2 Simple Ways)
- How to Make all Cells the Same Size in Excel (AutoFit Rows/Columns)
- How to Autofill Dates in Excel (Autofill Months/Years)
- Press Enter and Stay in the Same Cell in Excel
- How to Highlight Blank Cells in Excel? 3 Easy Methods!
- Fill Blank Cells with Dash (-) in Excel (3 Easy Ways)
- How to Fill Blank Cells with 0 in Excel (3 Easy Ways)