Most spreadsheet software comes with a default font pre-selected.
For example, Microsoft Excel worksheets always start with the Calibri font set at size 11. For Excel on a Mac, the default is Body Font (Calibri) in size 12.
You do have the option to change the font to whatever style, size, and color you like.
However, if you have a favorite font that you like to use in all your sheets, it will just be a waste of time changing the default font every time you open a new worksheet.
In this tutorial, I will show you how to change the default font in Excel in different versions (on Windows and Mac)
Why Change the Default Font in Excel?
Here are some other reasons you might want to change the default font in Excel.
- Many companies have their own fonts that they use as part of their branding strategy.
- The same old Calibri font may be boring, so you can use a different font to make your sheets and documents stand out.
- You might want to give all your worksheets a more personal touch by using your own signature font.
- For accessibility purposes, you might need to work with bigger sized fonts.
- You might be bored with the same old font. Using a new default font may be just what you need to revive your motivation.
Whatever the reason be, changing the default font in Excel is really easy and you just need to do it once, and never again.
In this tutorial, we will look at two ways in which you can change the default font in Excel:
- By using the Excel Options
- By creating an Excel Template
Changing the Default Font using Excel Options
This is the easiest and most commonly used method to change the default font in Excel.
Since this method is used differently in different Excel versions, we will show you how to use it in Excel 2010 and above, Excel 2007 as well as on a Mac.
Changing the Default font in Excel Newer Versions (2010 onwards)
Most of the newer Excel versions have more or less a similar interface for the File tab. So, if you’re using Excel Version 2010 to 2020, you can use the following method to change the default font:
- Click on the Excel File tab.
- Select ‘Options’ from the sidebar on the left
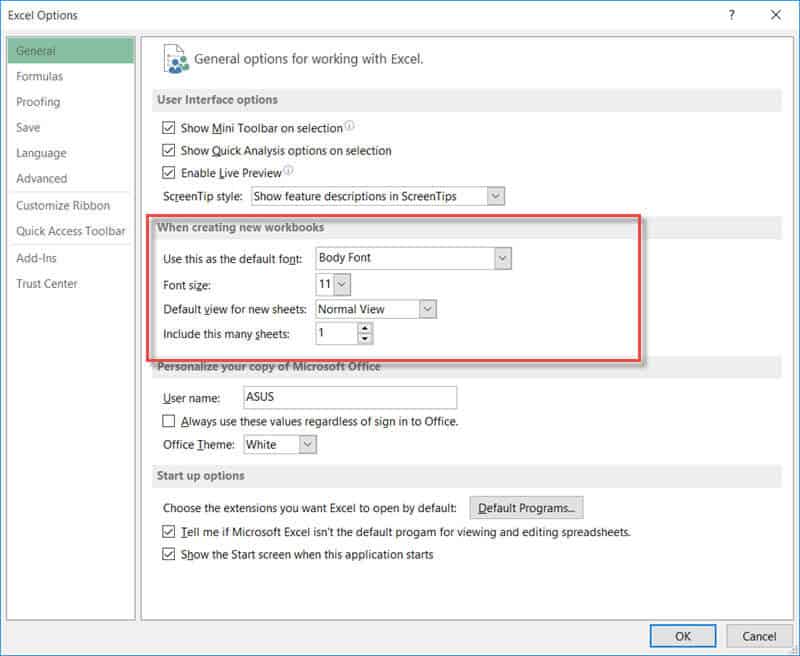
- This will open the Excel Options dialog box. Make sure that the General category is selected (on the left sidebar of the dialog box)
- Under the ‘When creating new workbooks’ section, select the type of font you want from the drop-down menu next to ‘Use this as the default font’.
- Select the size of your default font from the drop-down menu next to ‘Font size’.
- You will also see some other default options in this section. For example, you can change the default layout that you want to be displayed every time you open Excel. You can also select how many worksheets you want Excel to display every time it opens. By default, it is always 3.
- Once you have selected all your settings, Click OK.
- Close Excel for the new settings to take effect.
From now on, every time you open Excel, it will have your selected settings displayed by default.
Changing the Default Font in Excel 2007
If you are using Excel 2007 or earlier versions, you will find that the interface is a little different. Here’s how you can change the default font for these versions:
- Click the Microsoft Office button.
- Click Excel Options (at the bottom of the window).
- This will open the Excel Options dialog box. Make sure that the Popular category is selected (on the left sidebar of the dialog box)
- Under the ‘When creating new workbooks’ section, select the type of font you want from the drop-down menu next to ‘Use this font’.
- Select the size of your default font from the drop-down menu next to ‘Font size’.
- Click OK.
- Close and restart Excel for the new settings to take effect.
Changing the Default Font in Excel for Mac
If you’re on a Mac, here’s a step by step on how you can use the same method:
- From your Excel menu, navigate to Preferences.
- This will open the Excel Preferences box.
- Under the Authoring section, select ‘General’.
- This will open the General settings box. Select the type of font you want from the drop-down menu next to ‘Default font’.
- Select the size of your default font from the drop-down menu next to ‘Font size’.
- You can also select other default options, like the number of sheets you want your workbook to start with.
- Once you have selected all your settings, Click OK.
- Close Excel and restart Excel. You will find the new default font applied when you create a new worksheet or workbook.
Also read: How to Make Cells Bigger in Excel
Changing the Default font in Excel by Creating an Excel Template
You might want to have some default settings for the font, background colors, formulae, or even logos to appear in every worksheet that you open.
Excel templates help you in this respect by allowing you to create pre-formatted sheets that you can use over and over.
Having a default template like this is a great way to have your spreadsheet ready with your required settings.
For this, you need to modify the formatting according to your taste or requirement in a blank workbook. Then, you need to save it as the default template. Here’s a step-by-step of this method:
- In a blank Excel workbook, put all your desired settings and options. You can set margins, add images or logos, set up the header and footer, change the font, cell colors, print setting, and any just about anything you want to set as a default.
- Now click on the File tab.
- Select ‘Save As’ from the sidebar. Select ‘Browse’.
- This will open the ‘Save As’ dialog box.
- From the dropdown next to ‘Save As Type’ at the bottom of the window, select ‘Excel Template’.
- Change the file name to ‘Book’.
- The XLSTART folder contains Excel templates for the default book and sheet. It is usually under the Microsoft/Excel/ folder. If you don’t know the path to this folder, check the ‘Note’ below. Enter the path to the Microsoft/Excel/ XLSTART folder in the location bar at the top of the ‘Save As’ window.
- Click the ‘Save’ button.
- Close Excel and restart it. The new workbook should contain all the default formatting that you had set, along with the default font.

Note: If you don’t know the path to the Microsoft/Excel folder, here’s how you can get it:
- Navigate to Developer->Visual Basic. This will open your VBA window. If you don’t see the Developer tab, then from the File menu, go to Options. Select Customize Ribbon and check the Developer option from the Main Tabs. Finally, Click OK.
- At the bottom of your VBA window, you should see the “Immediate” window. If you don’t see it, then navigate to View->Immediate Window or press CTRL+G on your keyboard. In the Immediate window, type the line: ?Application.StartupPath
- Press the Return Key. This should display the path to your XLSTART folder. Select and copy this path.
Conclusion
In this tutorial, we showed you two ways in which you can set your preferred font as the default font in Excel.
One method is to set it from the Excel Options dialog box and another is to save your default font settings as an Excel template.
Do let us know in the comments if you found this tutorial helpful.
Other Excel tutorials you may find useful:
- How to Add Cell Borders in Excel
- How to Remove Dotted Lines in Excel
- Why does Excel Open on Startup (and How to Stop It)
- How to AutoFormat Formulas in Excel
- How to Subtract Multiple Cells from One Cell in Excel
- How to Create Barcodes in Excel
- How to Bold Text using VBA in Excel
- Difference between Microsoft Excel and Google Sheets
- What is an Active Cell in Excel?
- How to Change Theme Colors in Excel?
- How to Change Font Color Based on Cell Value in Excel?
Nice…it was quite helpful!