Barcode allows you to show data in a visual format that can easily be read by machines.
I am sure you have seen barcodes hundreds of times on products, including from grocery to clothing.
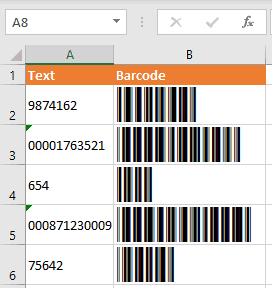
In this tutorial, I will show you how to add a barcode font in Excel so that you can insert barcodes in your worksheet.
Something as shown below:

Excel allows you to format cells as barcodes, which can be extremely useful, especially in the inventory management.
This way, you can create a product catalog with all barcodes, print product UPC codes, or track items easily.
While there is no in-built way in Excel to convert values to barcodes, you can easily do that using the Barcode font.
Let’s see how to so this.
Download and Install the Code 39 Barcode Font
In order to be able to use barcodes in Excel, you need to download a barcode font and install it first.
The most frequently used font is Code 39, and we will use it in examples.
You can download the Code 39 font from various free sites for fonts downloading. We did it from Dafont (https://www.dafont.com/search.php?q=code+39).
Just click on the Download button next to the Code 39 font.
The font will be downloaded in a ZIP folder in your Downloads folder (or wherever you download your files), as a .TTF file (TrueType font).
Below are the steps to install the Barcode font on your system so it’s also available in Excel:
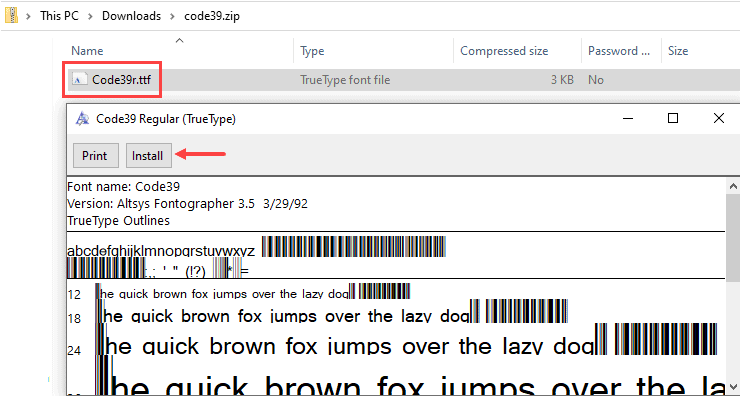
- Double-click the ZIP folder of the Code 39 font (that you downloaded from the above link)
- Double-click the .TTF file (when you open a file, you can see the preview of the font)
- Click on Install. This will install the font on your system
- Close the dilaog box
Now, the font is installed on your computer and you can use it in applications such as MS Excel.
In case you already have a file open, you should save and then reopen it to be able to see it in the barcode font.
If you’re wondering why this is called Code39, that’s because it generates a barcode that has five bars and four spaces (so a total of 9). And three of these nine bars would have more width, hence the 3 in 39.
Creating Barcodes in Excel
Now that the barcode font is installed on your system, let’s see how to use it to create barcodes in Excel.
Converting Cell Format to Text
Before I show you how to convert numbers or alphanumeric characters into barcode, you need to know an important thing.
The cells that has the numbers (that you want to convert to barcodes) need to be in the text format.
Let me explain why this is important.
Excel, in its bid to be as helpful as possible, does some automatic number formatting by default. For example, if you enter 0001 in a cell, it will be converted into 1 (as Excel thinks the leading zeroes are useless).
Or if you enter a large number, say 123456789876, Excel will change it to 1.23457E+11.
But when you’re generating barcodes, you need the text or the number as is. You don’t want Excel to change it
So by converting cells format to text, you ensure that the numbers don’t get truncated or changed by Excel.
IMPORTANT: You need to change the cell format before putting the numbers into the cells for which you want the barcode. So make the cell format Text first, and then enter the numbers.
Here is how you can change the cell format to Text
- Select cells where you plan to have the numbers that you would convert to barcodes. In my example, I will select column A
- Click on General (Number Format) in the Number part of the Home tab
- Choose ‘Text’
Once you have formatted the cells, you can enter the values that needs to be converted to Barcodes.
In case you’re copying this data from somewhere, make sure to paste it as values only (so it doesn’t mess up our Text formatting).
Enter the Values for Barcodes
Now that you have the column formatted as Text, you can enter the values that you converted to barcodes.
But I don’t want to convert the values to barcodes. Instead, I would like to have the value as is and it’s barcode in the adjacent cell.
For this, I will have to have the same values in the adjacent column as well.
This can be done easily.
Below are the steps to copy values from column A to column B.
- In the cell B2, enter: =A2;
- Drag the formula down until the last populated cell in column A (A6).
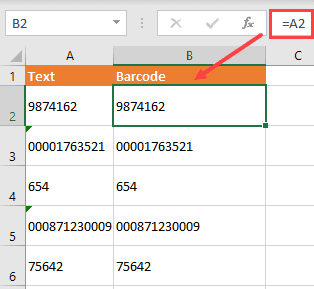
Don’t worry about the formatting on column B. Excel will make sure the formatting is same as that of cells in column A.
Formatting the Values to Convert into Barcodes
You can now format the values in column B as barcodes (font Code 39).
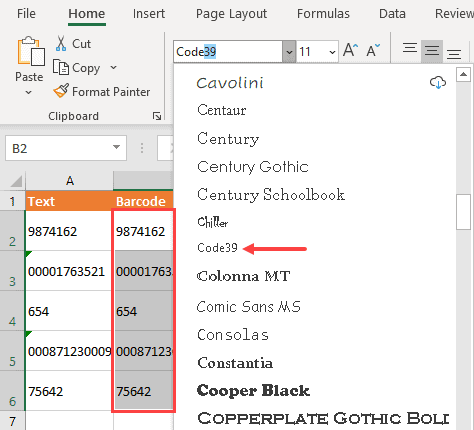
Below are the steps to do this:
- Select all cells with values in column B
- Click on the Font menu in the Home tab
- Choose Code39
After this, you get all the values in column B formatted as barcodes. You can also increase the font size in order to make them more visible.
- Click on the font size menu in the Home tab
- Choose (for example) 26
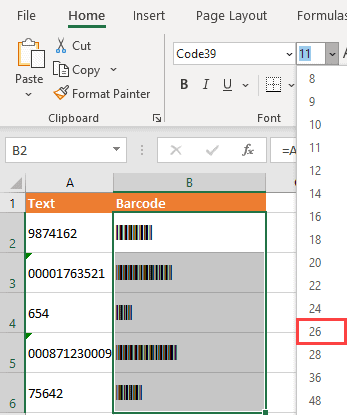
As a result, you get a barcode for each text in column A.
In our example, the barcode in column B is dynamic, which means that if the value in column A changes, the barcode would automatically update. In case you don’t want this, you can convert the formula in column B to values.
Note that when you install the font on your system, it doesn’t work just in Excel. It would also work on other office applications such as MS Word and MS PowerPoint.
Also read: How to Create a QR Code in Excel
Different Types of Barcodes
Code 39 is one of the easiest barcode font to use and includes both numbers and letters.
This type displays each character as five bars and four spaces, while three bars are wider than the others. That’s why it got the name 39.
Apart from this type, you probably heard of other barcodes, such as Code 128 (similar to 39, usually used for shipping), or UPC/EAN (used for product barcodes).
You can also install and use other barcodes in Excel similar to Code 39.
If you’re the curious type, here is some more information on different types of barcodes.
- Code 128: It is generally used for shipping and supply chain labels. In comparison with Code 39, the barcodes of Code 128 are denser and are usually used for container and pallet levels in the supply chain. It can also use the full ASCII character set, which Code39 can only use alphanumeric characters.
- UPC/EAN: UPC stands for Universal Product Code, EAN for European Article Numbering. This is a widely used barcode that can be found in items in-store and at the point of sale. The character set in UPC is restricted to 12 characters only.
- UPC-E: This is a simpler version of UPC, which was developed for smaller packages where the full 12 characters barcode of UPC won’t fit. This is restricted to 6 digits, where the leading and trailing zeroes are omitted.
- QR: QR stands for Quick Response and is used to open a website or app when you scan it with a mobile phone camera. You will often find this as a printed code where you can use it to make payments or avail discounts.
- I2of5: It stands for (Interleaved 2 of 5), where 2 out of every five bars are wide. It is a high-density barcode that supports numeric characters. It is a two-row barcode that’s used on 35 mm film rolls, and to label cartons.
- Postnet: It stands for Postal Numeric Encoding Technique and was used by the U.S. Postal Service. It can encode numeric characters only.
- Intelligent Mail: This one is currently used by the U.S. Postal Service. It encodes up to 65 characters. Apart from the width of the bars and spaces between them, even the height and vertical location of these bars can be read and converted into information. It uses numeric characters.
Generating Random Barcode in Excel
Now that you know how to easily install the barcode font and use it to create barcodes from numbers and alphanumeric text strings, you can also use Excel to create random barcodes.
Suppose you want to generate a random list of 20 barcodes. You can do that using the RANDBETWEEN formula, where you specify the lower and the upper limit and it will give you random numbers between these two values.
For example, if you want to generate random numbers between 1 and 100, you can use the formula RANDBETWEEN(1,100) and enter it into 20 cells to get 20 random values.
Below are the steps to generate random barcodes:
- In a cell, enter the formula =RANDBETWEEN(1,100)
- Copy the formula and paste it for 20 cells (or however number of random barcodes you want)
- Copy the entire range of cells that have these random numbers, and copy it (use Control + C or right-click and then click on Copy)
- With the cells selected, right-click and then click on the Paste as Values icon
The above steps would generate a list of 20 random numbers and then we have converted these to values (as RANDBETWEEN is a volatile formula and would other keep on updating).
Note that this can be done only with numbers. It’s a bit harder to generate random alphanumeric strings.
Now that you have random numbers, you can simply select these and apply the barcode formatting to to.
To do this:
- Select the cells that have the numbers
- Click the Home tab
- Select Code39 as the font
In case you want the numbers in a separate column and the barcodes in a separate column, you can first copy the numbers in the adjacent column and then apply the barcode font to it.
Third-Party Tools and Excel Barcode Add-Ins
While using the Excel barcode font technique works fine, there are other ways you can generate barcodes and then use in Excel.
There are some decent web based tools as well as applications that you can check out.
Some of the prominent bar codes generators include:
- Barcode.tec
- Cognex
- POSGuys
- Bartender Software
So this is how you can use the Code 39 font to easily generate barcodes in Excel.
I hope you found this tutorial useful,
Other Excel tutorials you may also like:
- How to Copy Formatting In Excel
- How to Set the Default Font in Excel (Windows and Mac)
- How To Set Column Width in Inches (or Centimeters) in Excel?
- How to Add Cell Borders in Excel
- What does Pound/Hash Symbol (####) Mean in Excel?
- How to Change Theme Colors in Excel?
- How to Insert Envelope/Mail Symbol in Excel?
very helpful
Much appreciate it!
Thank you so much for the very well organized, succinct and methodical description of how to get this working. I wish I had found your post before the many others I wasted my time reading.
Really appreciate your help
Nona
Thank you !!!!!!!