While it’s not very often that you may need to add a superscript in Excel, in case you need it, you’ll not be able to find it easily.

Unlike MS Word, where the subscript and superscript options are right there in the ribbon, in Excel, you can access these options through the Format cells dialog box.
In this tutorial, I will give you the shortcut to superscript in Excel
Shortcut to Superscript in Excel
Adding a superscript in Excel is a multi-step process:
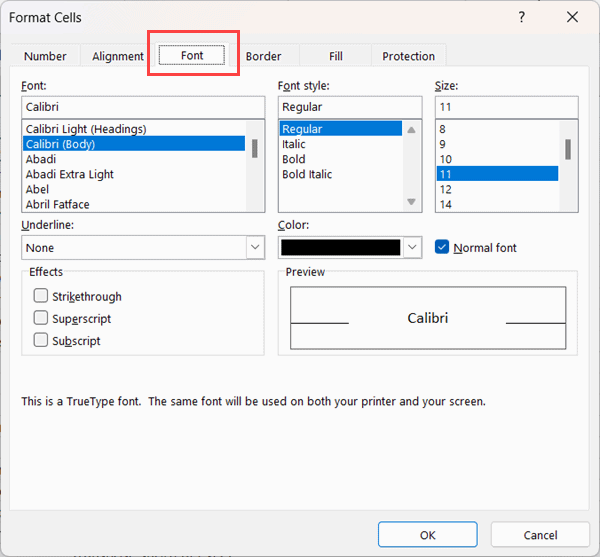
Opening the Format Cells dialog Box:
Control + 1
Selecting the Superscript option (once you’re in the Font tab)
ALT + E + Enter
How to Use the Keyboard Shortcut to Superscript in Excel
Below are the steps to use the above keyboard shortcut to get the superscript font:
- Select the cell on which you want to apply the superscript format
- Use the keyboard shortcut Control + 1 (hold the control key and then press the 1 key)
- In the Format Cells dialog box, select the Font tab

- Use the shortcut ALT + E + Enter (press one after the other)
My Opinion: Unless you need to use the subscript or superscript format quite often, in my opinion, it’s not worth it to get used to this shortcut
Important Things to Know About Superscript in Excel:
You can apply the superscript format to a single cell or some part of the text in the cell.
If you want to apply the superscript format to the entire cell, select the cell and then use the above shortcut.
And if you want to apply to only partial text in the cell, first get into the edit mode (by either double clicking on the cell or using the shortcut F2), select the part on which you want to apply the superscript format, and then use the steps above.
Other Excel shortcuts you may also like:
- Excel Keyboard Shortcuts
- Wrap Text in Excel (Shortcut)
- Insert Hyperlink in Excel (Shortcut)
- Add Comments in Excel (Shortcut)
- Subscript in Excel (Shortcut)
- Center Align in Excel (Shortcut)
- Insert Checkmark in Excel (Shortcut)
Other Excel Tutorials You May Also Like:
