When working with data and spreadsheets, readability, and structure matter a lot.
It makes the data easier to skim through and work with. One of the best ways to make your data more readable is to split it into chunks so that it is easier to access the right information.
When entering data from scratch, it’s possible to ensure that we structure the data to be more readable. However, sometimes you need to work with data that someone else has created.
If the volume of the data is very large then it’s usually quite difficult to structure the data’s readability.
For example, you might have got data with a list of names, and you might want to arrange the names in alphabetical order of surnames.

In other cases, you might have got a list of addresses, but want to organize this data properly so you can clearly see how many of the people reside in, say, New York.
The best way to work through the above two problems is by splitting one column into multiple columns.
The new versions of Excel provide a special feature that lets you do that using the ‘Data’ menu.
Let’s see how this can be achieved in both the above cases.
How to Split one Column into Multiple Columns
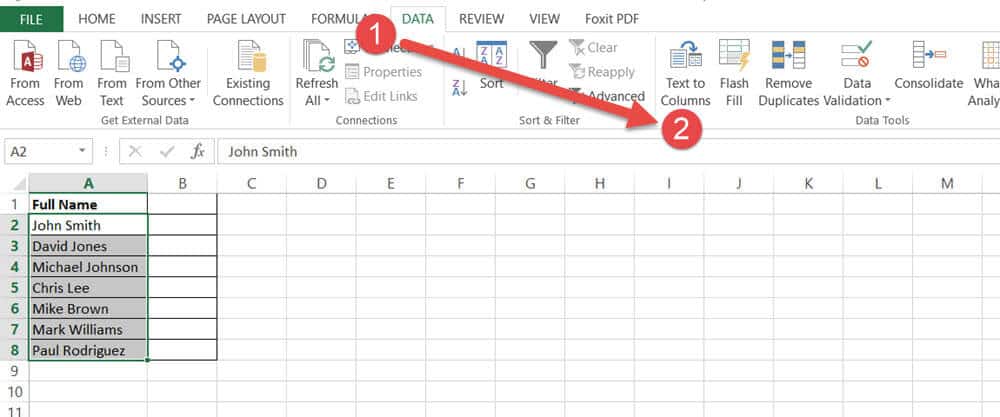
Say you have a list of names that you want to split into columns Name and Surname.
- Select the column that you want to split

- From the Data ribbon, select “Text to Columns” (in the Data Tools group). This will open the Convert Text to Columns wizard.
- Here you’ll see an option that allows you to set how you want the data in the selected cells to be delimited. Make sure this option is selected. If you’re not familiar with the term ‘delimited’, it is the character that specifies how the data in the cells are separated from each other, for example, the first name and last name in each cell are separated by a space. This means the delimiter here is a space character.

- Click Next
- Here are the settings you need to do in the second steps of the Tetx to Columns wizard:
- By default, you’ll find the Tab delimiter checked. But we don’t want to use that. We want to use Space delimiter. So uncheck the Tab delimiter and check the Space option (1).
- There is also a checkbox that lets you specify if you want to treat consecutive delimiters as one(2). That means if you have two spaces between names by mistake, do you want to treat it as one space?
- You can see how your data is going to look after the split in the data preview area (3) at the bottom of the dialog box. Notice when the space option is checked we get exactly the result we want.
- Finally Click Next (4)

- You’ll now see an option where you can specify the format for the data in the columns. By default, the General option is selected, which ensures that the columns have the same format as the original cells. Leave it with the General option selected and then click Finish.

We now have two columns of data, with the first name in Column A and last name in Column B.

It’s important to note that when you split the contents of a cell, Excel does not insert new cells to hold the contents.
So the new cells will overwrite the contents in the next cell on the right. Therefore, you should make sure that you leave an empty space on the right before splitting.
You also have the option to select the destination of the split data.
You can specify this during Step 7 by typing in the location where you want the split cells to be displayed in the destination input box. You can also select the destination cell from here.
It goes without saying that the number of columns that your data will be split into depends on the delimiters that you selected.
That means if you have a comma as a delimiter and in some cells, you have three words separated by commas then your data will be split into three columns.
Also read: How to Find the Column Number in Excel
How to Split Multiple Lines in a Cell into Multiple Cells
Now let’s discuss how to go about cases where you have a lot of information provided in separate lines of a cell.
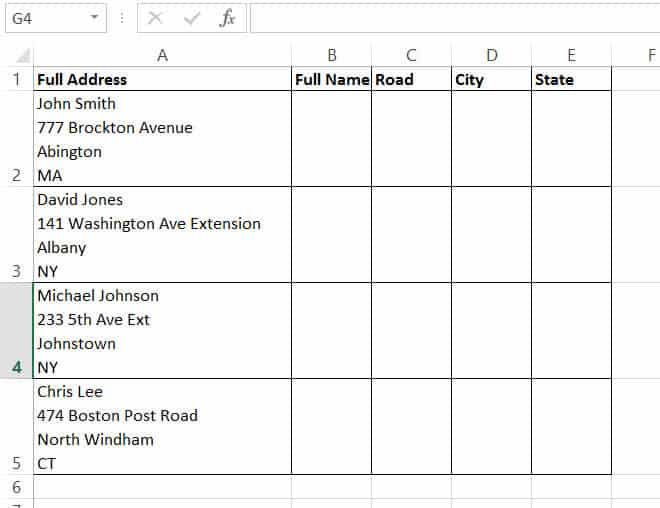
Take for example the sheet below.
Here you can see a whole address given in each cell. Each part of the address is on a separate line of a cell. Separating this column into four different columns that can show the full name of the person, Street, City and Country would make it much easier to identify patterns in the data.
Unfortunately separating cells with multiple lines is not as easy as the method given above. But it’s not too tough either. Here’s how you can go about this problem.
- Select the column that you want to split
- From the Data ribbon, select “Text to Columns” (in the Data Tools group). This will open the Convert Text to Columns wizard.
- Here you’ll see an option that allows you to set how you want the data in the selected cells to be delimited. Make sure this option is selected.
- Click Next
- By default, you’ll find the Tab delimiter checked. Uncheck all the checked delimiters and select the ‘Other’ option. In the small box next to this option, you need to specify the delimiter character that you want to use. If you want to specify a line break character. Press Ctrl + J on your keyboard. This will show a tiny blinking dot inside the box. This means that the line break delimiter has been inserted.

You can see how your data is going to look after the split in the data preview area at the bottom of the dialog box.
Notice we get exactly the result we want. We have all the names in the first column, the second lines (Street names) in the second column, the city names in the third column, and the country names in the fourth column.
- Click Next.
- You’ll now see an option where you can specify the format for the data in the columns. By default, the General option is selected, which ensures that the columns have the same format as the original cells.
- Here we also want all the columns to appear from column B onwards so the new cells don’t overwrite the existing column. Next to Destination, we see the cell ‘$A$2’ written. We can change this by selecting our required destination cell ‘$B$2’ and then click Finish.

- You might get a dialog box asking you if you want to replace the data that is already present in the destination cells. Click on OK.

Once this is done, you will find columns B through E each containing a separate element of the address that was present in Column A.

Also read: How To Add Consecutive Numbers In Excel
How to Split up a Merged Cell
Before we end the article we want to add one more case. You may have more than one cells merged together and be looking for a way to unmerge or split these cells. We would like to also address this issue, in case you landed on our page looking for a solution to that. Here are the steps:
- Click on the merged cell. If there is more than one cell that you want to un-merge, select all of them.

- Under the Home Tab’s Alignment tools, you will see a drop-down next to the option that says Merge and Center. Click on the dropdown arrow and select “Unmerge Cells”.
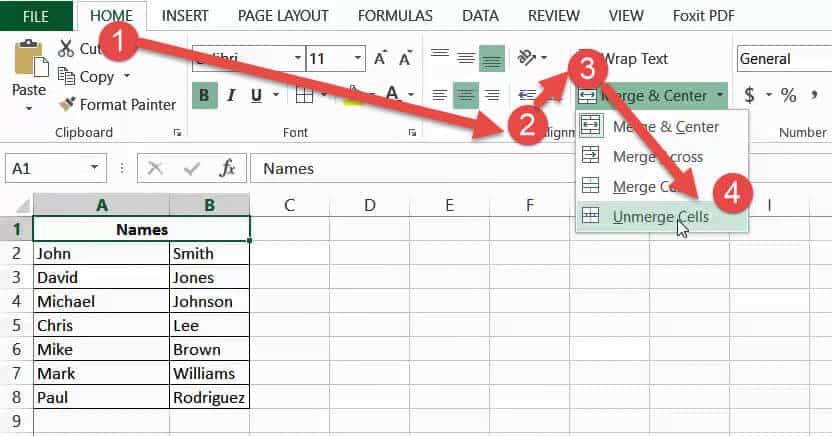
- This will split the merged cell back to the original number of cells.
Note that Excel does not have the option to split an unmerged cell into smaller cells (as is possible in MS Word).
We have discussed how you can split cells in Excel into separate cells using different types of delimiters. We have also taken a brief look at how to split cells that had been previously merged.
The above steps have been specified assuming that you are using Excel versions 2013 to 2019. However, Microsoft keeps updating its menus, tabs, and options in every new version it brings out.
So we cannot say for sure if the methods we mentioned will work on later versions of Excel.
I hope you found this tutorial useful!
Other Excel tutorials you may find useful:
- How to Find Merged Cells in Excel
- Split Text to Rows in Excel
- How to Merge First and Last Name in Excel
- How to Make all Cells the Same Size in Excel (AutoFit Rows/Columns)
- How to Remove Apostrophe in Excel
- How to Remove Commas in Excel (from Numbers or Text String)
- How to Flip Data in Excel (Columns, Rows, Tables)?
- How to Convert Columns to Rows in Excel?
- How to Combine Two Columns in Excel (with Space/Comma)
- How to Transpose Multiple Rows into One Column in Excel
Sir hello,
First of all i thank you for sharing a knowledge to us sir i have a data in one row which has arithmatic sign, multiplication sign and different numeric values now i want to split that data in multiple coloumns according to arithmatic sign values etc e.g (pay 2000 + personal pay 5000) like this type of data now how to split that data in different coloumns.